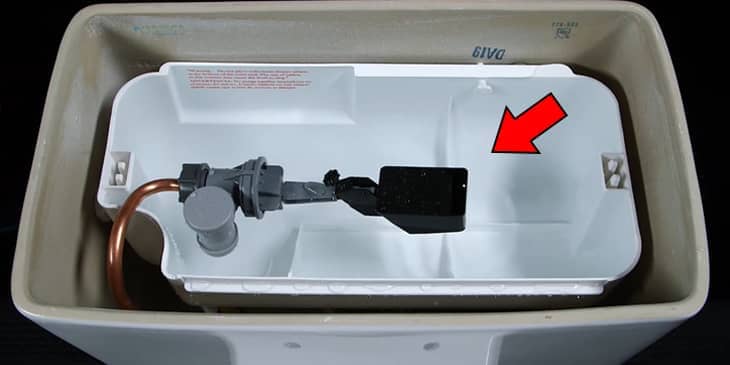
Your flapperless toilet keeps running after every flush, or you hear water refilling the tank randomly throughout the day. This wastes hundreds of gallons of water a month and drives up your water bill. Unlike traditional toilets, flapperless models use a canister flush valve with a rubber seal at the bottom instead of a flapper. When that seal wears or warps, water leaks from the tank into the bowl, forcing the fill valve to keep running.
The good news? In 9 out of 10 cases you can stop a flapperless toilet from running in under 20 minutes with parts that cost less than $15. This guide covers the exact diagnosis and repair steps that work on popular Glacier Bay, Niagara, and similar canister-style toilets.
Common Mistake Most Homeowners Make
Assuming flapperless toilets use a standard flapper and trying to replace a part that doesn’t exist. The real culprit is almost always the rubber canister seal (also called the disc shut-off seal) or a misadjusted fill valve. Skipping the 60-second food-coloring test leads to replacing the wrong part and the toilet keeps running.
This guide is written for homeowners with basic DIY skills who own a flapperless (canister-style) toilet and want to stop constant running without calling a plumber. It covers diagnosis, canister seal replacement, fill valve adjustment/replacement, and safety steps. It does NOT cover tank cracking, bowl leaks, or full toilet replacement. If you are uncomfortable shutting off water or working inside the tank, hire a licensed plumber immediately.
Tools and Materials You’ll Need
Gather these before starting — everything is available at any hardware store or online:
- Flathead and Phillips screwdrivers
- Adjustable pliers or channel locks
- Food coloring (for diagnosis test)
- Replacement canister seal / disc shut-off seal (model-specific — Glacier Bay or Niagara kits under $10)
- Universal or model-specific fill valve (Fluidmaster 400 series or equivalent)
- Plumber’s grease (optional but recommended)
- Clean rags or paper towels
- Bucket to catch water
Total cost: usually $8–$25. No special tools required.
Step-by-Step Diagnosis and Repair
Shut off the water supply valve behind the toilet. Flush the toilet to empty the tank completely. Add 10–15 drops of food coloring to the tank water (before refilling). Wait 10–15 minutes without flushing. If colored water appears in the bowl, you have a leak past the canister seal — proceed to Step 3. If no color appears but the toilet was still running before you shut off the water, the problem is the fill valve — go to Step 2.
With water still off, inspect the fill valve float. It should sit about ⅛ inch below the top of the overflow tube. Turn the adjustment screw counterclockwise to lower the water level if it’s too high. Turn water back on and test. If it still runs or the float sticks, replace the entire fill valve. Remove the old valve by unscrewing the nut under the tank, lift out the old unit, drop in the new one, hand-tighten the nut, reconnect the supply line, and adjust to proper water level.
Turn water off and flush to empty the tank. Reach in and twist the entire canister assembly counterclockwise to lift it straight out (some models have a locking tab — press and lift). At the bottom of the canister you will see a black or white rubber seal/disc. Pry it out with your fingers or a flat screwdriver. Clean the seating surface thoroughly with a rag and mild cleaner to remove mineral buildup. Apply a thin layer of plumber’s grease to the new seal, press it firmly into place, and reinstall the canister by twisting clockwise until it locks. Turn water back on and test with a flush.
Flush several times and listen for running water. Check the water level in the tank — it should stop ½ to 1 inch below the top of the overflow tube. If everything is quiet, you’re done. Wipe up any spills and replace the tank lid.
Red Flags — Stop and Call a Plumber
Why Flapperless Toilets Run More Often Than Traditional Models (The Unique Section)
Most online guides tell you to “replace the flapper.” That advice is useless for flapperless toilets. The canister seal is a smaller, less visible rubber disc that sits under the entire lift mechanism and wears faster because it stays in constant contact with water and minerals. Glacier Bay and Niagara models are especially prone to this after 2–4 years.
If your toilet is over 8 years old or you notice rust around the bolts holding the tank to the bowl, the entire toilet is likely at the end of its life. Replacing the whole unit is cheaper and more reliable than repeated repairs.
| Head-to-Head: Flapper vs Flapperless Running Issues | |||
|---|---|---|---|
| Issue | Traditional Flapper Toilet | Flapperless Canister Toilet | Winner for Easy Repair |
| Main leaking part | Rubber flapper | Canister rubber seal/disc | Flapper (cheaper & universal) |
| Replacement cost | $3–$8 | $8–$15 | Flapper |
| DIY difficulty | Very easy | Easy but model-specific | Flapper |
Frequently Asked Questions
Why does my flapperless toilet keep running after flush?
The most common reason is a worn canister seal at the bottom of the flush valve. Water leaks slowly into the bowl, so the fill valve keeps running to maintain tank level. The food-coloring test confirms this in seconds.
Can I fix a Glacier Bay flapperless toilet running without replacing the whole valve?
Yes. In most cases you only need the $8–$12 replacement canister seal. Niagara and Glacier Bay seals are interchangeable in many models. Full valve replacement is only needed if the plastic canister itself is cracked.
How do I know if the fill valve or canister seal is the problem?
Turn off the water, flush, and add food coloring. If color appears in the bowl within 15 minutes, it’s the canister seal. If no color but the tank refills anyway when water is turned back on, the fill valve is not shutting off properly.
Do flapperless toilets use more water when they run?
Yes — a constant trickle can waste over 200 gallons per day. Most modern flapperless toilets are 1.28 GPF or dual-flush Watersense rated, but a leaking seal defeats that efficiency completely.
Is it safe to use bleach tablets in a flapperless toilet?
No. Bleach tablets and in-tank cleaners accelerate rubber seal and diaphragm deterioration in canister systems. Use only bowl cleaners applied directly to the bowl.
How long does a replacement canister seal last?
Expect 3–5 years in hard water areas and up to 7 years in soft water. Replacing it proactively every 4 years prevents the running issue from returning.
Verdict / Summary
If the food-coloring test shows color in the bowl → replace the canister seal first (90% of cases).
If no color appears → adjust or replace the fill valve.
If the toilet is over 8 years old or parts keep failing → consider a full replacement for long-term reliability.
Flapperless vs Flapper Toilets — Which Runs Less?
Flapperless (canister) toilets were designed to eliminate the most common failure point — the flapper. In theory they should run less. In practice, the canister seal is simply a different failure point that is slightly harder to diagnose if you don’t know what to look for. Once you understand the seal replacement process, flapperless models are just as reliable and often quieter. See our full comparison in the one-piece vs two-piece toilet guide for more details on flush performance and maintenance.
Best Fill Valves for Flapperless Toilets
For Glacier Bay and Niagara models, the Fluidmaster 400 series or the exact OEM replacement works best. Avoid universal “will-fit” valves that don’t match the exact height and float design — they cause constant running or weak fills. We cover the top-rated options and exact installation in our best toilet fill valve guide.
How Much Water Does a Running Flapperless Toilet Waste?
A slow constant leak wastes 50–200 gallons per day depending on severity. At average U.S. water rates that adds $15–$60 to your monthly bill. Fixing it with the canister seal or fill valve pays for itself in the first month. For more ways to cut toilet water use, check our best flushing toilets guide and look for Watersense certified models with 1.28 GPF or lower.
Flapperless toilet running no longer has to be a mystery or an expensive plumber visit. With the right diagnosis and the $10 canister seal, you can stop the waste today. If you have a specific model number, drop it in the comments and I’ll point you to the exact replacement part.