Tired of a weak toilet flush that leaves waste behind and forces you to plunge again? You’re not alone. In most cases the problem is easy to fix yourself in under 30 minutes with parts that cost less than $25.
This guide walks you through the exact steps to diagnose and repair the 6 most common causes of weak flushing. You’ll learn what to look for inside the tank, which fix matches your symptoms, and exactly when it’s time to stop DIY work and call a plumber.
Homeowners who feel comfortable removing the tank lid and using basic tools. It covers standard gravity-fed toilets only (the type found in 95% of U.S. homes). It does NOT cover pressure-assist, macerating, or wall-mounted toilets. You’ll need 20–40 minutes. If you have main-line backups or feel unsure working with water shut-off valves, call a plumber right away.
Grabbing a plunger or pouring chemicals into the bowl first. This skips the tank completely and misses the real cause in about 80% of weak-flush cases. Always start with a quick 60-second look inside the tank.
Best Toilet Maintenance Tools You’ll Need
• Flange plunger (the one with the bell-shaped bottom — works best for toilets)
• Adjustable wrench or channel-lock pliers
• Flathead screwdriver
• Old toothbrush or small wire brush (for cleaning jets)
• Waterproof tape (for the jet-cleaning trick)
• White vinegar (2–3 cups) or citric acid powder
• Flashlight
• Pencil (to mark the correct water level)
• Replacement flapper (universal 2″ or 3″ — match your flush valve)
• Replacement fill valve (if yours is over 8 years old)
• Optional upgrade: 3″ flush valve kit (biggest performance boost possible)
Condition Map — The 6 Primary Causes of Weak Flush (Explained in Detail)
Your toilet’s flush power comes from three things working together: enough water in the tank, fast water flow through the bowl jets, and a clear path down the trapway. When any one of these fails, the flush feels weak. Here’s exactly what the 6 most common causes look like, why they happen, and how you can spot them in seconds.
Why it happens: The tank doesn’t hold enough water to create strong siphon action through the bowl.
Symptoms: Weak flush every single time; you hear the tank refill quickly.
Quick check: Remove the lid. Water should stop about 1 inch below the top of the overflow tube (the tall tube in the center). If it’s noticeably lower, this is your culprit.
Why it happens: Mineral buildup from hard water blocks the small holes under the rim and the large jet at the bottom of the bowl.
Symptoms: Water barely trickles from the rim holes; flush feels slow and quiet.
Quick check: Shine a flashlight under the rim. If you see white or brownish crust in the holes, the jets are clogged.
Why it happens: The rubber flapper doesn’t stay open long enough (or seals poorly), so the tank drains too slowly or incompletely.
Symptoms: Flapper closes early; you have to hold the handle down to get a full flush.
Quick check: Push the flapper down by hand — it should sit flat with no gaps. Lift the handle — the chain should have about ½ to 1 inch of slack when the flapper is closed.
Why it happens: The valve doesn’t let the tank fill to the correct level, or it runs continuously.
Symptoms: Tank takes forever to refill or keeps running after the flush.
Quick check: Listen after a flush. If you hear constant water noise longer than 30 seconds, the fill valve or float needs attention.
Why it happens: Even a small blockage in the curved pipe under the bowl reduces siphon power.
Symptoms: Flush improves right after plunging but gets weak again within a few hours.
Quick check: Plunge vigorously — if the flush suddenly gets stronger, then weakens again, you have a partial clog.
Why it happens: Many older toilets use a small 2″ valve that simply can’t move enough water fast enough for a strong flush.
Symptoms: All basic fixes help a little, but the flush is still not powerful.
Quick check: Look at the flush valve opening in the tank bottom. If it measures about 2 inches across, upgrading to a 3″ valve will make a huge difference.
Step-by-Step Fixes (Do Them in This Order)
Follow these steps exactly in order. Most people see a dramatic improvement by Step 3. Each step includes the exact tools you need, clear numbered instructions, how long it takes, how to test it, and what to do if the flush is still weak.
Time needed: 5 minutes
Tools needed: Flathead screwdriver or pliers (depends on your fill valve type)
1. Turn off the water supply valve behind the toilet (turn clockwise until it stops).
2. Flush the toilet once to empty most of the water from the tank.
3. Remove the tank lid carefully and place it on a towel.
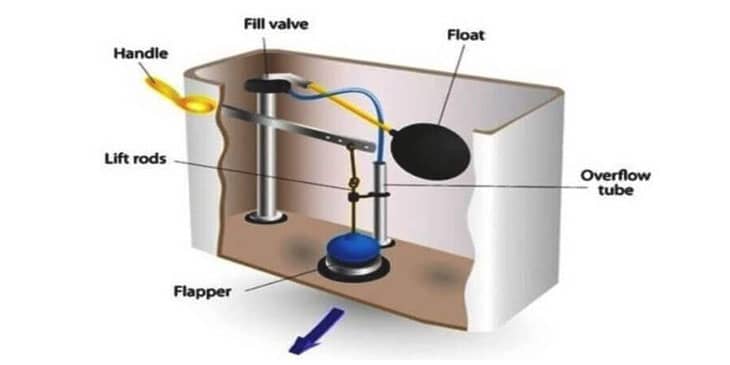
4. Locate the fill valve (the tall plastic or metal column on the left side of the tank).
5. Find the adjustment screw or clip on top of the float arm or fill valve body.
6. Turn the screw clockwise (or slide the clip upward) 5–8 full turns to raise the water shut-off level.
7. Turn the water supply back on and let the tank refill.
8. Mark the ideal water level with a pencil — it should stop 1 inch below the top of the overflow tube.
Test it: Flush and watch the flush power. The tank should now hold noticeably more water.
If it still feels weak: Move to Step 2. If the tank overflows, turn the screw counterclockwise one turn and test again.
Time needed: 20–60 minutes (plus soaking time)
Tools needed: Waterproof tape, white vinegar (2–3 cups), old toothbrush or wire brush, flashlight
1. Turn off the water supply and flush to empty the tank.
2. Use a towel to soak up any remaining water in the bowl.
3. Shine a flashlight under the rim and look for white/brown buildup in the small holes.
4. Cover every rim hole completely with waterproof tape.
5. Pour 2–3 cups of white vinegar directly into the overflow tube (the tall tube inside the tank).
6. Let it sit for at least 1 hour (overnight for heavy hard-water buildup).
7. Remove the tape, scrub each rim hole and the large siphon jet at the bottom of the bowl with the toothbrush or wire brush.
8. Turn the water back on and flush several times to rinse everything out.
Test it: Look under the rim while flushing — you should now see strong, even streams of water from every hole.
If it still feels weak: Move to Step 3.
Time needed: 10 minutes
Tools needed: Replacement flapper (universal 2″ or 3″), pliers if needed
1. With the tank full, push the flapper down by hand — it must sit perfectly flat with no gaps or warping.
2. Lift the handle and watch how the flapper opens. The chain should have ½ to 1 inch of slack when the flapper is closed.
3. If the chain is too tight or too loose, unhook it and adjust the length.
4. If the flapper is over 5 years old, cracked, or warped, remove the old one by unclipping the chain and lifting it off the flush valve pegs.
5. Install the new flapper exactly the same way — clip the chain to the handle arm.
6. Flush and hold the handle down for a full 5 seconds to make sure the tank empties completely.
Test it: The flush should now be noticeably stronger and the tank should drain fully before the flapper closes.
If it still feels weak: Move to Step 4.
Time needed: 10–15 minutes
Tools needed: Replacement fill valve (if over 8 years old), adjustable wrench
1. Turn off the water supply and flush to empty the tank.
2. Disconnect the water supply line from the bottom of the fill valve (use wrench if needed).
3. Unscrew the old fill valve from the bottom of the tank (usually one large nut).
4. Install the new fill valve following the manufacturer’s simple instructions (most are tool-free).
5. Reconnect the water line and turn the water back on.
6. Adjust the float so water stops 1 inch below the overflow tube.
Test it: The tank should refill quietly and stop completely within 30–45 seconds with no leaking or running.
If it still feels weak: Move to Step 5.
Time needed: 5–10 minutes
Tools needed: Flange plunger
1. Make sure there is some water in the bowl.
2. Place the flange plunger so the bell shape seals completely over the hole at the bottom of the bowl.
3. Pump vigorously 10–15 times with strong, steady strokes (do not break the seal).
4. Flush the toilet and see if the flush power improves.
Test it: The flush should now be noticeably stronger and stay strong for several flushes.
If it still feels weak after all steps: Go to the Advanced Flush Valve Upgrade section below or call a plumber.
Advanced Flush Valve Upgrades (Biggest Performance Boost)
If the basic fixes only help a little, your 2″ flush valve may be the bottleneck. Upgrading to a 3″ flush valve lets much more water rush through the bowl in the same amount of time.
1. Shut off water and drain the tank completely.
2. Remove the old 2″ flush valve (usually held by 3 nuts under the tank).
3. Install the new 3″ flush valve kit (fits most standard tanks).
4. Reinstall the flapper and refill.
Most people notice a dramatically stronger flush immediately.
Red Flags — Stop and Call a Plumber
What Most Guides Miss About Weak Flushes
Raising the water level or installing a 3″ valve increases power but can use slightly more water per flush. Measure with a gallon jug before and after so you stay efficient.
Cleaning the jets plus a 3″ valve upgrade can raise MaP flush scores from under 400g to over 900g on the same toilet.
If you’ve done every step and the flush is still weak, your toilet has simply reached the end of its life. Old narrow-trapway models can’t match modern performance. It’s time to upgrade rather than keep fighting it.
Frequently Asked Questions
How can I make my toilet flush stronger without buying a new toilet?
Start with the tank: raise the water level, clean the rim jets with vinegar, and check/replace the flapper. These three simple steps restore strong flushing on about 70% of toilets without new parts.
Why is my toilet still flushing weak after I cleaned the jets?
The flapper or fill valve is usually the next problem. Double-check chain slack and water level. If those are correct, you may need the 3″ flush valve upgrade or a deeper clog that requires a plumber.
Does raising the water level waste more water?
Only if you go above the manufacturer’s mark. Most modern 1.28 GPF toilets have a little extra room built in. Measure your flush volume with a gallon jug to stay efficient.
How often should I clean the tank to keep the flush strong?
Every 6–12 months in hard-water areas. A quick vinegar soak prevents gradual buildup and keeps your toilet performing like new.
Can I make a low-flow toilet flush stronger?
Yes! The same tank, jet, and flapper fixes work great. Adding a 3″ flush valve gives the biggest improvement. When nothing helps anymore, consider upgrading to a higher-performance model — see our guide to the best flushing toilets.
When should I call a plumber instead of fixing it myself?
Call right away if you hear gurgling in other drains, the flush stays weak after all fixes, or you see leaks or rocking. These point to bigger plumbing issues that DIY can’t safely solve.
Tank water more than 1 inch below the overflow tube → adjust the fill valve first.
Slow water from rim holes even after cleaning → replace the flapper next.
Everything else fails and plunging only helps temporarily → upgrade to a 3″ flush valve or call a plumber for a new toilet or drain service.
Toilet Flush Problems and Solutions
Most weak flush issues come down to the six causes above. Match the symptom to the fix instead of guessing. A toilet that runs after flushing usually means the flapper isn’t sealing. A noisy fill valve points to the fill valve or float. Keep up with simple annual tank cleaning and your toilet will stay powerful for years. Need replacement parts? Check our guide to the best toilet fill valves.
Clean Toilet Tank for Better Flush
A clean tank lets the fill valve and flapper work at full strength. Drain the tank, wipe the flush valve seat, and use the vinegar method on the jets at the same time. This easy habit prevents gradual power loss that many people blame on an “old toilet.” For more maintenance tips, see our guide to best flushing toilets that stay clean longer.
How to Unclog Toilet for Better Flush
A partial clog in the trapway kills siphon power even when the tank and jets are perfect. Use a flange plunger with strong pumps. If the problem keeps coming back, the line may need professional snaking. Once the drain flows freely, your toilet will deliver the strong flush it was designed to give. When plunging stops working, explore dual-flush toilet options that stay powerful while saving water.
Strong flushing starts with the right diagnosis and ends with the correct repair. Follow the steps above and your toilet will flush powerfully again — no more wasted water or extra plunging. Need help choosing parts? Our guides to toilet fill valves and best flushing toilets are ready when you are.