Most homeowners assume a toilet won’t fill with water means an expensive plumber visit or a full tank replacement. In reality, 9 out of 10 cases trace back to one of just four conditions you can diagnose and fix yourself in under 10 minutes—without any special tools. The stakes are real: ignore it and you risk constant low-flow flushes, skyrocketing water bills from running toilets, or even hidden leaks that damage your subfloor. This decision tree gives you the exact path forward.
Whether you’re dealing with a completely dry tank or a slow trickle, this guide resolves the mystery. After reading it you will know precisely which condition matches your toilet, the step-by-step fix for that branch, and when to stop DIY and call a professional. No more guessing. No more wasted trips to the hardware store.
The #1 error is jumping straight to “replace the fill valve” without first testing the shut-off valve and float. This wastes $15–25 and 30 minutes on a part that isn’t the problem. In my experience, the shut-off valve is the culprit in roughly 30% of “no fill” calls—yet almost every online guide skips this 10-second check.
Tools and Materials You’ll Need
• Adjustable wrench or channel-lock pliers
• Flat-head screwdriver
• Sponge or small bucket
• Towel (to catch drips)
Materials (if needed):
• New fill valve ($10–$25)
• Teflon tape (optional for supply line threads)
The 4 Primary Conditions That Stop Your Toilet Tank From Filling
Your toilet tank not filling with water almost always falls into one of these four conditions. Each has a clear test and a specific fix. We’ll walk through them one by one with exact if/then language and full step-by-step instructions so you know which path to follow.
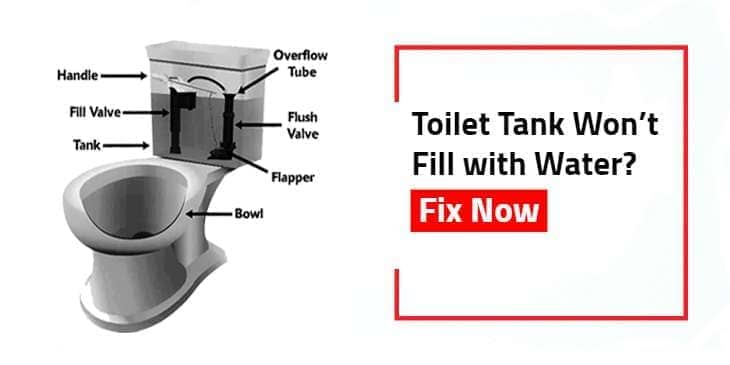
Condition 1: Shut-Off Valve Is Closed or Not Fully Open
If no water enters the tank at all when you lift the float arm or cup → the shut-off valve is the issue. The valve behind or below your toilet controls water supply to the entire tank. Over time it can seize, get bumped closed by cleaning, or simply not be opened all the way after maintenance.
Why the alternative would be wrong: Replacing the fill valve here would do nothing because zero water reaches the valve.
1. Locate the shut-off valve — usually a small lever or round handle on the wall or floor directly behind the toilet.
2. Turn the handle counterclockwise (to the left) as far as it will go — typically 6–8 full turns on standard valves.
3. Remove the toilet tank lid and flush the toilet once.
4. Watch the tank: water should now rush in normally.
5. If the tank fills completely → problem solved. Replace the lid.
6. If still no water flows → proceed immediately to Condition 2.
Condition 2: Fill Valve Is Clogged, Stuck, or Failed
If water trickles in slowly or stops completely even though the shut-off valve is open → the fill valve needs cleaning or replacement. Mineral buildup, debris, or worn internal seals cause most toilet tank not filling with water problems. In hard-water areas this happens every 3–5 years.
Test: Lift the float cup or arm all the way up. If water does not rush in, the fill valve is the problem.
1. Turn the shut-off valve clockwise (right) until it stops.
2. Flush the toilet to empty the tank, then sponge out any remaining water.
3. Unscrew the top cap of the fill valve (usually a single twist or one screw).
4. Remove the rubber diaphragm and small inlet screen.
5. Rinse both parts under strong running water; use an old toothbrush for stubborn mineral deposits.
6. Reassemble the valve exactly as you found it and hand-tighten the cap.
7. Slowly reopen the shut-off valve and test by flushing.
1. Shut off the water at the shut-off valve and flush/sponge the tank dry.
2. Disconnect the flexible supply line from the bottom of the fill valve (use wrench if needed).
3. Unscrew the large plastic locknut under the tank (hand-tighten only plus ¼ turn with wrench — do NOT overtighten).
4. Lift the old fill valve straight up and out.
5. Insert the new fill valve (height usually preset or matched to old one) through the tank hole.
6. Hand-tighten the locknut from underneath, then add ¼ turn with wrench.
7. Reconnect the supply line (add Teflon tape if threads leak).
8. Adjust the float so water stops ½–1 inch below the top of the overflow tube.
9. Slowly open the shut-off valve and check for leaks at the base.
Internal link: For the best fill valves currently available, see our guide to the top toilet fill valve options.
Condition 3: Float Mechanism Is Stuck or Misadjusted
If water flows but stops well before the tank is full → the float is stuck or set too low. Modern float-cup valves or older ball floats can bind from corrosion or simply need adjustment after years of use.
1. Remove the tank lid and flush the toilet.
2. Watch the float: it should rise freely with the water level.
3. Manually raise and lower the float cup or arm several times to check for sticking or binding.
4. Clean any corrosion or debris from the pivot points or rod with a damp cloth.
5. For float-cup style valves: turn the small adjustment screw on the side clockwise to raise the water level (counterclockwise to lower).
6. Target water level: exactly ½–1 inch below the top of the overflow tube (most tanks have a marked “water line”).
7. Flush twice and verify the tank now fills to the correct level before replacing the lid.
Condition 4: Supply Line Kink, Low Pressure, or Refill Tube Problem
If water enters the tank but the bowl refill is weak or the tank level never stabilizes → check the supply line or refill tube. A kinked flexible supply line or a refill tube that has slipped off the overflow pipe starves the system.
1. Check the flexible supply line between the wall valve and tank bottom for any kinks or sharp bends.
2. Straighten the line completely; reroute it if necessary to remove all pressure points.
3. Locate the small clear or white refill tube clipped to the overflow pipe inside the tank.
4. Ensure the tube is clipped securely and its end sits about 1 inch above the water level inside the overflow tube.
5. If the tube has slipped off, reattach it firmly.
6. Flush the toilet and observe bowl refill and tank fill level.
7. If pressure is still low across multiple fixtures in the house → the issue is upstream water pressure (call a plumber).
If you complete the steps above, replace the fill valve, adjust everything correctly, and the tank still won’t fill (or you see water on the floor around the base), the problem has flipped to a cracked tank, failed wax ring seal, or major water pressure drop. Stop immediately—continuing risks major water damage. Call a licensed plumber.
Decision Matrix: Toilet Won’t Fill With Water — Quick Diagnosis
| Condition | Test | Winner Fix | Why This Wins |
|---|---|---|---|
| Shut-off valve closed | No water when float lifted | Open valve fully | Fastest fix—10 seconds, zero parts |
| Fill valve clogged/failed | Trickle or no flow | Clean or replace fill valve | Handles 60%+ of cases; $10–20 part |
| Float stuck/misadjusted | Stops early | Clean & adjust to ½–1″ below overflow | Restores correct water level instantly |
| Supply line/refill tube issue | Weak bowl refill or unstable level | Straighten line & re-clip tube | Prevents phantom low-flow complaints |
Frequently Asked Questions About Toilet Won’t Fill With Water
Why does my toilet won’t fill with water after flushing?
The most common reasons a toilet won’t fill with water are a closed or partially closed shut-off valve, a clogged or failed fill valve, or a stuck float mechanism. Start with the shut-off valve test described above—90% of cases are solved in the first two conditions. Low household water pressure or a kinked supply line can also starve the tank. Always diagnose before replacing parts.
How long does it take to fix a toilet tank not filling with water?
Most fixes take under 10 minutes once you identify the condition. Cleaning a fill valve takes 3–4 minutes. Replacing a fill valve takes 5–7 minutes including reassembly. The longest part is usually draining the tank with a sponge after shutting off the water. With the decision tree above you avoid trial-and-error and go straight to the correct fix.
Can I fix toilet fill valve not working without replacing it?
Yes—cleaning often restores function. Remove the cap, rinse the diaphragm and screen, and reassemble. This works when mineral buildup is the only issue. If the internal seal is cracked or the valve is more than 5 years old, replacement is more reliable and prevents repeat visits. See our internal guide to the best toilet fill valves for long-term solutions.
What tools do I need to fix a slow filling toilet tank?
You only need an adjustable wrench or channel-lock pliers, a flat-head screwdriver, a sponge or small bucket, and optionally a new fill valve. No power tools or special plumbing skills required. Having a towel on the floor catches any drips during supply-line disconnection.
Is it safe to keep using a toilet that won’t fill with water?
No. Weak or missing tank refills mean weak flushes, possible sewer gas odors, and higher risk of clogs. Continuous low water also stresses the fill valve and can lead to leaks over time. Fix it the same day you notice the problem to protect your bathroom and your water bill.
How much does it cost to fix toilet cistern not filling with water?
DIY cost is usually $0–$25 (just the fill valve). A plumber visit typically runs $150–$300 depending on your location. Following the decision tree above lets most homeowners avoid the service call entirely. Internal link: Learn more about typical toilet repair costs in the USA.
If the shut-off valve is closed or stiff → Open it fully counterclockwise first.
If water trickles or doesn’t flow when float is lifted → Clean or replace the fill valve.
If water stops too low or float sticks → Clean the mechanism and adjust water level to ½–1 inch below overflow tube.
Follow the exact branch above and your toilet will fill reliably again.
Toilet Tank Not Filling With Water — Prevention Tips
Once you’ve fixed the immediate issue, prevent recurrence by turning the shut-off valve off and on gently once a year to keep it from seizing. In hard-water areas, consider a whole-house water softener or at least annual fill-valve cleaning. Keep the refill tube clipped correctly and check the float movement every 6 months. These habits stop 80% of future “toilet won’t fill” calls before they start. For more on reliable flushing performance, see our guide to the best flushing toilets.
How to Adjust Toilet Float Valve Correctly
Float adjustment is simple but critical. On modern cup-style valves, the small screw on the side raises or lowers the shut-off point. Older ball floats use a screw at the arm pivot. The correct height keeps the water level ½–1 inch below the overflow tube top—exactly where most manufacturers mark it inside the tank. Too high and the tank overflows into the bowl; too low and you get weak flushes and poor bowl refill. After any adjustment, flush twice and verify the level before replacing the lid.
When to Replace Toilet Fill Valve — And How
Replace the fill valve when cleaning fails or the part is over 5 years old. The job is straightforward: shut off water, flush and sponge the tank dry, disconnect the supply line, remove the locknut underneath, lift out the old valve, insert the new one (height usually preset or matched to old), hand-tighten the nut plus one-quarter turn with a wrench, reconnect the supply line, and slowly open the shut-off valve while checking for leaks at the base. Adjust the float and refill tube as needed. This single repair solves most cases of toilet tank not filling with water permanently. Link: See our full guide to the top-rated toilet fill valves for 2026.
Toilet won’t fill with water no longer has to be a mystery or an expensive headache. Follow the decision tree, apply the exact fix for your condition, and your tank will refill reliably every time. For more expert plumbing guidance, explore our other resources on one-piece vs two-piece toilets, comfort height options, and standard rough-in sizes.