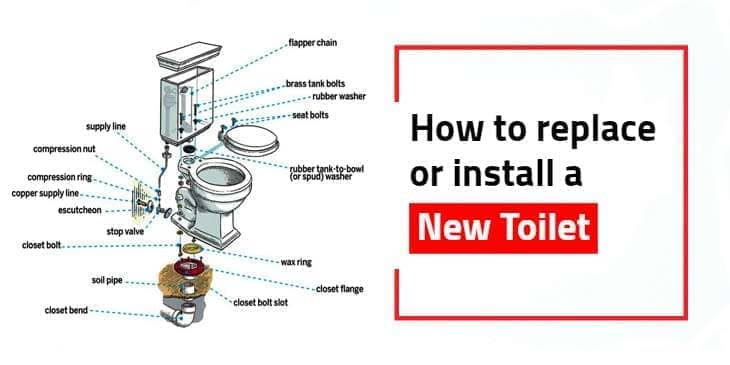
Replacing a toilet is one of the most rewarding plumbing jobs a homeowner can tackle — but it is also one of the most unforgiving. A missed step does not just mean a loose bolt. It can mean a slow wax seal failure that quietly rots your subfloor for six months before you notice the smell.
After 20 years on residential and commercial plumbing systems, the most expensive toilet replacements encountered are never caused by complicated plumbing — they are caused by skipping the flange inspection. That single step separates a watertight installation from a callback job.
This guide covers everything you need to replace a toilet correctly: when to replace versus repair, the exact tools required, how to remove the old toilet without cracking the flange, how to evaluate flange condition before setting anything down, and a full step-by-step installation with professional-grade checkpoints at every stage. This guide is written for homeowners with basic hand tool experience and the ability to lift 50–80 lbs. If you have back or mobility limitations, this job requires a second person or a licensed plumber.
📋 Scope of This Guide
Who this is for: Homeowners replacing an existing floor-mounted toilet with a new floor-mounted toilet on an existing 12-inch rough-in. Same-for-same replacements only.
Tools assumed: Adjustable wrench, screwdriver, putty knife, hacksaw, bucket, level, tape measure, rubber gloves. No specialty plumbing tools required.
What this guide does NOT cover: Moving a toilet to a new location, installing a wall-mounted toilet, changing rough-in size, adding electrical for smart toilet features, or working in homes with cast iron drain stacks below the slab.
When to hire a plumber instead: Cracked flange at the subfloor, subfloor rot larger than 6 inches, main shut-off valve that will not close, drain pipe that requires repositioning, or any situation where the drain stack is cast iron and corroded.
⚠️ The Most Common Mistake Before You Start
Homeowners buy a new toilet, remove the old one, and immediately set the new toilet down — without inspecting the flange. The wax ring then compresses on a cracked or misaligned flange, and the toilet appears sealed. Three months later, the floor is soft. Always inspect the closet flange completely before placing any wax on it. This adds five minutes to the job and can save thousands in subfloor repairs.
When Should You Replace Your Toilet? (Repair vs. Replacement)
Not every toilet problem requires a full replacement. Understanding the repair-versus-replacement threshold saves money when a simple fix is appropriate — and saves even more when a bad toilet is consuming water, masking a leak, or cracking in ways that will only get worse.
Repair the toilet when the issue is isolated to a replaceable component: a worn flapper, a faulty fill valve, a broken flush handle, or a running tank. These parts cost $8–$35 at any hardware store and can be replaced in under 20 minutes without touching the base. A toilet that flushes well but runs constantly is almost always a flapper or fill valve issue — not a replacement candidate.
Replace the toilet when the porcelain itself is compromised or when the performance problems are structural. Hairline cracks in the bowl or tank do not heal. A crack below the waterline in the bowl will eventually leak; there is no reliable long-term patch for vitreous china under constant water pressure.
Persistent rocking at the base — especially when accompanied by soft flooring around the perimeter — indicates that the wax seal has failed and may have allowed water to penetrate the subfloor. That situation requires removal regardless of whether you install the old toilet back or a new one.
Replace for efficiency when the toilet predates 1994 federal standards. Pre-1994 toilets use 3.5 to 7 gallons per flush (GPF). Current federal law caps toilets at 1.6 GPF, and WaterSense-certified models flush at 1.28 GPF or less. For a household of four flushing five times per day each, switching from a 3.5 GPF toilet to a 1.28 GPF model eliminates roughly 25,000 gallons of water waste annually. The EPA estimates WaterSense upgrades save the average family approximately $170 per year in water costs.
Repair or Replace? — Quick Decision Reference
| Symptom | Verdict |
|---|---|
| Running continuously | Repair — replace flapper or fill valve ($8–$35) |
| Weak or incomplete flush | Repair first — check flapper size and flush valve |
| Cracks in bowl or tank | Replace — cracked porcelain cannot be reliably sealed |
| Water at base after flushing | Remove and inspect — wax ring or flange failure |
| Toilet rocks side to side | Remove and inspect — broken flange or failed wax ring |
| Pre-1994 model (3.5+ GPF) | Replace — significant water and cost savings available |
| Repeated clogs in same toilet | Replace — likely mineral buildup in trapway; consider 1,000g+ MaP score model |
Tools and Materials You Need to Replace a Toilet
Gather every item on this list before removing the old toilet. Once the old toilet is off the floor, the drain is open and the clock is running on sewer gas exposure in the bathroom. A mid-job run to the hardware store is avoidable.
🔧 Tools
- Adjustable wrench (two if available)
- Channel-lock pliers
- Flathead and Phillips screwdrivers
- Putty knife (plastic or metal)
- Hacksaw (for cutting closet bolt excess)
- 5-gallon bucket
- Sponge or old towels
- Level (4-inch or longer)
- Tape measure
- Rubber gloves
- Penetrating oil (PB Blaster or WD-40) for corroded bolts
- Utility knife for caulk removal
🛒 Materials
- New toilet (correct rough-in size — usually 12 inches)
- Wax ring with plastic horn — or wax-free gasket
- New closet bolts (T-bolts) — always replace these
- Flexible water supply line (12–16 inch braided stainless)
- Toilet shims (plastic — not wood) if floor is uneven
- Flange repair kit (have on hand — inspect before using)
- Silicone caulk (white or color-matched)
- Plastic bag and duct tape to plug drain opening
- Old rags or newspaper for floor protection
⚠️ Measure Rough-In Before Buying the New Toilet
Measure from the finished wall (not the baseboard) to the center of the closet bolt caps before purchasing. Standard rough-in is 12 inches. Some older homes use 10 or 14 inches. Installing a 12-inch rough-in toilet into a 10-inch space is a costly mistake that requires returning the fixture. If the measurement falls between 11.5 and 12.5 inches, it is a 12-inch rough-in. Anything measuring 9.5–10.5 inches requires a 10-inch rough-in toilet — a less common but available configuration.
How to Remove the Old Toilet (Step-by-Step)
Removing a toilet is a straightforward procedure, but every step matters. Rushing the water shutoff or skipping the drain plug opens you to sewer gas exposure and potential contamination. Follow these steps in order.
Step 1 — Shut Off the Water Supply
Locate the shut-off valve on the wall or floor directly behind the toilet. Turn it clockwise until it stops. If the valve is corroded and will not turn, do not force it — shut off the main water supply to the house instead, then replace the shut-off valve before proceeding. Flush the toilet and hold the handle down for 10 seconds to drain as much water from the tank as possible. Remove the tank lid and use a sponge to absorb the remaining water in the tank and bowl. A dry toilet is easier and cleaner to move.
Step 2 — Disconnect the Water Supply Line
Using an adjustable wrench, disconnect the braided supply line from the bottom of the toilet tank’s fill valve inlet. Place the open end into the bucket to catch any remaining water in the line. If the supply line shows any kinking, discoloration, or is a rigid chrome tube (common in older homes), replace it with a new braided stainless line. They cost $6–$12 and eliminate a chronic leak source at the tank connection.
Step 3 — Remove the Tank (Optional But Recommended)
A complete two-piece toilet weighs 65–90 lbs. Removing the tank first reduces the bowl-only weight to roughly 50–55 lbs, which is easier to manage alone. Unscrew the two tank bolts from inside the tank — they thread through the bottom of the tank into the bowl — and lift the tank straight up. Set it on a folded towel or cardboard on the floor with the lid off. For one-piece toilets, the tank cannot be removed separately; you will need a second person for the lift.
Step 4 — Remove the Bolt Caps and Closet Bolt Nuts
Pry off the decorative plastic caps at the base of the toilet using a flathead screwdriver. Under each cap are a nut and washer securing the toilet to the closet flange below. If the bolts are corroded and the nuts will not turn, apply penetrating oil and wait 5 minutes. If they still will not break loose, hold the bolt shaft with channel-lock pliers while turning the nut with a wrench. As a last resort, cut the bolt above the nut with a hacksaw — you will install new bolts anyway.
Step 5 — Break the Wax Seal and Lift the Toilet
Rock the toilet bowl gently side to side to break the wax seal. Grip the bowl at the widest point near the base — not by the tank or rim — and lift straight up. The goal is a clean vertical lift; dragging sideways at this stage can chip the porcelain against the floor or damage the flange collar. Set the toilet on its side on the cardboard or old towels outside the bathroom. Do not lay it on its back — the tank bolt nipples can crack on a hard floor.
Step 6 — Plug the Drain and Remove the Old Wax Ring
Immediately stuff a large rag or folded old towel into the drain opening. Sewer gas — primarily hydrogen sulfide — will begin entering the bathroom the moment the drain is uncovered. With gloves on, scrape the old wax ring from the flange and the toilet horn using a putty knife. Remove all wax completely. Old wax left on the flange will prevent the new ring from seating flush. Bag and discard the old wax — it cannot be reused.
How to Inspect and Prepare the Toilet Flange
This is the most critical phase of the entire replacement. Every other step in this guide can be undone and redone if you make a mistake. Flange damage cannot be undone once a new toilet is set on a bad flange and the wax is compressed. Take five minutes here and do it correctly.
Step 7 — Inspect the Flange Ring
With the wax completely removed, examine the closet flange (also called the toilet flange or closet collar) in full. The flange is a ring — typically PVC, ABS, cast iron, or brass — that sits on the finished floor and anchors to the drain pipe below. Run your fingers around the full circumference of the ring. Look for any cracks, breaks, missing sections, or slots that have widened enough to prevent the T-bolt from holding. Even a hairline crack on the ring surface can propagate under the weight and movement of a toilet over time.
Step 8 — Check Flange Height Relative to the Floor
The top surface of the flange ring should sit between flush with the finished floor and 1/4 inch above it. This height allows a standard wax ring to compress correctly and form a full seal. If the flange sits more than 1/4 inch below the floor surface — which happens when tile or other thick flooring has been installed over the original floor height without adjusting the flange — a standard wax ring will not compress enough to seal. In this case, use an extra-thick wax ring or a flange extender ring to make up the height difference. Never stack two standard wax rings — this is a widely attempted workaround that almost always fails within two years.
Step 9 — Inspect the Subfloor Around the Flange
Press firmly on the floor around the flange perimeter with your thumb. Solid subfloor resists pressure — it does not flex, feel spongy, or produce a damp smell. If the floor deflects under thumb pressure within 6 inches of the flange, water has penetrated the subfloor — either from the old wax seal failure or from years of condensation. A soft subfloor cannot hold the flange anchor bolts under load. The flange itself will work loose over time even with a perfect wax seal, causing the toilet to rock and the new seal to fail. Subfloor damage within 6 inches of the flange requires repair before installation proceeds.
Step 10 — Install New Closet Bolts
Slide new T-bolts (closet bolts) into the slots on the flange ring. Position them parallel to each other and equidistant from the center of the drain opening — typically 5.5 inches from center to center side-to-side. Tighten the plastic or metal retaining washer that holds each bolt upright. Bolts that fall over while you are lowering the toilet will cause misalignment with the horn holes and force you to lift the toilet back off — which ruins the wax ring and requires starting over with a new one. Always use new bolts; the old ones are typically zinc or steel that have been exposed to moisture and are corroding at the threads.
How to Install a New Toilet (Step-by-Step)
With a verified flange in place and new closet bolts set, you are ready for installation. Read through all steps before starting. The wax ring placement and toilet lowering sequence are time-sensitive — the wax must be warm and pliable when compressed, and the toilet must be lowered in one controlled motion without repositioning.
Step 11 — Place the Wax Ring
Remove the rag from the drain opening immediately before this step — not before. Center the new wax ring over the flange with the plastic horn (if present) pointing down into the drain pipe. Press it lightly by hand to seat it in position. The wax ring should be at room temperature — cold wax is stiff and will not compress properly to form a full seal. If the wax ring came from a cold vehicle or unheated garage, warm it in your hands for a minute before placing it. Do not peel the plastic protective wrap until the ring is centered on the flange.
Step 12 — Lower the Toilet in One Controlled Motion
Pick up the toilet bowl and position it directly above the flange, looking down through the horn openings in the base to see the closet bolts. Align the horn holes in the toilet base with the two upright closet bolts. Lower the toilet in one slow, straight, vertical motion — do not rock it, drag it sideways, or reposition it once it contacts the wax. Each repositioning attempt compromises the wax compression and risks creating a gap in the seal. If the bolts miss the holes on the first attempt, lift the toilet completely clear of the wax, inspect the ring, and replace it if it shifted significantly. Wax rings cost $5–$12 — not worth trying to reuse a misaligned one.
Step 13 — Level and Secure the Toilet
Place a level across the rim of the bowl in both directions. If the toilet is not level, slide plastic toilet shims under the base on the low side before tightening the bolts. Do not use wood shims — they absorb moisture and compress over time, allowing the toilet to rock again within months. With the toilet level, hand-tighten the washer and nut onto each closet bolt finger-tight, then use a wrench to snug them down alternately — a half turn on the left bolt, then a half turn on the right — to apply even compression on the wax ring. The toilet base should feel solid and not rotate when you press on the sides. Stop tightening if you feel resistance building quickly — overtightening cracks the ceramic base. Cut the excess bolt length above the nut with a hacksaw, leaving approximately 1/4 inch above the nut for the decorative cap to fit over.
Step 14 — Attach the Tank
For two-piece toilets, lower the tank onto the bowl and align the tank bolt holes. Thread the rubber tank washers, bolts, and nuts by hand from inside the tank. Alternately snug each bolt a half turn at a time until the tank sits level and does not rock. Do not overtighten — tank bolts compressing against the porcelain bowl ledge can fracture the bowl. The tank should feel firmly seated with no side-to-side wobble. For one-piece toilets, this step is complete.
Step 15 — Reconnect the Water Supply Line
Connect the new braided supply line from the shut-off valve to the fill valve inlet at the bottom of the tank. Hand-tighten first, then use a wrench for a final 1/4 turn. Do not overtighten — fill valve inlets are plastic on most toilets. Open the shut-off valve slowly, allowing the tank to fill. Watch the supply line connection and the valve connection for drips during the first fill cycle. A drip at the supply line connection means the seat is not properly threaded — tighten slightly. A leak at the valve itself means the valve body is cracked and the valve must be replaced before the toilet is used.
Step 16 — Flush Test and Leak Check
Flush the toilet three times consecutively. After each flush, crouch down and look at the base perimeter and the supply line connection. Any water appearing at the base indicates the wax seal has not fully compressed — either the toilet must be resettled or a flange issue must be addressed. After three clean flushes with no moisture at the base, run your hand around the supply line connection and fill valve inlet. Dry everything with a paper towel first so that any new moisture is immediately visible.
Step 17 — Caulk the Base Perimeter
Apply a thin bead of white silicone caulk around the toilet base perimeter, leaving a 1-inch gap at the back center uncaulked. The gap is intentional — if the wax seal ever fails, water will seep out at the back and be visible at floor level rather than trapped under a fully sealed base, where it silently destroys the subfloor. Smooth the caulk bead with a wet finger and allow it to cure for 24 hours before the toilet is used for showers or baths that create floor moisture. Install the toilet seat per the manufacturer’s instructions. Snap the decorative bolt caps onto the base bolts.
Red Flags — Stop and Call a Plumber
Most toilet replacements proceed cleanly from start to finish. Some reveal conditions that are beyond the scope of a DIY replacement. Recognizing these red flags before they become expensive problems is what separates a professional approach from a costly mistake.
🔴 Red Flag 1 — Flange Cracked at the Subfloor Level
A crack in the top ring of the flange that does not extend below the floor surface can sometimes be addressed with a repair ring kit ($12–$25). A crack that extends down the barrel of the flange, or a flange whose anchor screws pull out of the subfloor with hand pressure, requires full flange replacement. Attempting to install a toilet on a broken, unsecured flange always results in failure — typically a rocking toilet that breaks the wax seal within weeks. Stop, call a licensed plumber, and have the flange replaced properly before the new toilet is installed.
🔴 Red Flag 2 — Subfloor Rot Larger Than 6 Inches Around the Flange
Minor softness at the immediate flange perimeter can sometimes be stabilized with epoxy consolidant — a liquid resin that penetrates soft wood fibers and hardens them. Rot extending more than 6 inches from the flange center, or any rot that includes the joist below, requires subfloor and potentially joist repair before the toilet can be set. Installing over rotted subfloor means the flange has no structural support. The toilet will shift under normal use, and the wax seal will fail again within weeks. This repair requires carpentry skills and, in many jurisdictions, a permit — call a licensed contractor.
🔴 Red Flag 3 — Shut-Off Valve That Will Not Close or Leaks When Turned
An old compression-style shut-off valve that has not been turned in years frequently fails to fully close when operated — or begins dripping at the packing nut when turned. If the valve does not stop water flow completely when turned clockwise, the main house supply must be shut off to proceed. This is the point to call a plumber to replace the valve with a modern 1/4-turn ball valve, because working with the main shut off is not a problem — but reconnecting a toilet supply line to a valve that leaks under pressure is. A slow valve drip behind a toilet goes undetected for months and can soak a subfloor from below.
🔴 Red Flag 4 — Drain Pipe Is Cast Iron and Visibly Corroded
In homes built before 1970, the drain pipe below the flange is often cast iron. A cast iron pipe in good condition is fine — it outlasts most homes. But if the exposed section of pipe below the flange shows heavy rust scale, pitting, or softness when probed, the pipe itself is compromised. Seating a flange on a weakened cast iron pipe risks the entire joint failing under the weight of the toilet. Have a licensed plumber inspect and if necessary replace the cast iron section with PVC before proceeding.
Professional vs. DIY Toilet Installation — Making the Right Call
The majority of standard toilet replacements — same rough-in, same location, no flange damage, solid subfloor — are entirely appropriate DIY projects for a capable homeowner. The job requires no special plumbing license, no permits in most jurisdictions for a simple like-for-like swap, and no tools beyond what most households own.
The total cost of a DIY replacement on a standard two-piece toilet runs $150–$220 including the toilet, wax ring, supply line, and bolts. The same job performed by a licensed plumber costs $375–$550 for labor plus materials, based on 2026 national averages.
That $200–$300 savings is real — but it carries a corresponding risk if the job is done incorrectly. A slow wax seal leak running for 60 days inside a wood subfloor can cause $1,500–$4,000 in damage, depending on the extent of rot and whether the ceiling below is affected.
The math is simple: DIY is the right choice when the flange is solid, the subfloor is firm, the shut-off valve closes cleanly, and the installer can comfortably manage the 50–80 lb lift required. Hiring a professional is the right choice when any of those conditions are not met — or when the homeowner simply does not want the liability of the result.
When the Answer Flips — When NOT to DIY This Job
If any one of the following conditions applies, the potential for a costly outcome shifts the equation strongly toward professional installation:
- The toilet location is changing — even by 6 inches — requiring drain or vent stack modification
- The replacement toilet is a wall-mounted model requiring carrier frame installation inside the wall cavity
- The home has a slab foundation and the drain routing is unclear
- The installer cannot safely lift 50–80 lbs from a crouched position without a second person
- A smart toilet is being installed that requires electrical rough-in for a GFCI outlet
- The flange, subfloor, or shut-off valve shows any of the red flag conditions above
A professional plumber in a standard market charges $85–$150 per hour. A typical toilet replacement with no complications takes 1–2 hours. That is a predictable, bounded cost. A DIY job that triggers subfloor repair is an open-ended expense that can run $500–$4,000 depending on the damage.
For those selecting a new toilet for a replacement project, the best toilets to buy guide covers eight categories by use case, and the best flushing toilets guide specifically covers models with verified MaP scores above 800 grams for households dealing with chronic clogging. For a more targeted brand comparison, the best TOTO toilets and best Kohler toilets guides detail specific models worth considering in each price tier.
FAQ — How to Replace a Toilet
How do you replace a toilet without causing a leak?
The most reliable path to a leak-free installation is a three-step verification before the wax ring is ever placed: confirm the flange ring is uncracked, confirm the flange top sits between flush with the floor and 1/4 inch above it, and confirm the subfloor around the flange is firm.
A correct-height flange with no damage, combined with a room-temperature wax ring lowered straight down in a single controlled motion, produces a reliable seal in the overwhelming majority of installations. Leaks almost always trace to one of three causes: a compromised flange, a wax ring that was cold and stiff during installation, or a toilet that was repositioned after contacting the wax.
How long does it take to replace a toilet?
A DIY toilet replacement with no complications typically takes 1–3 hours from water shutoff to final leak check. A licensed plumber performing the same swap on a straightforward job completes it in about 1 hour.
Budget an additional 30–60 minutes if the closet bolts are corroded and require cutting, or if flange cleaning takes extra effort. If subfloor damage or flange issues are discovered, the timeline expands significantly — repair times vary from a few hours for minor epoxy consolidation to a full day for subfloor replacement.
What tools are needed to replace a toilet?
The minimum toolkit is: adjustable wrench, flathead screwdriver, putty knife, 5-gallon bucket, sponge, rubber gloves, and a hacksaw for cutting excess bolt length. Add channel-lock pliers for corroded bolt removal, a level for confirming the toilet sits flat, and a tape measure for verifying rough-in dimensions before purchasing the new toilet. No specialty plumbing tools are required for a standard floor-mounted toilet replacement.
What is the toilet replacement cost with a plumber?
Professional toilet installation labor in the United States ranges from $150–$440, with most standard replacements landing at $175–$300 for labor alone on a simple swap. Add the toilet cost ($100–$600 for standard models, $800–$3,000+ for smart toilets) and materials such as wax ring, bolts, and supply line ($20–$40), and total professional replacement cost typically runs $375–$800.
Complex jobs involving flange replacement, subfloor repair, or relocation of the drain stack increase cost significantly — a damaged flange adds $200–$500, and subfloor repair starts at $400 and scales with the extent of damage.
When should you replace a toilet versus repairing it?
Replace the toilet when the porcelain has structural cracks, when the toilet rocks and the flange or wax ring has failed, when the toilet predates 1994 federal water efficiency standards (3.5+ GPF), or when replacement parts for the specific model are no longer available.
Repair the toilet when the issue is a faulty flapper, fill valve, flush handle, or flush valve — all of which cost under $40 and require no removal of the toilet from the floor.
Can you replace a toilet flange yourself?
Replacing a toilet flange is a more complex task than replacing a toilet because it involves working inside the drain pipe stack. Depending on the material, it may require solvent welding (PVC), lead and oakum work (cast iron), or a specialty repair ring.
PVC flange replacement in a home with PVC drain lines is a viable DIY job for an experienced homeowner comfortable with solvent cement. Cast iron flange replacement is not recommended as a DIY task — improper work can disturb the existing caulked lead joint and introduce a leak deeper in the stack. Surface repair rings that bolt over a damaged flange without requiring pipe work are a legitimate solution for minor flange ring damage and cost $12–$25 at any hardware store.
What is a toilet wax ring and when does it need replacing?
A toilet wax ring is a molded ring of petroleum wax that compresses between the bottom of the toilet’s horn outlet and the closet flange to create a watertight, airtight seal preventing sewer water and gas from entering the bathroom. A properly installed wax ring can last 20–30 years — often the life of the toilet.
It requires replacement any time the toilet is lifted from the floor, when water appears at the toilet base after flushing, when the toilet rocks noticeably, or when sewer odors appear in the bathroom despite a clean trap. A standard wax ring costs $5–$15; an extra-thick ring for low flanges costs $10–$20.
Verdict — How to Replace a Toilet
Three Key Takeaways
1. The flange check is not optional. Every professional toilet replacement begins with a complete flange inspection — ring integrity, height relative to the floor, and subfloor condition. Skipping this step is the single leading cause of post-installation leaks and callbacks. Budget five minutes here and it protects the entire installation.
2. The wax ring is a one-chance component. It must be at room temperature when placed, centered precisely, and compressed in a single straight-down motion. Any repositioning after contact compromises the seal. At $5–$15, a replacement wax ring is always cheaper than removing and reinstalling a toilet.
3. DIY saves money when the conditions are clean — professional installation saves more when they are not. A standard replacement on a solid flange and firm subfloor is a legitimate DIY project for a capable homeowner. When flange damage, subfloor rot, or valve failure are present, the cost of a professional repair is bounded. The cost of a slow DIY leak is not.
If you encounter any of the red flag conditions described in this guide — cracked flange, soft subfloor, failed shut-off valve, or corroded cast iron pipe — stop the installation and contact a licensed plumber before proceeding. The five-minute inspection is always worth it.
How to Replace a Toilet Step by Step — Summary Reference
For homeowners who want a condensed reference during the job, here is the complete procedure in sequence. Shut off the water supply valve and flush the tank. Sponge out remaining water from tank and bowl. Disconnect the water supply line. Remove the tank on two-piece models. Pry off bolt caps and remove nuts and washers.
Rock the bowl gently to break the wax seal and lift straight up. Plug the drain immediately with a rag. Remove all old wax from the flange and toilet horn using a putty knife. Inspect the flange ring for cracks, check height relative to the floor, and press the subfloor for firmness. Install new T-bolts in the flange slots.
Place the new wax ring centered on the flange at room temperature. Lower the toilet straight down in one motion, aligning the horn holes with the closet bolts. Apply body weight to compress the wax ring fully. Level the toilet and add plastic shims if needed. Hand-tighten, then alternately snug each bolt nut. Cut excess bolt with hacksaw.
Reattach the tank. Connect the new supply line. Open the shut-off valve and check for leaks at the supply connection and base perimeter through three flush cycles. Apply silicone caulk around the base with a gap at the rear. Snap on bolt caps and install the seat.
For guidance on choosing the right replacement toilet before starting this process, the best comfort height toilet guide covers ADA-compliant models ideal for accessibility upgrades, and the best small toilet guide covers compact options for tight bathrooms. For questions about fill valve repair specifically — a common repair that avoids a full replacement — the best toilet fill valve guide covers the top-rated replacement valves with installation notes.
DIY Toilet Replacement Guide — What to Know Before You Start
A DIY toilet replacement guide is only useful if it addresses the real difficulty — which is not the mechanics of the job, but the decision points that arise mid-project. The job itself is straightforward: 17 steps, basic tools, no special skills.
The decisions that derail it are the ones no step-by-step list prepares you for: what to do when the bolt will not turn, what a cracked flange actually looks like up close, whether the slight softness you feel in the subfloor is a problem or normal flex.
The biggest decision point in any DIY toilet replacement guide is the flange assessment. This is the step where professional experience matters most and where a homeowner working alone is most likely to miss something that costs them later. If the flange ring has a hairline crack visible only under raking light, many homeowners will miss it.
If the subfloor has slight flex but no obvious rot odor, it may feel passable. Use a bright flashlight — not just ambient bathroom light — to inspect the flange. Press the subfloor firmly in a 12-inch radius, not just directly adjacent to the ring. These two checks, done thoroughly, catch 90% of the conditions that produce post-installation failures.
For a bathroom where the toilet installation is part of a broader renovation, consider timing the replacement during flooring work. Installing flooring before resetting the toilet means the flange height must be verified or adjusted to account for the new floor thickness — typically 3/8 inch for LVP, 3/4 inch for ceramic tile.
Missing this adjustment results in a flange that is recessed below the finished floor, requiring an extra-thick wax ring or a flange extender regardless of the flange’s own condition. Coordinating the plumber visit with the flooring schedule avoids a second removal and reinstallation. The best two-piece toilet guide covers easy-to-install models well suited to first-time DIY replacements, including options under $250 from major brands with strong availability at home improvement stores.
Replacing Toilet Wax Ring and Toilet Flange — What’s Different
Replacing a toilet wax ring is a subset of the full replacement procedure — the same steps apply through flange inspection, but the existing toilet goes back in place rather than a new one going down. The wax ring itself costs $5–$15 and is always replaced whenever the toilet is lifted, without exception.
Compressed wax does not re-seal when a toilet is reset on it. A wax ring that has been lifted and re-seated — even gently — has a high probability of leaving a gap in the seal that allows sewer water to seep through with each flush.
Replacing a toilet flange is a separate and more involved task. A surface repair ring — a steel or stainless ring that bolts over the existing flange ring to cover cracks and provide new bolt slots — handles minor damage without requiring access to the drain pipe below. These repair rings cost $12–$25 and are appropriate when the flange barrel is intact and the existing flange is secured to the subfloor.
Full flange replacement — removing the old flange and inserting or gluing a new one into the drain pipe — is necessary when the barrel is cracked, when the flange has pulled away from the subfloor entirely, or when the existing flange is too low and a flange extender stack is impractical. PVC-to-PVC flange replacement uses solvent cement and is manageable as a DIY task. Cast iron flange replacement involves caulked lead joints or no-hub couplings and is typically a plumber-only job.
The toilet flange should sit at the correct height relative to the finished floor regardless of which repair path is taken. Flange top surface flush with the floor or up to 1/4 inch above — standard wax ring. Flange top surface more than 1/4 inch below the floor — flange extender ring or extra-thick wax ring required.
Never stack two standard wax rings as a height solution. The two-ring stack is inherently unstable; the rings compress at different rates under load, and one of them inevitably shifts out of alignment within the first year of use. The best one-piece toilets guide covers models worth considering when replacing a two-piece toilet, particularly for homeowners who prefer a simpler base design with fewer joints to maintain over time.
How Long Does It Take to Replace a Toilet — Realistic Time Estimates
How long it takes to replace a toilet depends on two variables: the experience level of the installer and the condition of the existing installation. A licensed plumber on a clean job — solid flange, accessible bolts, working shut-off valve — completes a standard toilet replacement in 45–90 minutes from water shutoff to final leak check.
A first-time DIY installer on the same clean job typically takes 2–4 hours. The extra time accounts for reading instructions, double-checking measurements, taking care not to overtighten bolts, and the general deliberateness of working through an unfamiliar procedure.
Corroded closet bolts add 15–30 minutes. Penetrating oil needs soak time before the bolt will release, and cutting through corroded zinc hardware with a hacksaw in a tight space takes patience. Subfloor inspection, if it reveals minor issues requiring epoxy consolidant, adds 30–60 minutes of application and cure time before the flange can be re-secured. A full subfloor repair turns a 2-hour job into a full-day or multi-day project depending on the extent of damage.
The realistic time budget for a first-time DIY toilet replacement on a standard same-for-same swap with no complications is one full afternoon — roughly 3–4 hours including setup, the procedure itself, cleanup, and disposal of the old toilet.
Budget extra time if the bathroom has limited working space, if the old toilet is a one-piece model requiring two people, or if any of the inspection steps reveal issues requiring additional materials from the hardware store. The best American Standard toilet guide and the best Kohler toilets guide cover specific models with straightforward installation instructions that reduce setup time for first-time installers.