A toilet flange that sits just ⅛ inch too high or too low can void your wax ring seal within 18 months — but the fix for each direction is completely different. Shimming a flange that is too high makes the problem worse, not better. Using a standard wax ring on a flange that sits ¾ inch below the finished floor guarantees a leak within two years.
Fixing an uneven toilet flange is not complicated, but only if you match the repair method to your exact measurement and your exact flange material. Get that pairing wrong and you are pulling the toilet again six months from now.
This guide is written for homeowners and DIYers who have confirmed that the toilet is leaking or rocking and have traced the cause to an uneven or incorrectly positioned flange. It covers every fix method — shimming, flange extension kits, repair rings, and selective replacement — with clear measurement thresholds that tell you which method applies.
What this guide does not cover is active sewer gas intrusion, cracked drain pipes below the subfloor, or toilet flanges embedded in concrete slabs where pipe access requires a jackhammer.
⚠ Scope of This Guide
Who this is for: Homeowners and DIYers with basic plumbing comfort — able to remove and reset a toilet, use a level, and work with basic hand tools.
Tools assumed: Adjustable wrench, torpedo level, tape measure, utility knife, putty knife, bucket, rubber gloves, and either a hacksaw or oscillating tool if flange cutting is needed.
What this guide does NOT cover: Slab-embedded flanges requiring concrete cutting, drain pipe replacement below subfloor, active sewage backflow, or flanges with pipe damage extending more than 6 inches below the floor surface.
When to hire instead: If you find soft, discolored, or rotted subfloor around the flange opening, stop immediately. Subfloor rot changes this from a flange repair into a structural repair that must be done first. A licensed plumber should also be called if the drain pipe itself is cracked, offset from center, or corroded at the pipe-to-flange joint.
⚠ The Most Common Mistake — Using the Wrong Fix for the Wrong Direction
Most homeowners who fail at a toilet flange repair make one of two errors: they use a thick wax ring to compensate for a flange that is too high, or they ignore a flange that tilts 4–5 degrees and wonder why the toilet wobbles six weeks later. The correct approach is to measure the gap precisely, identify the direction of the problem, and select the one repair method that addresses that specific condition. Every other method — regardless of how many YouTube videos recommend it — will fail on a different timeline.
What “Uneven” Actually Means — and Why Direction Matters
A toilet flange can be uneven in three distinct ways, and each requires a different repair strategy. Understanding which type you have is the first diagnostic step — before you buy anything or touch a tool.
Type 1 — Flange sits too high: The top surface of the flange ring is more than ¼ inch above the finished floor. This is the least common scenario and is typically caused by new flooring being installed around (not over) the flange, leaving it proud. The IPC specifies that the flange top should sit at finished floor level with a maximum of ¼ inch above — anything higher than that prevents the toilet base from seating flat, which causes rocking and eventual bolt failure.
Type 2 — Flange sits too low: The top surface of the flange ring is at or below the finished floor level. This is the most common scenario, caused by new tile, hardwood, or vinyl being installed over the existing subfloor without raising the flange. A standard wax ring assumes the flange sits at or just above floor level; when it sits low, the wax cannot fully compress and a partial seal results — one that holds for months before failing.
Type 3 — Flange is tilted or crooked: The flange ring is not level — one side sits higher than the other, typically by 3–8 degrees. This can result from original installation error, subfloor movement, or one side of the flange anchor screws pulling loose. A tilted flange creates an uneven compression point on the wax ring, which means one side seals and the other does not. The toilet will rock on the low side and slowly work the wax seal loose.
The direction of the problem determines whether you need to add material, cut material, or reanchor and shim. Treating a high flange like a low flange — or vice versa — is the single most common repair failure in this category.
Tools and Materials You Will Need
Gather everything before you start. Stopping mid-repair with the toilet off the flange and sewer gas escaping into the bathroom is not a position you want to be in.
Diagnostic tools: Tape measure, torpedo level (18-inch preferred), combination square or straightedge, pencil or chalk for marking measurements.
Removal and prep tools: Adjustable wrench (for closet bolt nuts), putty knife or scraper (old wax removal), utility knife (scoring caulk), 5-gallon bucket with lid (setting the toilet on), rubber gloves, shop towels.
Repair materials — select based on diagnosis:
- High flange fix: Oscillating tool or hacksaw, metal-cutting blade, new wax ring (standard thickness), plastic toilet shims (if floor is slightly uneven after cut)
- Low flange fix (gap under ½ inch): Oatey Set-Rite flange extension spacers (¼–1⅝ inch range), foam rubber gasket included in kit, self-tapping screws, new wax ring (standard thickness)
- Low flange fix (gap over ½ inch): Oatey MaxWax or jumbo wax ring, or flange extension kit stacked to correct height
- Tilted flange fix: Stainless steel toilet shims, silicone sealant, new wax ring
- Broken bolt rail fix: Stainless steel split-ring repair kit (fits cast iron, PVC, or ABS)
Reinstallation materials: New closet bolts (brass or stainless — never zinc-plated, which corrodes), new wax ring, new bolt caps, white silicone caulk for base seal (leave a 1-inch gap at the rear for leak detection).
Do not reuse the old wax ring. Once compressed, it cannot re-seal reliably even if it appears intact.
Step 1: Diagnose the Flange — Measure the Gap
Step 1A — Remove the Toilet
Turn off the water supply valve. Flush and hold the handle to empty the tank. Disconnect the supply line. Remove bolt caps and nuts. Rock the toilet gently side to side to break the wax seal. Lift straight up — do not twist. Set the toilet on its side in a bathtub or on cardboard. Stuff a rag into the flange opening immediately to block sewer gas.
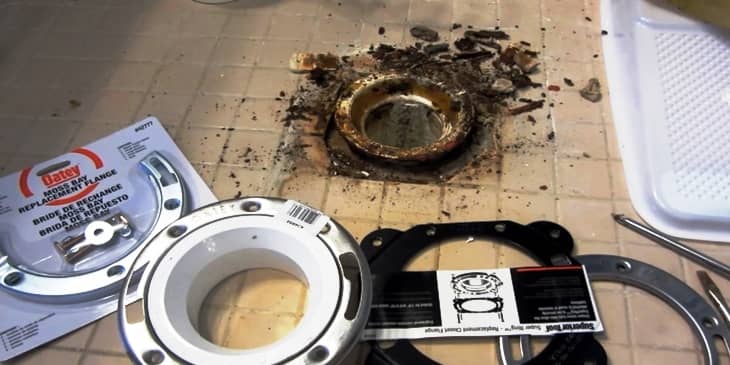
Step 1B — Clean and Inspect the Flange
Remove the rag. Use a putty knife to scrape all old wax from the flange surface and the surrounding floor. Wipe clean with a dry cloth. Inspect the flange ring for cracks, broken bolt rails, or corrosion. Inspect the anchor screws — loose screws into rotted subfloor mean the subfloor must be repaired before any flange fix will hold. Note the flange material: PVC (white or gray), ABS (black), cast iron (dark gray, heavy), or brass (yellow-gold).
Step 1C — Measure Flange Height at Four Points
Place a straightedge across the finished floor, spanning the flange opening. Using a tape measure or combination square, measure from the bottom edge of the straightedge down to the top surface of the flange ring at four points: front, back, left, right. Record all four measurements. If all four measurements are within ⅛ inch of each other, the flange is level but may be the wrong height. If the measurements vary by more than ⅛ inch, the flange is tilted.
Interpreting your measurements:
— Flange top is 0–¼ inch below the straightedge: correct position, no height fix needed (only address if tilted)
— Flange top is ¼–¾ inch below the straightedge: low flange, requires extension kit or jumbo wax ring
— Flange top is more than ¾ inch below: low flange requiring stacked extension spacers or repair ring plus extension
— Flange top is above the straightedge (any measurement): high flange requiring cutting or grinding
— Measurements vary by more than ⅛ inch between the four points: tilted flange
Step 2: Choose the Right Fix Method
Your four measurements from Step 1C determine exactly which method you use. This decision table eliminates guesswork.
| Your Measurement | Condition | Correct Fix Method |
|---|---|---|
| Flange top is above floor level | High flange | Cut/grind flange ring down → Step 3 |
| Flange top is ¼–½ inch below floor | Slightly low flange | Flange extension spacer kit → Step 4A |
| Flange top is ½–1⅝ inch below floor | Low flange | Stacked extension spacers (Oatey Set-Rite) → Step 4B |
| Flange top more than 1⅝ inch below floor | Severely low | Flange replacement at correct height |
| Measurements vary more than ⅛ inch | Tilted flange | Reanchor + shim → Step 5 |
| Bolt rails cracked or broken | Damaged flange | Stainless repair ring over existing flange |
Step 3: Fix a High Flange (Flange Sits Above Finished Floor)
3A — Determine How Much to Cut
Your target: flange ring top surface between flush with the finished floor and ¼ inch above it. Measure the exact amount of material to remove using your four-point measurement from Step 1C. If the flange is ½ inch too high, you need to remove ¼–½ inch of ring height to land in the correct range.
3B — Cut the Flange Ring Down
For PVC and ABS flanges: use an oscillating multi-tool with a fine-tooth blade to cut the flange collar horizontally at the correct height. Work slowly in small arcs around the circumference. Do not rush — a single overcutting pass cannot be undone. For cast iron flanges: use an angle grinder with a metal-cutting disc. Wear eye protection and hearing protection. Cut in sections rather than a continuous arc to maintain control. After cutting, use a file or coarse sandpaper to flatten any burrs on the cut edge.
3C — Verify and Reanchor
After cutting, re-measure at all four points with your straightedge. The flange top should now be flush with or up to ¼ inch above the finished floor at all four measurement points. If the cut was uneven, use a file to correct the high spots. Re-drill anchor screw holes into solid subfloor if the original holes were damaged. Use 1½-inch stainless steel screws — not zinc-plated, which corrode in bathroom humidity within 3–5 years.
Step 4: Fix a Low Flange (Flange Sits Below Finished Floor)
4A — Extension Spacer Kit for Gaps Up to 1⅝ Inch
The Oatey Set-Rite Toilet Flange Extension Kit is the industry standard solution for low flanges. The kit includes spacers that can be stacked to raise the flange surface between ¼ inch and 1⅝ inches. Each spacer is ¼ inch thick. Count how many spacers you need: if the flange top is ¾ inch below finished floor level, use three ¼-inch spacers. The kit includes a foam rubber gasket and six self-tapping screws for a watertight fit. It is UPC-listed and compatible with PVC, ABS, cast iron, and stainless steel flanges — the one kit that covers all four pipe materials.
Installation procedure: Dry-fit the spacers on the flange. Stack until the top spacer surface sits flush with or just above the finished floor. Apply the foam rubber gasket between the flange top and the first spacer. Drive the self-tapping screws through the spacer tabs into the flange body. Check for level using a torpedo level placed across the spacer surface. If the spacer surface is not level, the underlying flange is tilted — proceed to Step 5 before continuing.
4B — Jumbo Wax Ring for Gaps of ¼ to ½ Inch (Alternative to Extension Kit)
When the flange sits ¼ to ½ inch below the finished floor and the flange ring itself is in good condition with solid anchor screws, a jumbo (MaxWax or double-thickness) wax ring alone may be sufficient. The Oatey MaxWax contains 40% more wax than a standard ring, specifically designed for flanges at or slightly below finished floor height. Important: this approach only works when the gap is under ½ inch. For gaps larger than ½ inch, a wax ring alone — even jumbo thickness — will compress unevenly under the toilet’s weight and fail within 1–2 years. Use the extension kit instead.
Step 5: Fix a Crooked or Tilted Flange
5A — Identify the Low Side
Your four-point measurement from Step 1C has already identified which side of the flange sits lower. The difference between the highest and lowest point tells you how much the flange is tilted. A difference of ⅛ to ¼ inch is addressable with shims at the toilet base after the toilet is reset. A difference of more than ¼ inch at the flange itself means the flange anchor on the low side has pulled loose or the subfloor has shifted — and the flange must be reanchored before any other fix.
5B — Reanchor the Low Side
Remove the anchor screws on the low side of the flange. Inspect the subfloor holes — if they are stripped or the wood is soft, fill the holes with epoxy wood filler and allow to cure fully (24 hours minimum) before driving new screws. Drive new 1½-inch stainless steel screws into solid subfloor, pulling the low side of the flange flat against the floor surface. Re-measure at all four points. The flange should now sit level within ⅛ inch across all measurement points.
5C — Shim the Toilet Base After Reset
After reanchoring, if the flange surface is level but the finished floor is itself uneven around the flange area, the toilet base will rock even on a correct flange. Dry-set the toilet on the flange without a wax ring. Place a level across the toilet rim in both directions. Identify any gap between the toilet base and the floor. Insert plastic toilet shims (not wood — wood absorbs moisture and compresses) at the low points until the toilet sits level without rocking. Only then install the wax ring and permanently set the toilet. Trim any excess shim material with a utility knife after the bolts are tightened.
Step 6: Seal and Reinstall the Toilet
6A — Install New Closet Bolts
Slide new closet bolts into the flange slots. Position them parallel to the wall behind the toilet — this ensures the toilet sets square. Use brass or stainless steel bolts only. If the existing bolt slots are damaged or the bolt slides rather than locks, wrap the bolt base with a nut-and-washer combination to hold it in position while you lower the toilet.
6B — Place the Wax Ring
For PVC and ABS flanges, press the wax ring onto the toilet horn (the outlet on the bottom of the toilet) rather than setting it on the flange. This gives you better visual alignment as you lower the toilet. For cast iron flanges with a repair ring, set the wax ring on the flange surface. Warm the bathroom to at least 70°F before installation — cold wax (below 65°F) does not compress properly and the seal will fail. If working in a cold bathroom, warm the wax ring with a heat gun on low for 30 seconds before placement.
6C — Set the Toilet
Straddle the toilet with both hands on either side of the tank. Align the bolt holes in the toilet base with the closet bolts. Lower the toilet straight down — do not angle or rotate it once the wax makes contact. Press down firmly and evenly with your body weight. Sit on the toilet and press down for 30 seconds. This is what compresses and sets the wax. Once seated, place your level across the bowl rim. If the toilet is not level, add plastic shims now — before tightening the bolts.
6D — Tighten Bolts and Verify Seal
Hand-tighten the nuts onto the closet bolts. Then alternate tightening each side — a quarter turn at a time, alternating left and right — until snug. The target is firm contact without flex, not maximum torque. Over-tightening cracks the toilet base. After tightening, try to rock the toilet with both hands. There should be zero movement. Trim bolts to ½ inch above the nut using a hacksaw. Cap the bolts. Apply white silicone caulk around the base perimeter, leaving a 1-inch gap at the rear of the toilet — this gap allows you to detect a leak at the base rather than trapping water under the toilet.
6E — Reconnect and Test
Reconnect the water supply line. Turn on the supply valve slowly. Allow the tank to fill completely. Flush 10 times over 15 minutes. After each flush, watch the base of the toilet for any moisture. After the 10th flush, try to rock the toilet again — there should still be zero movement. Any moisture at the base or any movement at this stage means the wax seal failed and the toilet must be removed and reset with a fresh wax ring.
Red Flags — Stop and Call a Plumber
🚨 Red Flag 1 — Subfloor Rot at the Flange Opening
When you remove the toilet and find that the subfloor within 6 inches of the flange opening is soft, spongy, discolored brown or black, or crumbles when pressed with a screwdriver tip, stop the repair immediately. Subfloor rot means moisture has been infiltrating through the flange seal for months or years. Any flange repair done on a rotted subfloor will fail — the anchor screws have nothing solid to grip. A licensed plumber and carpenter must assess and repair the subfloor before the toilet can be safely reset. This repair typically costs $800–$2,500 depending on the extent of the rot and whether ceiling access below is needed.
🚨 Red Flag 2 — Crack in the Drain Pipe Below the Flange
If you remove the flange and find that the drain pipe itself is cracked, split, or has separated at a joint below the flange collar, this is outside the scope of a DIY flange fix. A cracked drain pipe allows sewage to leak into the subfloor cavity on every flush — a problem that will cause structural damage to the subfloor and the ceiling of the room below. A licensed plumber must cut out the damaged pipe section and replace it before a new flange can be installed. Do not proceed with the flange repair until the pipe is confirmed intact.
🚨 Red Flag 3 — Flange Sits More Than 1⅝ Inch Below Finished Floor
The Oatey Set-Rite extension kit — the most capable stacking extension system available to DIYers — maxes out at 1⅝ inches of elevation. If your flange measurement shows the ring sitting more than 1⅝ inches below the finished floor, you have exceeded the range of standard extension products. The correct repair is full flange replacement at the correct height, which requires cutting the existing pipe, solvent-welding a new flange at the proper elevation, and reanchoring. If the pipe is cast iron, this work requires a plumber with access to the appropriate tools and materials for cutting cast iron drain pipe.
🚨 Red Flag 4 — Persistent Sewer Gas Odor After Reinstallation
If you complete the repair, reinstall the toilet, and still detect a sulfur or rotten-egg odor coming from around the toilet base, the wax seal alone is not the source. A complete wax seal failure would show as water at the base, not odor without water. Odor without visible moisture indicates either a cracked flange body below the floor surface, a failed wax ring seated on a surface you cannot see, or a venting problem in the drain system. At this point, the repair has moved beyond what a visual inspection and standard fix methods can address. Call a licensed plumber for a smoke test or video inspection of the drain line.
What Other Expert Miss: Flange Material Changes Everything
Nearly every guide on fixing an uneven toilet flange treats the flange as a single uniform object. The actual repair choices differ significantly based on whether your flange is PVC, ABS, cast iron, or brass — and ignoring that distinction is the reason most DIY flange repairs fail on the first attempt.
PVC Flange (White or Gray)
Most common in homes built after 1980. Extension spacer kits snap and screw onto the existing ring without adhesive — install in under 20 minutes. High flanges can be cut with an oscillating tool. Repair rings designed for PVC flanges use a lap-over design that rests on the ring surface. Solvent-welded to the pipe — never use heat guns or torches near PVC pipe joints, as they can soften the cement bond.
ABS Flange (Black)
Common in homes built in the 1970s–1990s, particularly in the western United States. Functionally identical to PVC for repair purposes — extension kits and repair rings that specify PVC/ABS compatibility work on both. Do not mix ABS cement with PVC cement if you are solvent-welding a replacement flange — they are chemically incompatible and the joint will fail under thermal cycling.
Cast Iron Flange (Dark Gray, Heavy)
Found in homes built before 1960, and in some heavy-duty commercial applications. Standard repair rings that simply screw over the top of the existing flange work on cast iron — look for a stainless steel split-ring repair kit that fits over the iron ring. Do not use standard PVC extension kits directly on cast iron without a compatible gasket system — the gasket foam will not compress evenly on a rough iron surface. The Oatey Twist-N-Set is specifically designed for cast iron repair without removing the old flange.
Brass Flange (Yellow-Gold)
Rare in modern installations. Found in older high-end homes and some commercial installations. Repair options are more limited — a standard split-ring stainless repair kit works over a brass ring, but solvent welding is not an option. If the brass ring is cracked or warped, full replacement is the correct path. Replacement brass flanges are significantly more expensive ($45–$120) than PVC equivalents ($8–$25), but matching material is important in older plumbing systems where the pipe-to-flange connection uses lead oakum or no-hub couplings.
When the Answer Flips — When NOT to Repair (Replace Instead)
Every method in this guide is a repair of an existing flange. There are three specific scenarios where repair is the wrong choice and full replacement is the only reliable path:
1. Flange body is cracked, not just the ring. A crack in the flange body (the collar that connects to the drain pipe) allows sewer gas and sewage to bypass the wax seal entirely. No amount of shimming or extension will fix a cracked flange body — it must be cut out and replaced.
2. Anchor screws pull directly from rotten subfloor with no resistance. If every screw you drive pulls out without resistance, there is nothing for any repair method to anchor to. Subfloor repair must precede flange repair — always.
3. The flange has already been repaired twice before. A flange with two stainless repair rings stacked on it, multiple sets of screw holes, and accumulated caulk from previous repair attempts is telling you something. At that point, the labor cost of proper replacement is less than the cumulative cost of the third repair attempt that also fails.
For guidance on selecting the right replacement toilet after a complete flange and subfloor repair, see our guide to the best toilets to buy and our breakdown of best TOTO toilets for high-efficiency options that put less stress on the wax seal through consistent flush pressure.
Frequently Asked Questions — Fixing Uneven Toilet Flange
What is the correct height for fixing an uneven toilet flange?
The IPC specifies that the top of the toilet flange should be at finished floor level, with a maximum of ¼ inch above the floor surface. This position allows a standard wax ring to compress correctly when the toilet is set — roughly ½ inch of compression creates the watertight seal.
A flange top that sits more than ¼ inch above floor level prevents the toilet base from contacting the floor evenly and causes rocking. A flange at or below floor level means the wax cannot fully compress, and the seal will fail prematurely under normal flushing pressure and movement.
Can I fix an uneven toilet flange without removing the toilet?
No. There is no reliable method for correcting flange height or levelness without removing the toilet. Any fix that involves the flange surface — extension spacers, repair rings, shimming the ring, or cutting a high flange — requires clear access to the entire flange perimeter.
Attempting to insert shims or adhesive under the toilet base without removing it addresses the symptom (rocking) but not the cause (an uneven flange), and the wax ring damage from that rocking will continue to worsen beneath the surface.
How do I know if my toilet flange is too high or too low?
Remove the toilet and place a straightedge across the finished floor spanning the flange opening. Measure from the bottom of the straightedge to the top surface of the flange ring at four points: front, back, left, and right. If the flange top is above the straightedge, it is too high. If the flange top is below the straightedge by more than ¼ inch, it is too low.
If all four measurements are within ⅛ inch of each other, the flange is level — only the height needs correction. If the measurements vary by more than ⅛ inch, the flange is tilted and must be reanchored before addressing height.
What is the best wax ring for an uneven toilet flange?
The answer depends on your specific gap. If the flange top sits flush with the floor or up to ¼ inch above it, a standard wax ring is correct. If the flange top sits ¼–½ inch below the finished floor, the Oatey MaxWax (40% more wax than standard) handles that range without stacking.
For gaps larger than ½ inch, a flange extension kit brings the ring surface to the correct height, and then a standard wax ring seals it from that corrected height. Do not stack two standard wax rings — they can shift during installation and produce a partial seal.
Can I use a wax-free seal on an uneven flange?
Wax-free seals (rubber or foam gaskets) offer the advantage of being repositionable if the toilet shifts during installation. However, they rely on even, flat contact between the toilet outlet and the seal. On a tilted or severely uneven flange, a wax-free seal cannot conform to compensate for the angle the way traditional wax can.
Wax is the correct choice for any installation where the flange surface is not perfectly level, because wax deforms to fill gaps and voids that a rigid rubber seal cannot accommodate.
How long does a toilet flange repair last?
A properly executed repair — correct method for the measured gap, correct flange material compatibility, solid anchor screws into sound subfloor, and correctly installed wax ring — should last the functional life of the toilet: 20–30 years.
What shortens that lifespan is incomplete shimming that allows micro-movement, bolt over-tightening that cracks the porcelain, or a wax ring installed in a bathroom colder than 65°F. The 10-flush test described in Step 6E is the most reliable field verification that the repair will hold long-term.
What causes a toilet flange to become uneven in the first place?
The four most common causes are: (1) new flooring installed over the existing subfloor without raising the flange — the most frequent cause, responsible for approximately 60–70% of low-flange cases; (2) subfloor movement or settlement pulling one side of the anchor screws loose, creating a tilt; (3) original installation error where the plumber set the flange before finished flooring was in place.
The fourth cause is cast iron flange corrosion over decades, where the ring deteriorates unevenly and the bolt rails crack or crumble, allowing the ring to shift position relative to the pipe collar.
Summary: How to Fix an Uneven Toilet Flange
If the flange sits above the finished floor → cut or grind the ring down to the correct height, reanchor with stainless screws, and reset with a standard wax ring. Do not try to compensate with shims or thin wax rings — a high flange creates a toilet that cannot seat flat, and that problem only gets worse over time.
If the flange sits below the finished floor → use a flange extension spacer kit (Oatey Set-Rite) for gaps up to 1⅝ inch. For gaps under ½ inch, an Oatey MaxWax ring alone may suffice. For gaps beyond 1⅝ inch, full flange replacement at correct height is required. Never stack two standard wax rings.
If the flange is tilted → reanchor the low side into solid subfloor, verify level at all four measurement points, then shim the toilet base after dry-fitting before any wax ring is installed. Never use the closet bolts to pull a tilted toilet into level position — that cracks the base.
Call a licensed plumber if: you find subfloor rot, a cracked pipe below the flange, or a flange that sits more than 1⅝ inch below finished floor level. These conditions exceed what standard DIY repair products and methods can reliably address when fixing an uneven toilet flange.
Shimming an Uneven Toilet Flange: When Shims Work and When They Do Not
Plastic toilet shims are one of the most misused repair items when fixing an uneven toilet flange. They are designed for a specific and limited purpose: leveling a toilet base on a floor surface that is itself slightly uneven, after the flange has already been corrected to the proper height. They are not a substitute for a properly positioned flange, and using them in place of a real flange fix is the fastest way to a second wax ring failure.
When shims are the right tool: after completing a flange height correction (Steps 3–4) and dry-fitting the toilet, place a torpedo level across the bowl rim. If one side of the toilet lifts between 1/16 and 3/16 inch off the floor due to a slightly uneven tile surface, plastic shims inserted at that contact point — before the wax ring is installed — will stabilize the toilet and prevent micro-rocking that degrades the wax seal over time.
When shims are the wrong tool: if the toilet rocks because the flange is tilted, shimming the base without fixing the flange leaves the root cause untouched. The toilet may feel stable after shimming, but the wax seal is compressed unevenly at the high side of the tilt — and uneven wax compression fails faster than no wax at all.
Shims at the base cannot compensate for a flange that presents at different heights around its circumference. Fix the flange first, then shim only for residual floor unevenness.
Use plastic shims only — never wood (which absorbs moisture and compresses over time) and never metal washers (which concentrate point loads on the porcelain). After the toilet is set and the bolts tightened, trim any excess shim material flush with the toilet base using a utility knife, then seal the base perimeter with white silicone caulk.
This is the same technique used on every commercial toilet installation in high-traffic buildings — it is the code-correct approach, not a workaround. For more on full toilet replacement decisions, see our guide to the best flushing toilets to understand which models are most forgiving of minor floor unevenness through their base design.
Toilet Flange Extension Kit for Height Adjustment: Which Kit Is Right for Your Gap
The toilet flange extension kit is the correct solution for the most common uneven flange scenario: a flange that dropped below the finished floor level after new tile, vinyl, or hardwood was installed. The concept is straightforward — the kit adds height to the existing flange ring so that the effective sealing surface sits at the correct elevation — but the implementation details matter considerably.
The Oatey Set-Rite Extension Kit is the industry benchmark. It provides four ¼-inch spacers that can be stacked individually or in combination to achieve any increment from ¼ inch to 1⅝ inches of elevation. The kit includes a foam rubber gasket that compresses between the existing flange and the first spacer to create a watertight connection at that joint.
Six self-tapping screws secure the assembly. The system is UPC-listed and rated for PVC, ABS, cast iron, and stainless steel flange rings — one kit that covers the full range of residential pipe materials.
The key installation mistake to avoid: stacking more spacers than necessary. The target is a spacer surface that sits flush with or no more than ¼ inch above the finished floor — the same specification as a correctly installed original flange. If you stack to ¾ inch above the floor because you overestimated the gap, the toilet base will not seat flat and the problem restarts.
Measure the gap carefully in Step 1C, count the exact number of ¼-inch spacers required, and stop there. After stacking and securing, dry-fit the toilet without the wax ring and verify level before committing to the installation.
For flanges with both a height problem and a cracked bolt rail, the correct sequence is repair ring first (to restore solid bolt slots), then extension spacer kit over the repaired assembly. Attempting to use a spacer kit on a flange with broken bolt rails will simply shift the bolt problem to the spacer level — address the structural failure first, then address the height.
If you are evaluating whether a full toilet replacement makes sense alongside a flange repair, our guide to the best Kohler toilets and best American Standard toilets covers models with bases designed for maximum stability on repaired flanges.
Uneven Toilet Flange and Wax Ring: Matching the Seal to the Surface
The relationship between flange height and wax ring selection is the single most consequential decision in a toilet flange repair — and the one most often handled incorrectly by homeowners who rely on a single-size wax ring regardless of the installation conditions. Getting this pairing right means a seal that holds for decades. Getting it wrong means a call to a plumber six to eighteen months later.
Wax rings work by compression. When you lower the toilet onto the flange, your body weight compresses the wax ring, which deforms to fill the space between the toilet outlet and the flange opening. The amount of compression available depends on the gap between the toilet horn and the flange surface.
A standard wax ring assumes that gap is roughly ½ to ¾ inch — the distance created when a correctly positioned flange sits at or just above floor level and a standard toilet sits on that floor. Change either variable and the math changes.
When the flange sits low, the gap increases. A standard ring does not have enough wax to bridge a large gap without thinning out under the toilet’s weight — which is why low-flange installations see the ring compress to a thin disk on the flange side and a gap on the toilet side.
The Oatey MaxWax (extra-thick ring) handles gaps up to ½ inch below floor level reliably. For larger gaps, bring the flange surface up with an extension kit and then use a standard ring — never try to bridge a ¾-inch gap with even a jumbo wax ring.
When the flange sits high, the gap is too small. A standard or thick wax ring will not compress sufficiently, and the excess wax will squeeze outward rather than sealing inward. The result is a toilet that appears seated but has a partial seal. The correct fix for a high flange is cutting the flange down — not using a thinner wax ring as a workaround.
After cutting the flange to the correct height, a standard wax ring restores the proper compression geometry. For new toilet installations after a flange repair, our guide to the best dual flush toilets covers models with consistent flush pressure that maintains stable wax seal compression over the long term.