Most homeowners who call a plumber about a pressure assist toilet problem don’t actually need a plumber. After twenty years in plumbing, the pattern is consistent: weak flushes, constant running, and mysterious noises are almost always caused by three repairable components — the flush cartridge, the air inducer duckbill valve, or a supply pressure issue that takes less than ten minutes to diagnose.
The exception is a ruptured pressure vessel, and when that happens, you’ll know it immediately. This guide covers every pressure assist toilet problem in diagnostic order, starting with the easiest and cheapest fixes and ending with the clear signal that repair has run its course.
This guide is written for homeowners who own a residential pressure assist toilet — typically a Flushmate-equipped model from Kohler, American Standard, Gerber, or Crane — and want to troubleshoot and repair it without unnecessary part purchases or service calls. It covers the five most common pressure assist toilet problems, a step-by-step cartridge replacement procedure, red flags that require a professional, and a clear decision framework for repair versus full replacement.
📋 Scope — What This Guide Covers
Who this is for: Homeowners with a standard residential pressure assist toilet (Flushmate system) experiencing weak flushes, running, leaking, noise, or a stuck flush lever. Comfort with basic tools required.
Tools assumed: Adjustable pliers, flathead screwdriver, small pointed tool (paperclip), pressure gauge (optional but recommended), bucket.
What this guide does NOT cover: Commercial flushometer valve systems, toilet installation from scratch, or drain line problems below the floor.
When to hire a professional instead: If your Flushmate vessel is on a safety recall list, if the outer porcelain tank is cracked, or if water is escaping around the tank-to-bowl joint under pressure. These situations require professional repair or replacement.
⚠️ The Most Common Mistake Before Calling a Plumber
Homeowners replace the flush cartridge first — because that’s the most visible part — before checking house water pressure. If your home’s supply pressure is below 20 PSI at the toilet, no cartridge will fix a weak flush. A $15 pressure gauge test takes three minutes and can save you $40–$80 in parts and a wasted service call. Check pressure at the supply valve behind the toilet before ordering any replacement parts.
How a Pressure Assist System Actually Works
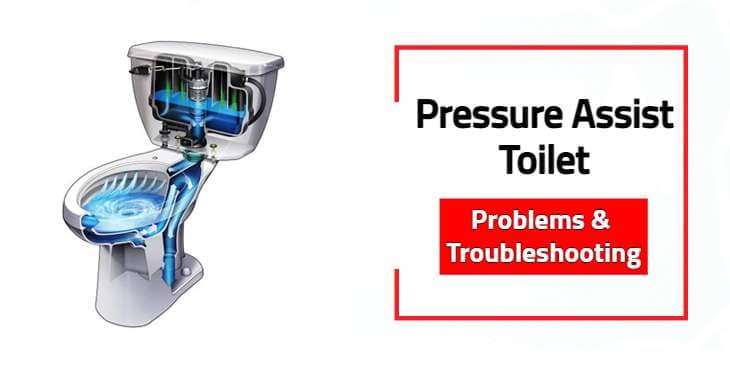
Understanding the mechanism is the fastest path to accurate diagnosis. A pressure assist toilet does not hold open water in its tank like a gravity toilet. Instead, it contains a sealed plastic or steel pressure vessel — the Flushmate unit — inside the outer porcelain tank. As the water supply line fills the vessel, it compresses trapped air inside. When you press the flush handle, a flush cartridge releases that compressed air-and-water charge into the bowl at high velocity, producing the characteristic powerful flush.
The system has four key components you’ll interact with during troubleshooting: the flush valve cartridge (controls water release during flush), the air inducer and duckbill valve (allows air into the vessel during refill), the inlet screen (filters debris from the supply line), and the actuator mechanism (the connection between the handle and the cartridge).
The system requires a minimum of 20–25 PSI of supply pressure to pressurize correctly — Flushmate specifies a static pressure range of 20–80 PSI, with 1.1 GPF high-efficiency models requiring a minimum of 35 PSI.
Because there is no open water in the outer tank and no flapper to replace, pressure assist toilet problems look and sound different from gravity toilet failures. A gravity toilet that runs constantly has a failed flapper or fill valve. A pressure assist toilet that runs constantly has a cartridge alignment issue, a clogged inlet screen, or inadequate supply pressure. The diagnostic logic is entirely separate — and it’s the reason most generic troubleshooting advice fails on these systems.
Problem #1 — Weak or No Flush
A weak flush is the most common pressure assist toilet problem. When the system is working correctly, the flush is unmistakably powerful — strong enough that waste rarely returns to the bowl. If the flush has weakened gradually, or if it now requires holding the lever down to complete, work through these causes in order.
Step 1 — Check Supply Pressure
Attach a pressure gauge to the supply valve behind the toilet. Ideal static pressure is 30–80 PSI. If pressure reads below 20 PSI, the vessel cannot charge adequately regardless of cartridge condition. Locate the home’s pressure reducing valve (PRV) — typically near the main shutoff — and verify it’s set to 45–60 PSI. Adjusting the PRV clockwise increases pressure. Do not set above 60 PSI, as higher pressure accelerates wear on all household plumbing.
Step 2 — Verify the Supply Valve Is Fully Open
Turn the supply valve counterclockwise until it stops. A valve that’s only three-quarters open restricts flow enough to produce a weak flush. This is the most frequently overlooked cause and the easiest fix — fully open valve, test flush, done.
Step 3 — Clean the Inlet Screen
Shut off the supply valve and flush the toilet to relieve pressure. Disconnect the supply line from the supply shank at the bottom of the Flushmate vessel. Use a paperclip or small pointed tool to extract the inlet screen from inside the shank. Rinse it under running water and clear any mineral debris. Reinstall, reconnect the supply line, open the valve, and test. A clogged inlet screen produces the exact symptom pattern of a weak flush even when pressure is adequate.
Step 4 — Check the Air Inducer Duckbill Valve
With pressure relieved, remove the air inducer cap at the top of the Flushmate vessel. Pull out the duckbill valve — a small rubber check valve shaped like a duck’s bill. Squeeze the flat sides together. The lips should open fully and close cleanly.
If the valve is cracked, deformed, or clogged with mineral deposits, it cannot allow air into the vessel during refill, which prevents proper pressurization. Clean and reinstall, or replace (under $10 at plumbing supply houses). Do not overtighten the air inducer cap — finger tight is correct.
Step 5 — Adjust or Replace the Flush Valve Cartridge
If all of the above check out and the flush remains weak, the cartridge itself may need adjustment or replacement. The cartridge controls the release pressure and timing of the flush. An improperly seated cartridge — threaded too tight or too loose — degrades performance. The replacement procedure is covered in the dedicated section below. A replacement Flushmate flush cartridge costs $35–$55 at plumbing supply houses or online, with the complete kit including wrench running $50–$75.
Problem #2 — Pressure Assist Toilet Keeps Running After Flush
A pressure assist toilet that keeps running sounds like water continuously trickling into the bowl after the flush cycle should have ended. Unlike a gravity toilet where a running sound almost always means a failed flapper, a pressure assist toilet that runs has one of three specific causes.
Cause 1 — Insufficient Water Pressure
When supply pressure is marginal — below 20–25 PSI — the Flushmate vessel cannot build sufficient charge to allow the cartridge to seat and close properly after the flush. Water continues trickling because the valve never fully shuts. The fix is the same as in Problem #1: verify PRV setting and confirm supply valve is fully open before assuming a mechanical failure inside the vessel.
Cause 2 — Cartridge Out of Adjustment
The flush valve cartridge is threaded into the vessel and must be set to the correct depth. Flushmate’s specification is that exactly one black thread on the vessel should remain visible above the cartridge after seating. If the cartridge is threaded too loosely, it won’t close fully after the flush.
With pressure relieved, use the Flushmate cartridge wrench to thread the cartridge clockwise one-quarter turn at a time, pausing after each quarter turn, until the running stops. Do not overtighten — threading past the correct depth can cause the opposite problem.
Cause 3 — Actuator Misalignment
The actuator connects the flush handle to the cartridge. On push-button models, correct actuator clearance is approximately 1/8 inch between the button and the actuator when at rest. On handle-type fixtures, there should be a nickel-thickness gap between the flush rod and the plunger arm.
If the actuator is pressing against the cartridge when the handle is at rest, it holds the cartridge partially open — causing a constant run-on condition. Adjust the actuator setscrew (counterclockwise to raise, clockwise to lower) until the correct clearance is restored.
⛔ Important: Don’t Ignore a Running Pressure Assist Toilet
A gravity toilet that runs wastes about 200 gallons per day. A pressure assist toilet that runs wastes water at a similar rate — but more critically, it indicates the vessel is not pressurizing correctly. Continuous water movement through an already-pressurized system can accelerate wear on internal seals. Diagnose and fix a running pressure assist toilet within 48 hours of noticing it.
Problem #3 — Pressure Assist Toilet Leaking
Leaks on a pressure assist toilet fall into four distinct categories, each with a different location and a different fix. Identifying where the water is coming from determines the repair path.
Leak Location 1 — Trickle Into the Bowl After Refill
Water dripping into the bowl immediately after refill is complete points to a cartridge that isn’t sealing fully. Return to Problem #2, Cause 2 — cartridge adjustment. If adjustment doesn’t eliminate the trickle after three quarter-turn increments, the cartridge seals are worn and the cartridge needs replacement. A replacement Flushmate cartridge costs $35–$55 and is a straightforward DIY repair for anyone comfortable with basic plumbing tasks.
Leak Location 2 — Water at Tank-to-Bowl Bolts
The tank connects to the bowl via two or three bolts with rubber seals, washers, and nuts. When a nut works loose — often from repeated vibration during the powerful flush cycle — water seeps from the bolt holes.
Turn off the supply, relieve pressure, and tighten the nuts. Use a screwdriver to hold the bolt from the inside while tightening the nut from beneath. Avoid overtightening — cracking the porcelain tank base is irreversible. If the rubber washers are deformed, replace them (standard tank bolt kits, $5–$12 at hardware stores).
Leak Location 3 — Water at the Tank-to-Bowl Gasket
Pressure assist tanks use a specific tank-to-bowl gasket — do not substitute with a standard gravity toilet gasket, as the dimensions and compression characteristics are different. If water appears at the joint between the tank and bowl, the gasket may have been installed dry, installed incorrectly, or degraded over time. This repair requires removing the tank, replacing the gasket with the correct Flushmate-compatible part, and reinstalling. The gasket itself runs $8–$20; Flushmate recommends always replacing the gasket when the tank is removed for any reason.
Leak Location 4 — Water Escaping Around the Tank Lid or on the Floor
Water escaping around the lid joint or pooling on the floor outside the toilet base — combined with a loud pop or bang — indicates a bladder rupture in the pressure vessel. This is not a minor leak. Older Flushmate systems had documented bladder failures, which led to safety recalls on certain models.
Turn off the supply valve immediately, relieve pressure by flushing, and do not use the toilet until the vessel is inspected. Check whether your unit is subject to the Sloan Flushmate recall at flushmate.com before proceeding.
One note on condensation: gravity toilets develop exterior tank condensation because the cold water inside the tank meets warm humid air. Pressure assist toilets rarely have this issue because the outer porcelain tank contains no standing water — just the sealed vessel. If you see moisture on the outside of the tank on a pressure assist toilet, check for a genuine leak rather than attributing it to condensation.
Problem #4 — Why Is My Pressure Assist Toilet So Loud?
Some noise is normal and expected with pressure assist toilets. The pressurized flush cycle produces a loud whooshing sound — approximately 96 decibels at the toilet, compared to 75–85 decibels for a gravity toilet. This is a design characteristic, not a defect. The noise lasts three to four seconds and is the direct result of compressed air forcing water through the bowl at high velocity.
However, certain types of noise indicate a problem rather than normal operation. Use this guide to distinguish between acceptable and abnormal sounds.
| Sound | Normal or Problem? | Likely Cause / Action |
|---|---|---|
| Loud whoosh during flush (3–4 sec) | Normal | Pressure-assisted operation. No action needed. |
| Hissing or whistling during refill | Problem | Clogged inlet screen or partially closed supply valve restricting flow. Clean screen, open valve fully. |
| Loud bang or pop at flush | Serious Problem | Possible vessel bladder failure or water hammer. Shut off supply. Inspect immediately. |
| Gurgling after flush stops | Investigate | Possible partial drain restriction below the toilet or cartridge not sealing fully. Check both. |
| Extended hiss after refill (15+ sec) | Problem | Run-on condition. Address per Problem #2 above. |
| Noisy fill that has gotten louder recently | Investigate | Duckbill valve or inlet screen partially blocked. Clean both as first step. |
If the flush noise on your pressure assist toilet has been increasing gradually, check the actuator clearance first. An actuator that contacts the cartridge prematurely causes an early, explosive release of pressure — louder than normal and shorter in duration. Correct clearance is 1/8 inch on push-button models and a nickel-width gap on handle-type fixtures.
Beyond this adjustment, newer Flushmate generations are meaningfully quieter than older units from the 1990s and early 2000s — if your toilet is more than fifteen years old and noise has become a serious issue, a full vessel replacement is worth considering for the noise improvement alone.
Problem #5 — Flush Lever Hard to Push or Gets Stuck
Pressure assist toilets require slightly more force to activate the flush lever than gravity toilets, because the actuator must overcome a small amount of back pressure from the vessel. This is normal. What is not normal is a lever that requires significant force, that must be held down through the entire flush cycle, or that sticks in the down position after release.
Cause — Flush Rod Binding or Corroded Handle Linkage
Check the flush rod (on handle-type fixtures) or the linkage connecting the handle to the actuator. Corrosion, mineral buildup, or physical misalignment causes binding that requires excessive force. Remove the tank lid and visually inspect the connection. Clean with white vinegar if mineral deposits are present. Realign the rod so it operates freely without bending. If the handle mechanism itself has corroded threads or a cracked arm, replace the handle assembly — a standard pressure assist toilet handle runs $12–$25.
Cause — Actuator Set Too Low (Must Hold Lever Down)
If you must hold the lever down for the flush to complete, the actuator is not opening the cartridge fully with a single press. On push-button models, the actuator needs to be lowered (turned clockwise with the setscrew) so it makes full contact with the cartridge.
On handle-type fixtures, verify the flush rod is properly engaged with the actuator arm — the rod should push the arm fully without slipping. This is a five-minute adjustment that eliminates the problem in almost every case before a cartridge replacement is warranted.
Cause — Worn Cartridge Spring
Inside the flush cartridge, a spring returns the plunger to the closed position after each flush. As this spring weakens with age, the cartridge requires more handle force to open fully, and may stick briefly in the open position.
A temporary field fix is removing the cartridge, carefully stretching the spring two to three coils longer, and reinstalling. This buys time. The permanent fix is a new cartridge. If the toilet is seven or more years old and the spring fix is needed, budget for a full cartridge replacement within the next six months.
How to Replace a Pressure Assist Cartridge (Step-by-Step)
Cartridge replacement is the single most effective repair for multiple pressure assist toilet problems — weak flush, constant running, and a stuck lever often all resolve with a new cartridge. Estimated time: 20–30 minutes. Difficulty: manageable for any homeowner comfortable with basic plumbing tasks. Cost: $35–$75 depending on whether you purchase the cartridge alone or the complete kit with wrench.
Step 1 — Identify Your Flushmate Model
The Flushmate model number is printed on a sticker on the side or top of the pressure vessel inside the tank. Flushmate makes several generations (Series 503, 503H, 504, 3 Series) and cartridges are not interchangeable between series. Confirm your model before ordering any parts. The model number typically begins with “M” or “503” and appears on the label alongside a serial number.
Step 2 — Shut Off Water and Relieve Pressure
Turn the supply valve clockwise until fully closed. Flush the toilet to discharge the compressed air-water charge inside the vessel. This is a safety-critical step — never remove the cartridge from a pressurized vessel. After flushing, remove the tank lid and set it aside. Confirm no water is flowing into the vessel by listening for silence inside the tank.
⚠️ Warning: Do not loosen or remove the cartridge until you have confirmed the vessel is fully depressurized. Removing the cartridge under pressure can cause injury from sudden water discharge.
Step 3 — Disconnect the Handle Linkage
On handle-type fixtures, disengage the flush rod from the handle linkage by unhooking or sliding it free. On push-button models, simply leave the actuator in place — it will be accessed from outside the tank. The cartridge must be accessed without the flush rod in the way.
Step 4 — Remove the Old Cartridge
Use the Flushmate cartridge removal wrench (included in kit purchases, or available separately for $10–$15) to unscrew the cartridge counterclockwise. Standard pliers may work if the wrench is unavailable, but the cartridge cap can be damaged by pliers without the proper fit. Once loose, pull the cartridge straight out of the vessel opening. Note the orientation of the cartridge before removal.
Step 5 — Install the New Cartridge
Insert the new cartridge into the vessel opening and thread clockwise by hand until snug. The critical installation specification: thread the cartridge until exactly one black thread on the vessel remains visible above the cartridge. Open the supply valve fully. Continue threading the cartridge clockwise one-quarter turn at a time — pause after each quarter turn — until water stops running into the bowl and the vessel pressurizes. Do not thread past this point.
Step 6 — Reconnect the Handle and Test
Reconnect the flush rod or handle linkage. Verify actuator clearance is 1/8 inch on push-button fixtures or a nickel-width gap on handle fixtures. Flush three times and observe: flush should be powerful and complete in three to four seconds, refill should stop completely within 60–90 seconds, and no water should trickle into the bowl after refill. If any running continues, adjust the cartridge one additional quarter turn clockwise.
Step 7 — Reinstall the Tank Lid and Monitor
Replace the tank lid. Check around all connections — supply line, tank-to-bowl bolts — for any moisture. Flush five to six times over the next 30 minutes and confirm consistent performance. A successful cartridge replacement produces a noticeable improvement in flush power if the old cartridge had degraded gradually.
Red Flags — Stop and Call a Plumber
Most pressure assist toilet problems are DIY-repairable. These specific situations are not. Stop working on the toilet and contact a licensed plumber if any of the following apply.
🛑 Red Flag 1 — Water Escaping Under Pressure From the Tank
If water is spraying or escaping forcefully from around the tank lid or through cracks in the outer porcelain tank, the pressure vessel may have ruptured. This is a safety emergency. Turn off the supply valve immediately and flush to relieve pressure. Do not use the toilet until a professional has inspected the vessel. Check flushmate.com to determine if your unit is subject to any active safety recall before authorizing repair versus replacement.
🛑 Red Flag 2 — Cracked Porcelain Tank or Bowl
Any crack in the outer ceramic tank or bowl means the toilet must be replaced — not repaired. A cracked tank on a pressure assist toilet is more serious than on a gravity model because the tank is under significant vibration from each flush cycle. A crack that appears minor under normal tank water pressure can propagate and fail suddenly when subjected to the vibration load. Do not attempt to patch or epoxy a cracked pressure assist toilet tank.
🛑 Red Flag 3 — Sewage Odor With Water at the Base
Water pooling at the base of the toilet combined with a sewer gas odor indicates a failed wax ring or a cracked toilet horn (the outlet at the bottom of the bowl). The powerful flush cycle of a pressure assist toilet puts more dynamic stress on the wax seal than a gravity toilet — wax ring failures can occur earlier than expected.
The toilet must be removed, the flange inspected, and the wax ring replaced. If the flange is damaged at the subfloor level, that repair requires a plumber before any toilet reinstallation can proceed.
🛑 Red Flag 4 — Recall Unit Still In Service
Sloan (manufacturer of Flushmate) has issued safety recalls on specific Flushmate III models due to documented bladder failures capable of cracking the porcelain tank lid and causing injury. If your toilet was manufactured between 1997 and 2008, verify your unit against the recall database at flushmate.com before performing any internal repairs. Recall replacement kits were provided at no cost. Operating a recalled unit without the recall kit installed is a safety risk — not a minor oversight.
When to Fix vs. When to Replace Your Pressure Assist Toilet
This is the question most guides avoid answering directly. After twenty years of pressure assist toilet repair and replacement decisions, the answer comes down to three factors: vessel age, problem type, and parts availability. Here is how to apply them.
If the toilet is under 10 years old and the problem is cartridge or duckbill valve related → Repair
A cartridge replacement ($35–$75 in parts) on a vessel less than ten years old is straightforward and cost-effective. The Flushmate vessel itself carries a lifetime warranty on the tank. Internal parts are the wear items. Repair is the right call for anything younger than a decade that doesn’t have structural vessel damage.
If the toilet is 10–20 years old and requires multiple repairs within 12 months → Consider full vessel replacement
Replacing the entire internal Flushmate assembly (vessel, cartridge, gaskets, locknuts) costs $160–$200 for parts alone — versus $250–$800 for a complete new toilet. If the outer porcelain is in good condition and the rough-in and flange are sound, a full internal replacement is a sensible middle path. The labor to swap internals versus a full toilet replacement is only about 30 minutes more.
If the toilet is over 20 years old, on a recall list, or has physical porcelain damage → Replace the entire toilet
A twenty-year-old Flushmate unit that flushes 1.6 GPF is being replaced by 1.1 GPF and 1.28 GPF WaterSense-certified models that can save 4,000 or more gallons annually in a household of four. The efficiency argument for replacement at this age is sound regardless of current repair cost. If the vessel is on the recall list, replacement is the responsible choice — the recall kit resolves the immediate risk, but the underlying vessel age still applies.
↩ When the Answer Flips — When Repair Makes No Sense
If your household has multiple people using the bathroom frequently and the loud flush has always been a complaint, repair is the wrong answer — it’s time to switch to a high-performance gravity toilet. Modern gravity-flush toilets like the TOTO Drake II or American Standard Champion 4 now match or exceed the clog resistance of pressure assist models in residential settings, with flush noise 10–20 decibels quieter.
A pressure assist toilet that works perfectly but drives complaints every time it’s used is not worth maintaining. For more on high-performance gravity options, see the best flushing toilets guide.
Frequently Asked Questions — Pressure Assist Toilet Problems
Q1: What are the most common pressure assist toilet problems and what causes them?
The five most common pressure assist toilet problems are weak or absent flush, continuous run-on after flushing, leaking from multiple possible locations, excessive or abnormal noise, and a flush lever that’s hard to press or sticks.
Almost all of these trace to three root causes: inadequate supply pressure (below 20–25 PSI), a worn or misadjusted flush valve cartridge, or a clogged inlet screen or duckbill valve. The good news is that all three root causes are diagnosable and fixable without specialized plumbing knowledge, as long as the pressure vessel itself is intact.
Q2: How do I fix a pressure assist toilet that won’t flush or flushes weakly?
Start by verifying supply pressure with a gauge — the system needs a minimum of 20–25 PSI, and high-efficiency 1.1 GPF models require at least 35 PSI. Confirm the supply valve is fully open. Then clean the inlet screen at the supply shank and inspect the duckbill valve inside the air inducer cap.
If all of these check out, the flush cartridge likely needs adjustment or replacement. A cartridge-only replacement runs $35–$55 and resolves the problem in the majority of cases where supply pressure is adequate.
Q3: Why is my pressure assisted toilet keeps running after flushing?
A pressure assist toilet that keeps running after the flush cycle has three likely causes: insufficient supply pressure preventing the cartridge from fully closing, a cartridge that’s threaded too loosely (requiring adjustment one quarter-turn clockwise at a time until running stops), or an actuator with incorrect clearance that holds the cartridge partially open at rest. Check pressure first, then cartridge depth, then actuator alignment. If all three are correct and the toilet still runs, the cartridge seals are worn and the cartridge needs replacement.
Q4: How much does it cost to repair a pressure assist toilet?
DIY repair costs range from under $15 (duckbill valve or inlet screen cleaning) to $50–$75 (complete flush cartridge kit with wrench). A full internal Flushmate assembly replacement — if the vessel itself needs to go — runs $160–$200 in parts. If a plumber handles the repair, expect $150–$250 for a cartridge replacement including labor, and $300–$450 for a full internal assembly replacement. A new pressure assist toilet installed professionally runs $400–$1,000 depending on the model and local labor rates.
Q5: Is a noisy pressure assist toilet normal, or does the noise indicate a problem?
The loud whoosh during the flush cycle — approximately 96 decibels lasting three to four seconds — is normal for pressure assist operation and is not a defect. What indicates a problem is hissing or whistling during the refill cycle (inlet restriction), a sudden bang or pop during flush (possible vessel failure), or gurgling that continues after the flush ends.
A refill sound that has become louder over recent months points to a clogged duckbill valve or inlet screen. Normal operation is loud but brief — abnormal noise persists into the refill phase.
Q6: How long does a pressure assist toilet last, and when is it time to replace instead of repair?
A well-maintained pressure assist toilet can last 25–30 years, five years longer than the typical gravity model. The Flushmate vessel itself carries a lifetime warranty on the tank. Internal wear parts — cartridge, duckbill valve, inlet screen — need attention every 7–12 years under normal residential use.
Replacement is the right choice when the toilet is over twenty years old and requires multiple repairs within a year, when the vessel is on a safety recall list without the repair kit installed, or when the outer porcelain is physically cracked. For any toilet under twenty years old with an intact vessel, a full internal assembly replacement ($160–$200 in parts) is often more economical than a full toilet swap.
✅ Summary — Pressure Assist Toilet Problems: What to Do
If your pressure assist toilet has a weak flush or won’t flush at all → Check supply pressure first (minimum 20–25 PSI), then clean the inlet screen and duckbill valve. If both are clear, replace the flush cartridge ($35–$75). Supply pressure below the minimum threshold is the most common cause that no cartridge will fix.
If your pressure assist toilet is leaking or keeps running → Identify the leak location before ordering any parts. A trickle into the bowl is a cartridge adjustment or replacement issue. Water at the bolts is a hardware tightening issue. Water escaping under pressure from the tank or at the lid is a red flag requiring professional inspection immediately.
If your pressure assist toilet is over 20 years old or on a Flushmate recall list → Repair is not the right answer. Check the recall database at flushmate.com, and evaluate a full replacement — modern 1.1 GPF WaterSense-certified pressure assist or high-efficiency gravity models will outperform an aging system and reduce water consumption by 4,000+ gallons annually for a household of four. For guidance on high-performance replacement options, see the best flushing toilets guide and the complete toilet buying guide.
Pressure Assist vs. Gravity Flush Problems — What’s Different and Why
Homeowners who have only owned gravity toilets are often confused when pressure assist toilet repair advice doesn’t apply to their symptoms — and vice versa. The two systems fail in fundamentally different ways.
A gravity toilet that runs constantly has a failed flapper or a waterlogged float — both are $10–$20 fixes with parts at any hardware store. A pressure assist toilet that runs constantly has a cartridge depth issue, an actuator gap problem, or a pressure supply deficiency — none of which a flapper addresses.
On the flip side, gravity toilets are significantly more vulnerable to clogging and ghost flushing — a toilet that flushes on its own due to slow flapper leaks that drop the water level. Pressure assist toilets almost never clog under normal residential waste loads.
They don’t ghost-flush because there is no standing water to slowly leak past a flapper. The sealed vessel either holds pressure or it doesn’t — there’s no slow deterioration of the kind that produces a gravity toilet’s characteristic “running for three seconds every twenty minutes.”
Parts availability is a real factor in pressure assist toilet repair. Unlike gravity toilet components — flappers, fill valves, and float assemblies interchangeable across brands — pressure assist cartridges and duckbill valves are Flushmate model-specific. Big-box hardware stores often don’t stock the correct part.
Order directly from Flushmate or a plumbing supply house rather than substituting a generic part that won’t seat correctly. For help comparing the two systems, the best flushing toilets review covers both types in detail.
Replacing a Pressure Assist Cartridge — Parts, Cost, and Where to Buy
The flush valve cartridge is the most frequently replaced pressure assist toilet part, and getting the right part before starting the repair saves a second trip or a week’s wait on shipping. Flushmate cartridges are model-specific. The Flushmate Series 503 and 503H cartridges are not the same as the Series 504 cartridge. The model designation is printed on the label affixed to the vessel inside the tank — look for a sticker with “FLUSHMATE” and a model number beginning with “M” followed by digits.
A replacement flush valve cartridge runs $35–$55 purchased directly from Flushmate or a plumbing supply house. The complete service kit — cartridge, duckbill valve, and cartridge removal wrench — runs $50–$75 and is the better purchase if you don’t already own the wrench. Standard pliers can remove many cartridges, but the hex fitting on the cartridge cap is sized for the proprietary wrench and pliers risk damaging the cap, making future removal more difficult.
Home Depot and Lowe’s carry Flushmate parts inconsistently — call ahead to confirm stock before making the trip. Online ordering from flushmaterepairparts.com or directly from Sloan (the manufacturer) guarantees the correct model. If your toilet bowl needs replacement at the same time as internal repairs, review the complete toilet buying guide for current model recommendations across all performance categories.
Pressure Assist Toilet Maintenance — Preventing Problems Before They Start
Pressure assist toilet maintenance requirements are lighter than gravity toilets because there is no flapper to degrade, no float assembly to corrode, and no open water in the tank to allow mineral buildup on surfaces. The system has fewer moving parts by design. That said, the parts that do move are under pressure — and they benefit from periodic attention.
Once a year, shut off the supply, relieve pressure, disconnect the supply line, and inspect the inlet screen. In homes with hard water — typically 120 mg/L hardness or higher — the screen can accumulate mineral scale that subtly restricts flow without causing obvious failure. A two-minute rinse under running water prevents the gradual flush weakening that develops over 18–24 months. At the same time, check the duckbill valve condition and the supply line connection for any seepage at the fittings.
Every three to five years, verify that home supply pressure is within the correct operating range using a gauge attached to the supply valve. House water pressure can shift as municipal supply systems change or as PRV settings drift — a pressure reading that was 50 PSI when the toilet was installed may have dropped to 22 PSI over a decade.
Proactive pressure verification is the single maintenance step most likely to prevent the majority of pressure assist toilet problems before they develop. For related bathroom fixture guidance, see the best toilet fill valve guide for gravity toilet maintenance reference.