Walk into any hardware store and ask for a toilet shut-off valve size and type, and you’ll get handed three different options — and they all look nearly identical. The difference between them is whether your replacement holds for 15 years or starts weeping at the compression fitting within a month. Getting this wrong means a return trip with the main water shut off, the bathroom flooded with towels, and the whole job done twice.
This guide covers the exact standard toilet shut-off valve size used in nearly every U.S. home, the five valve types and which fits your pipe material, the full step-by-step replacement procedure, and the specific conditions where you stop and call a plumber. Whether you’re dealing with a leaking toilet shutoff valve or planning a proactive upgrade, you’ll leave here knowing exactly what to buy and how to install it correctly.
⚠️ The Most Common Mistake — Confusing Inlet Size with Outlet Size
Most homeowners grab a valve labeled “3/8 inch” assuming it matches the pipe coming out of the wall — but that 3/8 inch refers to the outlet (where the supply line connects to the toilet), not the inlet (where the valve meets your wall pipe). The inlet on nearly every toilet shutoff valve is 1/2 inch.
Buying a 3/8 x 3/8 valve for a 1/2-inch copper stub-out is the single most common error I see on these jobs. The correct part is always labeled 1/2″ NOM x 3/8″ OD Compression.
📋 Who This Guide Is For & What It Covers
Covers: Standard residential toilet angle stop valves, compression and push-to-connect types, quarter-turn ball valve upgrades, and complete DIY replacement on copper, PEX, and CPVC supply pipe.
Does NOT cover: Main water line shutoffs, whole-house gate valves, or commercial 3/4-inch supply valve replacement. Soldered sweat-fit valve replacement is noted but requires professional execution.
Tools needed: Adjustable wrench (10-inch), basin wrench or slip-joint pliers, compression sleeve puller (optional), Teflon tape, bucket, towel, emery cloth.
What Is a Toilet Shut-Off Valve?
The toilet shut-off valve — also called a stop valve, angle stop, or supply valve — sits between your home’s water supply pipe and the toilet’s fill valve. Its sole job is to isolate water flow to a single fixture without requiring you to shut off water to the entire house. Every residential toilet in the U.S. should have one within 12 inches of the toilet’s supply inlet, typically mounted to the wall behind the bowl near the floor.
The valve body connects on two ends: the inlet (the pipe coming out of your wall or floor) and the outlet (the braided stainless supply line running up to the toilet tank). Understanding the difference between those two connection points is the foundation of choosing the right replacement. A toilet fill valve is the internal tank component — the shut-off valve is the external supply control upstream of it.
Shut-off valves rarely get operated during normal use, sometimes going 10–15 years without being turned. That inactivity is what kills them. The internal rubber washers dry-rot, the stem corrodes, and the packing deteriorates — so when you finally turn it to make a repair, it leaks. Proactive replacement every 8–10 years eliminates that risk.
Standard Toilet Shut-Off Valve Size Explained
The standard toilet shut-off valve size is 1/2 inch NOM inlet × 3/8 inch OD compression outlet. That designation appears on the valve’s packaging and tells you everything about how it connects on both ends. In 95% of U.S. residential bathrooms built after 1970, those are the exact dimensions you need — no guessing, no adapters.
Here’s what those numbers actually mean on your pipe:
| Measurement | What It Refers To | Standard U.S. Residential |
|---|---|---|
| Inlet (Wall Side) | Pipe stub-out from wall/floor | 1/2″ NOM (Nominal) or 1/2″ OD Compression |
| Outlet (Toilet Side) | Supply line connection | 3/8″ OD Compression |
| Full Label | How it appears in stores | 1/2″ NOM x 3/8″ OD Compression Angle Stop |
| Older Homes (pre-1970) | May have galvanized pipe | 1/2″ FIP (Female Iron Pipe) inlet needed |
| Supply Line Connection | Toilet tank ballcock inlet | 7/8″ Ballcock nut (standard across all brands) |
One point that trips up a lot of DIYers: the 1/2-inch inlet measurement refers to the nominal pipe size (NPS), which is an industry standard designation — not the actual outside diameter of the copper pipe. A 1/2-inch copper pipe has an OD of 5/8 inch. The NOM label accounts for this, so don’t measure your copper stub-out and go looking for a valve with a 5/8-inch inlet. Look for the NOM designation and it will fit correctly.
If you have a 1/2-inch PEX supply pipe, the OD is exactly 5/8 inch — and you’ll need a PEX-specific angle stop with a PEX barb or push-to-connect inlet, not a compression valve. The external dimensions look similar, but the fitting mechanism is entirely different. Forcing a compression ferrule onto PEX tubing causes a leak within weeks.
Types of Toilet Shut-Off Valves
Not every shut-off valve is the same — they differ in shape, operation mechanism, and the pipe material they’re designed for. Picking the wrong type forces you to cut and repipe the stub-out, which is an unnecessary job when you just needed a $15 valve swap. Here are the five types you’ll encounter on a toilet supply line.
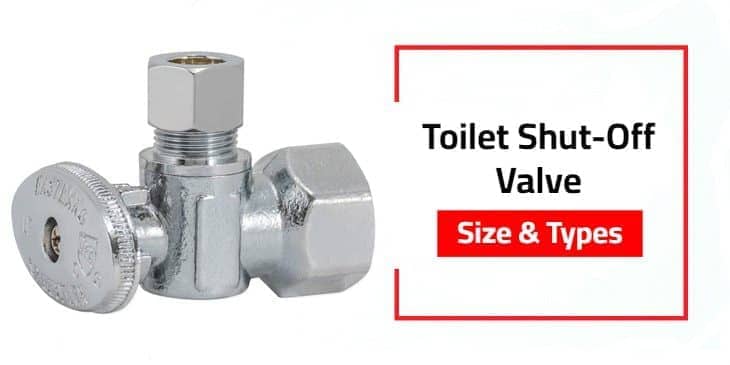
1. Angle Stop Valve (Toilet Angle Stop Valve) — Most Common
The toilet angle stop valve routes water at a 90-degree turn — inlet from the wall, outlet directed upward toward the tank. This 90° configuration is why it’s called an “angle” stop. It’s the standard configuration for virtually all toilet installations where the supply pipe exits the wall horizontally behind the bowl. Available as compression, push-to-connect, and sweat-fit. Quarter-turn ball valve models are now the preferred angle stop style.
2. Straight Stop Valve — Floor-Entry Supply Lines
Inlet and outlet run in a straight line — water enters from the floor pipe and exits directly upward to the supply hose. Use a straight stop valve only when your supply pipe exits the floor beneath the toilet. Using an angle stop where a straight stop is required means the supply line must bend unnaturally, stressing the hose fitting at the tank inlet and creating a slow leak point over time.
3. Quarter-Turn Ball Valve — Best Replacement Choice
The quarter turn toilet shut-off valve uses an internal brass ball with a hole bored through it — rotate the handle 90° and it’s open; another 90° and it’s fully sealed. No washers, no packing to deteriorate, no corroding stem. Quarter-turn ball valves are the professional-grade upgrade for multi-turn compression valves.
They cost $8–$22 more at the hardware store but eliminate the primary failure mode of older multi-turn designs. If you’re replacing a valve today, choose a quarter-turn ball valve in angle or straight configuration to match your supply pipe exit point.
4. Multi-Turn Compression Valve — Common in Older Homes
Requires multiple full rotations to fully open or close — uses a rubber seat washer that compresses against a brass seat to stop flow. These have been standard in American bathrooms since the 1960s, which is why they’re still in millions of homes. They work on copper, CPVC, and CPVC supply stubs.
The problem is those rubber washers degrade over years of inactivity. If your existing valve is a multi-turn compression type and it’s more than 10 years old, replace it proactively with a quarter-turn ball valve. Don’t wait for it to fail mid-repair.
5. Push-to-Connect (SharkBite-Style) — For PEX and Quick Repairs
Slides onto the pipe until it clicks — internal teeth and an O-ring create a watertight seal without any tools, ferrules, or solder. SharkBite is the dominant brand in this category. Push-to-connect angle stops work on copper, PEX, CPVC, and PE-RT pipe — making them the most versatile toilet supply valve available. Cost runs $20–$45, significantly higher than compression valves.
They’re ideal in tight spaces where a wrench can’t get proper leverage on a compression nut. One limitation: unlike soldered connections, push-to-connect valves are not considered permanent and may be prohibited in some jurisdictions for concealed installations.
| Supply Pipe Material | Compatible Valve Type | Best Choice |
|---|---|---|
| Copper | Compression, Sweat, Push-to-Connect | Quarter-turn compression angle stop |
| PEX | PEX barb/crimp, Push-to-Connect | SharkBite push-to-connect angle stop |
| CPVC | Compression, Push-to-Connect, CPVC solvent | Compression angle stop (CPVC-rated) |
| Galvanized Steel | Female Iron Pipe (FIP/NPT) threaded | 1/2″ FIP angle stop + Teflon tape |
How to Replace a Toilet Shut-Off Valve — Step-by-Step
This procedure covers the most common scenario: replacing a compression-fit or threaded angle stop valve on a copper supply stub-out with a new quarter-turn compression ball valve. Time required: 30–60 minutes. Skill level: intermediate DIY. You’ll need the main water shutoff location before starting — don’t begin without knowing exactly where it is.
Step 1 — Shut Off the Main Water Supply
Locate your home’s main shutoff valve — typically in the basement, utility room, or exterior meter box. Turn it fully clockwise until it stops. If you have a quarter-turn ball valve as your main, the handle should be perpendicular to the pipe in the closed position. Do not attempt to use the existing toilet stop valve to isolate water — if it’s failed or compromised, it won’t hold, and you’ll have an active leak during removal.
Step 2 — Drain the Lines and Prepare the Work Area
Flush the toilet to empty the tank. Then open a faucet on a lower floor of the house — this relieves pressure in the line and allows remaining water in the supply pipe to drain before you remove the valve. Place a bucket and a folded towel under the shut-off valve. Expect 8–16 oz of residual water to drain from the stub-out when the valve is removed.
Step 3 — Disconnect the Supply Line
Use an adjustable wrench to loosen the supply line nut at the valve outlet — turn counterclockwise. Hold the valve body still with your other hand or a pair of slip-joint pliers so you don’t stress the wall connection. If the supply line is 7 or more years old, replace it now while everything is apart. Stainless braided supply lines cost $6–$12 and supply line failures — not valve failures — are one of the top causes of bathroom flooding.
Step 4 — Remove the Old Valve
The removal method depends on your valve type:
Compression valve: Loosen the inlet compression nut counterclockwise. Once loose, the valve and compression ferrule (brass ring) slide off the pipe. The ferrule may be stuck — use a compression sleeve puller tool ($28–$35 at plumbing supply houses) to remove it cleanly without marring the copper. Never try to cut the ferrule off with a saw — you’ll nick the pipe and need to cut and re-extend it.
Threaded valve (galvanized): Hold the pipe with one wrench and turn the valve body counterclockwise with a second wrench. Clean old Teflon tape completely from the threads before installing the new valve.
Step 5 — Prepare the Pipe and Install the New Valve
Use emery cloth or fine-grit sandpaper to clean the first 1.5 inches of the copper stub-out — oxidation on the pipe surface prevents a clean ferrule seal. Wipe clean with a dry cloth.
For compression fitting: Slide the new compression nut onto the pipe (threads facing outward), then slide the new brass ferrule onto the pipe. Push the new valve body onto the pipe until it seats. Hand-tighten the compression nut.
Then use two wrenches — one holding the valve body still, one tightening the nut — and turn exactly one half-turn (180°) past hand-tight. That is the correct torque for a 1/2-inch compression fitting. Over-tightening crushes the ferrule and causes a leak at the fitting rather than preventing one.
Step 6 — Reconnect the Supply Line and Restore Water
Turn the new valve to the closed position before restoring main water. Then turn the main shutoff back on slowly. Open the new toilet valve counterclockwise — the tank will begin filling. Watch the compression fitting at the inlet and the supply line connection at the outlet for 90 seconds. No drips = the job is done.
If you see a slow weep at the compression nut, shut the main off, drain the line, and tighten the nut by an additional 1/8 turn maximum. Do not continue tightening past that — the ferrule has likely seated and over-tightening will split it.
⚠️ Critical — Do Not Over-Tighten the Compression Nut
The correct specification is hand-tight + 1/2 turn (180°) with a wrench. Tightening beyond 3/4 turn deforms the ferrule, cracks the nut, or crushes the stub-out — all of which require cutting the pipe back 2 inches to start over. If it leaks after one full tightening pass, the ferrule is damaged. Replace the ferrule, not just the nut.
Toilet Shutoff Valve Leaking: Causes & Fixes
A toilet shutoff valve leaking is one of those problems that looks minor until it isn’t. Slow drips at the compression fitting wet the subfloor. Packing nut leaks around the stem go unnoticed behind the toilet for months. Here are the four specific leak scenarios and what each one means for your repair plan.
Leak at the Compression Nut (Inlet)
Cause: Ferrule not fully seated, ferrule damaged, or pipe surface was corroded at installation. Fix: Tighten the compression nut 1/8 turn at a time. If no improvement after 1/4 turn total, shut off main and replace the ferrule. A $1.50 brass compression ferrule is almost always the culprit. Replacing just the ferrule — not the entire valve — resolves most inlet leaks.
Leak Around the Valve Stem (Packing Nut)
Cause: Packing material has dried out or deteriorated — common in multi-turn valves not operated in years. Fix for multi-turn valves: Tighten the packing nut (the hexagonal nut directly behind the handle) 1/8 turn clockwise with an adjustable wrench. This compresses the packing against the stem and often stops the weep. If it doesn’t stop after two small adjustments, the packing is gone — replace the entire valve. Packing-nut leaks are a clear signal a quarter-turn upgrade is overdue.
Leak at the Outlet / Supply Line Connection
Cause: Supply line nut not fully tightened, or the nylon or rubber washer inside the line nut has flattened. Fix: Turn the supply line nut clockwise 1/4 turn with an adjustable wrench — do not use pliers directly on the braided stainless exterior. If the leak persists, the washer is bad. Braided stainless supply lines ($6–$12) include a fresh washer — replace the line, not just the washer.
Valve Won’t Close — Water Continues Flowing
Cause: Internal seat washer has disintegrated or the ball valve seat is damaged. This is not fixable. A valve that won’t fully close is a failed valve. Replace the entire unit. Do not attempt to rebuild an angle stop — the repair cost in parts and time exceeds the cost of a new valve at $12–$35. The only situation where full replacement is delayed is if the main shutoff is also compromised — in which case, call a licensed plumber before doing anything else.
Stop and Call a Plumber — Red Flags
Most toilet shut-off valve replacements are solid DIY work. But three specific conditions in this job move it outside DIY territory — and proceeding without professional help in these cases typically results in a burst pipe, a flooded bathroom, or a permit issue.
🚨 Red Flag 1 — Your Main Shutoff Won’t Close
If you turn your main shutoff fully clockwise and water is still flowing — even a slow trickle — stop immediately. You cannot safely replace a toilet angle stop with live water pressure on the line. A licensed plumber has the tools to shut off at the street meter, replace the main valve, and then complete the toilet work. Attempting to force through this situation with towels and speed is how kitchens and bathrooms flood.
🚨 Red Flag 2 — The Stub-Out Pipe Is Corroded or Cracked
Once you remove the old compression nut, inspect the exposed copper stub-out closely. Green oxidation is normal. White calcium buildup wipes off. But if you see pitting, pinhole corrosion, or a hairline crack in the copper, do not attempt to install a new compression fitting over that section. The ferrule will not seal on damaged pipe. The section needs to be cut back to clean copper and a new stub-out extension sweat-soldered in — this is a trade-level job.
🚨 Red Flag 3 — You Have a Sweat (Soldered) Valve with No Compression Alternative
If the original valve was soldered directly to the copper pipe and the stub-out is too short for a push-to-connect replacement to seat properly (minimum 1 inch of exposed clean pipe required), the job requires a propane torch and silver solder to install a new fitting.
Open flame soldering in a confined bathroom space — near a wood subfloor and drywall — is a fire risk for anyone who hasn’t done it professionally. One misplaced torch tip causes a wall fire. Hire a plumber for sweat-only configurations.
What Competitors Miss: NPS vs. OD vs. Compression Sizing
Every guide I’ve reviewed on toilet shut-off valve sizing treats all “1/2-inch” measurements as interchangeable. They aren’t, and that gap in explanation is exactly what sends plumbers back for a second visit. Here’s the breakdown that every homeowner actually needs:
NPS (Nominal Pipe Size) — 1/2″ NPS Copper Pipe Has an OD of 5/8″
Nominal pipe size is a designation that does not match actual measured dimensions. A 1/2″ NPS copper stub-out measures 0.625 inches (5/8 inch) on the outside. If you put a caliper on your copper stub-out and measure 0.625 inches, that’s a standard 1/2″ nominal pipe — and you need a valve labeled “1/2″ NOM Inlet,” not “5/8″ inlet.” The valve’s compression nut is sized to engage the ferrule on a 5/8″ OD pipe while carrying the 1/2″ NOM designation.
OD (Outside Diameter) — PEX Sizing Is Different
PEX pipe sizes do closely match nominal designations. A 1/2″ PEX pipe has an OD of approximately 5/8 inch — essentially matching copper. However, the critical difference is pipe wall stiffness. A compression ferrule needs a rigid pipe wall to seat against. PEX is flexible — ferrules deform PEX tubing rather than seating cleanly. Use push-to-connect valves (SharkBite type) on PEX, not standard brass compression fittings. Mixing the two results in a slow leak at the ferrule that worsens over months.
IPS/FIP (Iron Pipe Size / Female Iron Pipe) — For Threaded Galvanized Only
If your stub-out is galvanized steel with external threads, the measurement standard is IPS, not NPS or OD. A 1/2″ IPS stop valve has threads that match 1/2″ galvanized pipe. The thread pitch (NPT — National Pipe Taper) is the same as standard pipe thread, but the valve body is designed to thread directly onto the pipe stub without a ferrule.
Always wrap with three layers of Teflon tape and thread on clockwise — the connection is complete at hand-tight + 1 to 1.5 additional turns max.
🔄 When the Answer Flips — When NOT to Replace the Valve Yourself
If your stub-out is under 1 inch in length (measured from the wall face to where the old ferrule compressed), you cannot fit a new compression ferrule or a SharkBite fitting properly. The job becomes a wall-opening and pipe-extension project — call a plumber.
If the valve has been leaking into the wall cavity (not just onto the floor), there may be mold or structural damage behind the drywall. The valve replacement is the easy part — the remediation is not.
If you’re upgrading from galvanized to copper supply pipe while you’re in there — this is not a toilet valve job anymore. That’s a full supply line repipe requiring permits in most jurisdictions.
| Your Condition | Pipe Type | Best Valve Choice | DIY or Pro? |
|---|---|---|---|
| Standard wall-exit, copper | Copper 1/2″ NOM | 1/2″ NOM x 3/8″ OD compression quarter-turn angle stop | ✅ DIY |
| PEX supply, modern home | PEX 1/2″ | SharkBite 1/2″ PTC x 3/8″ OD angle stop | ✅ DIY |
| Floor-exit supply pipe | Copper or PEX | Straight stop valve (not angle stop) | ✅ DIY |
| Galvanized steel, older home | Galvanized 1/2″ IPS | 1/2″ FIP x 3/8″ OD angle stop + Teflon tape | ⚠️ Experienced DIY |
| Soldered (sweat) valve, short stub-out | Copper | Push-to-connect if 1″+ of clean pipe; otherwise solder extension | 🚨 Call a plumber |
Frequently Asked Questions
What is the standard toilet shut-off valve size and type for most U.S. homes?
The standard toilet shut-off valve size is 1/2 inch NOM inlet × 3/8 inch OD compression outlet. This configuration fits nearly all residential toilets in the U.S. built after 1970 where the supply pipe exits the wall as a copper or CPVC stub-out. The valve type most commonly installed is a quarter-turn ball valve angle stop — it replaces the older multi-turn compression design that was standard for decades.
The “1/2 x 3/8” designation appears on the valve box at any hardware store, and that’s the part you need without measuring or guessing for a standard bathroom.
How do I know if I need an angle stop or a straight stop valve?
Look at where the supply pipe exits your wall or floor. If the pipe exits horizontally from the wall behind the toilet bowl, you need an angle stop valve — it routes the water at 90 degrees upward toward the tank. If the pipe comes vertically up through the floor beneath or near the toilet base, you need a straight stop valve, which passes water straight through without redirecting it.
Installing the wrong orientation forces the supply line into an unnatural bend and creates a stress point at both connection ends over time. Match the valve body geometry to the pipe exit direction — it’s that straightforward.
Is a quarter-turn valve better than a multi-turn compression valve for toilet shut-off?
Yes, the quarter turn toilet shut-off valve is the professional standard for new installations and replacements. Multi-turn compression valves use rubber seat washers that degrade when the valve sits unoperated for years — which is the normal operating condition for a toilet stop valve. Quarter-turn ball valves use a solid brass ball with no washers to deteriorate, and the internal seat doesn’t degrade from inactivity.
They cost $8–$22 more than compression valves at retail but eliminate the primary failure mode. Plumbers upgrading bathrooms in 2024–2026 use quarter-turn ball valves exclusively for all new toilet angle stop installations.
Why is my toilet shutoff valve leaking after I just tightened it?
A toilet shutoff valve leaking after tightening usually means the brass compression ferrule has seated improperly or is damaged. If you can still see a drip at the inlet compression nut after tightening 1/4 turn past your first snug point, the ferrule needs to be replaced — not further tightened. Continuing to tighten a seated-but-leaking compression joint deforms the ferrule permanently and often cracks the nut itself.
Shut off the main, drain the line, remove the compression nut, pull the old ferrule off with a compression sleeve puller, install a new $1.50 brass ferrule, and reassemble. If the leak is at the packing nut (the nut behind the handle), it’s a different problem — tighten that nut 1/8 turn at a time until the weep stops.
Can I replace a toilet shut-off valve without shutting off the main water?
No — and this is one of the most frequent mistakes I see attempted. If the toilet shut-off valve itself has failed (which is the reason you’re replacing it), it cannot be relied upon to isolate the line while you work. Even if the valve partially closes, residual pressure in the line will spray water the moment the inlet compression nut is loosened.
The only safe approach is to shut off the main water supply, relieve line pressure by opening a lower faucet, flush the toilet to drain the tank, and then proceed with removal. The main shutoff is the non-negotiable starting point for this job, every single time.
How long does a toilet angle stop valve last?
A quality brass quarter-turn ball valve angle stop lasts 15–25 years under normal residential use. Multi-turn compression valves fail in 8–15 years, most often failing when first operated after years of inactivity. Valves installed in areas with hard water (above 150 ppm hardness) or high water pressure (above 80 PSI) fail faster — mineral buildup seizes the ball or erodes the compression seat.
The common recommendation is to test your toilet shut-off valve once per year by operating it fully open to closed and back, and to replace proactively at the 10-year mark for compression valves or the 15-year mark for ball valves. Replacement labor and parts cost $40–$120 — far less than a $3,000–$8,000 water damage claim from a failed valve.
✅ Verdict: Matching Your Situation to the Right Valve
If you’re replacing a standard toilet valve on copper pipe in a home built after 1970 → buy a 1/2″ NOM x 3/8″ OD compression quarter-turn angle stop. That’s the correct part for 90% of residential toilet replacements in the U.S. Complete the job yourself in 30–60 minutes following the procedure above.
If your supply pipe is PEX or you’re working in a tight space where a wrench can’t get proper leverage → choose a SharkBite push-to-connect angle stop. It works on copper, PEX, and CPVC without ferrules or wrenches, and installs in under 5 minutes once the line is drained.
If the stub-out is corroded, shorter than 1 inch, or the valve is soldered and there’s no clean pipe to work with → this job has moved past DIY. Call a licensed plumber before you open the wall or cut any pipe. A plumber charges $150–$350 to replace a toilet angle stop under those conditions — a fraction of what you’ll spend on water damage remediation if the job goes wrong.
Toilet Angle Stop Valve: What Makes It Different from Other Stop Valves
The toilet angle stop valve is the most installed plumbing valve in residential bathrooms — and most homeowners couldn’t identify it if they opened the cabinet below the sink. The defining characteristic is the 90-degree internal turn between inlet and outlet. Water enters horizontally from the wall pipe and exits vertically toward the toilet tank supply line. That redirection happens inside a compact brass body no larger than a golf ball, without elbows or external fittings.
Angle stops differ from straight stops (inline flow, used for floor-exit supply lines) and ball valves (which can be used at the main supply in angle or straight configuration). Most modern angle stops use a quarter-turn ball design internally — the handle rotates 90 degrees between full open and full close. Older angle stops use a rising stem with a seat washer.
You can tell them apart immediately: a multi-turn valve requires 3–5 full handle rotations to close; a ball valve reaches full closed in one quarter rotation with a firm stop.
For anyone planning a fill valve replacement or a full toilet installation, upgrading the angle stop at the same time makes sense — the main is already off and the supply line is already disconnected. The incremental cost is $12–$25 for the valve and under 10 additional minutes of work.
Quarter Turn Toilet Shut-Off Valve: Why Plumbers Don’t Install Anything Else
Every plumber I know — including those I’ve trained under and those I’ve worked alongside for the last two decades — uses quarter turn toilet shut-off valves exclusively for all new and replacement work. The reasoning is simple: the multi-turn compression valve’s primary failure mechanism is rubber deterioration, and toilet valves are operated roughly zero times per year under normal conditions.
A washer that never moves never gets replaced. A washer that never gets replaced eventually crumbles — and when it does, it’s always during a repair when you need the valve to actually stop water flow.
Quarter-turn ball valves eliminate that failure mode entirely. The internal brass ball and PTFE (polytetrafluoroethylene) seats don’t compress against anything — they rotate. There’s no washer to dry-rot. The ball stays functional whether it’s operated daily or left in one position for a decade. Brass ball valve bodies also resist the mineral scaling that seizes multi-turn stems in hard water areas — a relevant factor in most of the Southwest, Midwest, and Mid-Atlantic regions where water hardness exceeds 120 ppm.
When shopping, look for quarter-turn angle stops with a lead-free certified brass body and a chrome-plated finish. Budget options in zinc alloy or plastic-bodied construction may match the price, but brass handles the thermal cycling and pressure fluctuations in residential water lines far better over a 15-year service life. For a complete overview of the toilet’s internal water management, see our guide on the best toilet fill valves and how they interact with the supply valve downstream.
How to Replace a Toilet Shut-Off Valve: 3 Situations Where the Process Differs
The core procedure for how to replace a toilet shut-off valve is consistent — shut off main, drain, disconnect supply line, remove old valve, prep pipe, install new valve, restore water, check for leaks. But three installation scenarios require meaningfully different execution, and treating them identically is where DIY replacements go wrong.
Scenario 1 — Compression to Compression Replacement (Most Common): The old and new valves both use compression fittings. The ferrule from the old valve must come off — don’t try to reuse it. A compression sleeve puller removes the old ferrule cleanly in under 30 seconds. Install the new ferrule from the replacement valve kit and proceed. Reusing an old, deformed ferrule is the single most common cause of a leak-after-replacement call-back on this job.
Scenario 2 — Replacing a Soldered Valve with Push-to-Connect: Cut the pipe with a pipe cutter 1/2 inch beyond the solder joint — not through it. Deburr the cut end with the built-in reamer on the cutter. Verify there is at least 1 full inch of clean, straight pipe exposed before inserting the SharkBite fitting.
Push firmly until you feel the click. Mark the insertion depth with a permanent marker on the pipe before pushing — most SharkBite angle stops show insert depth on the valve body. Check the depth mark is at the fitting face after installation.
Scenario 3 — Threaded Galvanized Replacement: Old galvanized pipe threads corrode and can shear during removal. Apply penetrating oil (PB Blaster, not WD-40) to the threads at the wall face and let it soak 15 minutes before attempting to turn the valve. Use two wrenches — one holding the pipe still at the wall, one on the valve body — to prevent torquing the pipe inside the wall.
If the valve won’t break loose after 30 pounds of force, stop and cut the galvanized stub-out with a reciprocating saw, leaving enough thread exposed for a new threaded fitting. Forcing a corroded galvanized joint causes pipe failure inside the wall cavity — which is a much larger repair than valve replacement.
For anyone tackling a broader bathroom plumbing overhaul, our guides on standard toilet rough-in size and toilet installation costs cover the surrounding work in the same level of procedural detail. And for the toilet itself, the best flushing toilets guide covers what to look for if you’re replacing the bowl at the same time as the valve.