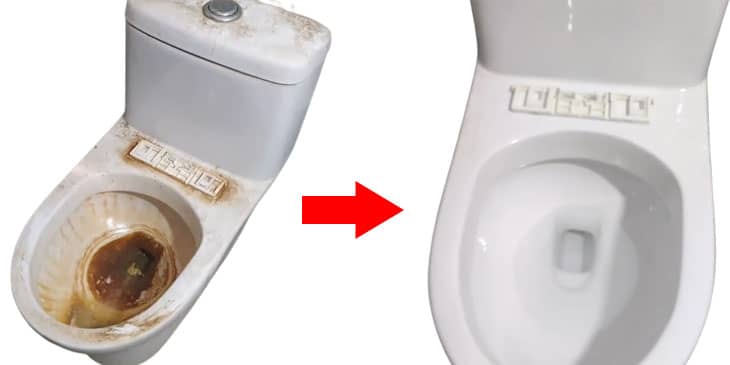
In 2021, U.S. poison control centers logged 4,800 calls from people who mixed two of the most popular toilet cleaners together — bleach and vinegar — and released chlorine gas inside their bathrooms. That single statistic tells you why learning how to clean a toilet perfectly starts with the chemistry you skip, not the chemicals you buy. The difference between a spotless bowl and a hospital visit is understanding which products never touch each other, and in what order professional plumbers actually clean.
This guide walks through the exact 8-step procedure I use on job-site toilets after installations, plus the deep-cleaning methods for the three problem areas most tutorials miss: under-rim jets, the tank, and mineral-stained waterlines. It is written for homeowners who want a genuinely clean toilet — not a surface wipe-down — and who own a standard vitreous china bowl.
After reading this, you will know which product to reach for, which tool to keep away from porcelain, and how often each stage of cleaning actually needs to happen.
Tools assumed: Basic bathroom supplies, a toilet brush, rubber gloves. No plumbing experience required.
What this does NOT cover: Clearing clogs (that is a plunger or auger job, not a cleaning job), removing a toilet for installation, repairing a running fill valve, or cleaning commercial flushometer toilets.
Call a plumber instead if: the toilet leaks at the base, the tank won’t hold water, or you see cracks in the porcelain. Cleaning won’t fix any of those.
Tools And Materials You Need To Clean A Toilet Perfectly
Most bathroom cleaning fails because people improvise with whatever is under the sink. The pro kit is short — about $25 total — and cleaning is twice as fast once you stop substituting. Here is the exact list I carry to service calls when a homeowner asks for a post-install deep clean.
If the toilet itself is worn out, no amount of cleaning will bring it back. Scoring and pitting means the glaze is gone and stains will return within days. For replacement guidance, see the full breakdown at best toilets to buy or the category guides like best one-piece toilets (easier to clean — no seam between tank and bowl).
The 8-Step Procedure To Clean A Toilet Perfectly
Order matters. Top-to-bottom, dry-to-wet, exterior-to-interior — cleaning out of sequence spreads contamination. This sequence takes 20–25 minutes for a weekly clean and about 60 minutes for a full deep clean that includes the tank and rim jets.
Open the bathroom window or run the exhaust fan before any cleaner comes out of the bottle. Closed bathrooms concentrate fumes from bleach, ammonia, and acid cleaners fast. Move rugs, trash cans, and anything decorative off the floor around the toilet — they will get splashed. Put on gloves now, not after the cleaner is already on your hands.
Flush once to wet the bowl surface. Squeeze bowl cleaner under the rim all the way around, then let it run down the sides. Do not scrub yet. Cleaner needs 10 minutes of contact time to actually kill bacteria — the CDC’s recommended dwell time for chlorine disinfection. Scrubbing immediately wastes most of the cleaner’s power.
Use disinfecting wipes in this exact order: tank lid, flush handle, back of tank, sides of tank, outside of bowl, base and floor around the toilet. Top-down prevents re-contaminating surfaces you already wiped. The flush handle carries more bacteria per square inch than the seat does — it gets touched before handwashing, not after. Switch to a fresh wipe whenever the current one looks soiled.
Lift the seat. Wipe the top of the lid, then the top and bottom of the seat itself. Use the old toothbrush along the hinge seam where the seat bolts meet the bowl — urine splash and mineral residue build up there and standard wipes can’t reach. If the seat is wood or painted, use a mild disinfectant, not bleach, which strips the finish. For seat replacement information, see our guide on the best toilet seat options.
After the 10-minute dwell, scrub in three zones: (1) the waterline ring, where minerals and biofilm concentrate; (2) under the rim in a slow back-and-forth motion, hitting each jet hole; (3) down into the throat of the bowl where the siphon jet sits. A stiff-bristle brush is mandatory — a soft brush will not break up the waterline ring even with good cleaner. Scrub for a full 2 minutes, not the 15-second rinse that most people call scrubbing.
Flush once to rinse out the cleaner. Then flush a second time after 30 seconds — this clears any residue that clung to the rim jets. A single flush rarely clears all the cleaner from the under-rim area, which is why some people smell bleach for hours afterward. Two flushes solves it.
Dip the brush in the fresh toilet water after the second flush. Hold it under the seat with the lid slightly pressed down — this lets the brush drip-dry without sitting in its own dirty water in the holder. A brush stored wet in a sealed holder turns into a bacteria farm within 48 hours. Every 2–3 months, soak the brush in a cup of undiluted bleach for 1 hour, rinse, and replace it entirely every 6 months.
Wipe the floor around the base of the toilet and 18 inches outward in every direction. Micro-splashes from every flush — especially with the lid open — land in exactly that radius. Urine and bacteria accumulating on the floor is the main reason bathrooms smell even after the toilet itself is spotless. Use a dedicated mop head or floor-specific wipe, not the one you used for the seat.
Red Flags — Stop And Call A Plumber
Cleaning only fixes cleanliness. The following conditions mean something mechanical is wrong with the toilet, and no amount of scrubbing will fix them. Ignoring them leads to water damage, subfloor rot, or a complete toilet replacement that could have been avoided.
A wet ring around the toilet base means the wax ring has failed. Every flush is now sending contaminated water under the floor. This is not a cleaning problem — it is a subfloor emergency. Shut off the supply valve at the wall and call a plumber before the next flush.
If the bathroom still smells like sewage after a thorough cleaning, the wax seal is broken or the vent stack on the roof is blocked. Air fresheners mask it for an hour. A plumber has to reseal the base or clear the stack. Ignore this and methane continues venting into the home.
Black or orange stains that reappear almost immediately after a deep clean mean the porcelain glaze is worn through. Stains now embed directly into the ceramic and cannot be cleaned — only replaced. This usually happens after 15–20 years of hard-water exposure or repeated pumice-stone abrasion.
If you’ve cleaned the rim jets with vinegar and the flush still comes straight down instead of swirling, the internal trapway is clogged or the fill valve is underperforming. See the best toilet fill valve guide for replacement parts, or call a plumber if the trapway itself is the issue.
A hairline crack grows under the pressure of every flush cycle. Eventually the tank or bowl fails catastrophically — usually at the worst possible moment. Porcelain cannot be repaired. Replace the toilet before it floods the bathroom. Browse the best flushing toilets guide for modern replacement options.
Deep Cleaning The Problem Areas — What Competitor Guides Miss
The 8-step weekly clean keeps a toilet sanitary. It does not reach three zones where grime concentrates invisibly: under-rim jets, inside the tank, and deep mineral stains at the waterline. Every major tutorial skips at least two of these. Here is how professionals actually handle them.
Rim jets are the small holes under the bowl edge that route tank water into the bowl during a flush. Clogged jets cause weak flushes and biofilm growth that no surface cleaning removes. Manufacturer support from Gerber and Globe Union gives a specific procedure: turn off the water supply at the wall, flush to empty the tank, then fill the tank with 1 gallon of undiluted white vinegar.
Leave it 24 hours. The vinegar slowly feeds through the siphon into the rim channel, dissolving limescale from the inside. Flush twice to rinse, then use an old toothbrush on each jet hole. Do this twice a year for homes on municipal water, quarterly for well-water homes.
Tank sediment is one of the most overlooked maintenance failures. Most tutorials tell homeowners to pour bleach in the tank — this is wrong. Sodium hypochlorite corrodes the rubber flapper, the fill-valve seals, and the flush-valve gasket. Within 6–12 months of regular bleach tablets, these parts harden, crack, and leak.
The correct procedure: shut off the supply, flush to empty, pour 3 cups of white vinegar into the empty tank, and let it sit 12 hours. Scrub the walls gently with a nylon brush (not metal), turn the water back on, flush three times. This removes mineral scale without touching the rubber components. The best toilet fill valve manufacturers all explicitly void warranties on bleach-damaged valves.
The brown or orange ring at the waterline is iron oxide — iron minerals from the water reacting with oxygen at the air-water boundary. Chemical cleaners dissolve surface layers but not deep stains. A wet pumice stone physically abrades the stain off.
Three rules: (1) fully submerge the stone in the bowl water for 30 seconds first — dry pumice scratches porcelain; (2) use light pressure, let the stone do the work; (3) never use more than 4–6 times per year.
Repeated pumice use over years eventually wears through the glaze and creates permanent pits that catch new stains faster. Users on cleaning forums report losing toilets this way after 10–15 years of weekly pumice use. For toilets with worn glaze, see the best toilets to buy guide for replacement.
Everything above assumes a standard vitreous china toilet. If you own a toilet with natural stone trim, marble flooring adjacent to the base, or a colored/enamel-coated surface (some vintage toilets from the 1960s–1970s), vinegar becomes the wrong tool.
Acid etches marble and eats colored enamel glazes. In those cases, switch entirely to a pH-neutral bathroom cleaner (Method Daily Shower type) and accept that hard-water stains will require professional restoration rather than DIY removal. Pumice stone is also banned on colored or coated porcelain — it strips color.
Frequently Asked Questions About How To Clean A Toilet Perfectly
The 5-minute version: squeeze bowl cleaner under the rim, let it sit 3 minutes while you wipe the seat, lid, and flush handle with a disinfecting wipe. Scrub the bowl for 90 seconds focusing on the waterline, flush twice, wipe the exterior of the tank and the floor around the base. This skips the deep-clean steps (rim jets, tank, pumice) but gets the toilet visibly clean and sanitary in under 5 minutes. Save the full procedure for the next scheduled weekly clean.
Yes — baking soda plus vinegar is the one combination that is completely safe. The reaction produces carbon dioxide and water, both harmless. The fizzing action lifts light stains and deodorizes, though it is weaker than a dedicated bowl cleaner for serious buildup.
Pour 1 cup baking soda into the bowl, follow with 1 cup vinegar, let it fizz for 10 minutes, scrub, then flush. Do not combine this with any bleach-based cleaner — the vinegar would still react with residual bleach from the previous cleaning.
Yellow discoloration appearing within days of cleaning almost always points to one of three causes: hard water depositing calcium and iron minerals, urine splash that did not get wiped (especially on the underside of the seat and rim), or a worn porcelain glaze that now absorbs stains into the ceramic itself. A water softener solves the first. A 2-minute daily wipe with disinfecting wipes solves the second. The third means the toilet is approaching end-of-life and replacement is the only real fix.
Regular bowl cleaning — once a week for the main toilet, every two weeks for a guest toilet used rarely. Full deep clean including tank, rim jets, and exterior — every 3 months in hard-water areas, every 6 months on municipal soft water. Pumice-stone waterline treatment — only when visible staining appears, maximum 4–6 times per year. Tank vinegar soak — twice a year regardless of water hardness. Skipping deep cleans lets mineral buildup damage internal parts faster than any bathroom use does.
Black spots below the waterline are almost always mold — typically Cladosporium or Aspergillus species, which thrive in the moist, dark, organic-debris-rich environment of a bowl. They are not the same as the rare toxic Stachybotrys mold.
Treatment: pour 1 cup hydrogen peroxide or a bleach-based bowl cleaner directly onto the spots, leave 15 minutes, scrub with a stiff brush, flush.
Then address the cause — improve bathroom ventilation with a working exhaust fan, close the lid when not in use, and flush unused toilets every few days to prevent stagnation.
Used correctly — wet, light pressure, 4–6 times a year maximum — a pumice stone is safe on vitreous china porcelain and will not damage the glaze. Used incorrectly — dry, heavy pressure, or weekly — it will eventually wear through the glaze and create permanent pits. Never use pumice on colored porcelain, enamel-coated surfaces, plastic, acrylic, or fiberglass fixtures. If the toilet is already showing dull patches where the glaze has been abraded, stop using pumice entirely and switch to chemical descaling only.
Baking soda and white vinegar is the strongest all-natural option. Sprinkle 1 cup baking soda into the bowl, pour 1 cup vinegar slowly, let it fizz 10 minutes, scrub thoroughly, flush twice.
For the seat and exterior, mix equal parts vinegar and water in a spray bottle with 10 drops of tea tree oil — tea tree is a genuine antifungal, not just scent.
Natural methods work well for weekly maintenance but are weaker than commercial cleaners against serious biofilm or mineral staining. For those, the vinegar-in-tank method or a targeted chemical descaler is still required once or twice a year.
How To Remove Hard Water Stains From Toilet Bowl Permanently
Hard-water stains come from calcium, magnesium, and iron minerals that precipitate out of the water at the air-water boundary inside the bowl. A brown or orange ring at the waterline is iron oxide; a chalky white or gray buildup is calcium carbonate and magnesium scale. Standard bowl cleaners soften the top layer but cannot penetrate fully embedded deposits.
The two-stage method that actually works: first, pour 2 cups of white vinegar into the bowl, let it sit 3 hours (overnight for severe staining), and scrub with a stiff brush. Second, for anything the vinegar did not lift, wet a pumice stone and gently rub the remaining ring using short strokes. This combination removes stains that chemical cleaners alone cannot touch.
The permanent solution is upstream: a water softener that removes the minerals before they reach the toilet. Without one, stains will always return — they are a water-chemistry problem, not a cleaning problem. For households on well water, a combined water softener and iron filter eliminates the issue entirely. Modern toilets with fully-glazed trapways also resist staining better than older models — see the best TOTO toilets for examples with the most stain-resistant glaze technology.
Bleach vs Vinegar For Toilet Cleaning — Which Works Better
Bleach and vinegar solve different problems. Bleach (sodium hypochlorite) is a disinfectant that kills bacteria, viruses, and mold — it does not dissolve mineral deposits. Vinegar (dilute acetic acid) dissolves calcium, magnesium, and iron scale — but it is a weak disinfectant, killing only about 80% of household bacteria compared to bleach’s 99.9%.
For weekly germ control: bleach-based cleaner wins every time. For quarterly descaling of rim jets, tank, and waterline: vinegar wins, and it is also safe around rubber flappers and seals where bleach is destructive. The professional approach uses both on different days for different jobs — never in the same bowl on the same day.
The irreversible rule: mixing bleach and vinegar releases chlorine gas, which has caused documented hospitalizations and fatalities across all 50 states. If you are unsure whether the bowl still has bleach residue, flush three times before introducing any acid-based product.
For households with young children or pets, many plumbers recommend going vinegar-only to eliminate the mixing risk entirely, accepting the slightly lower disinfection for the much higher safety margin. Compact bathrooms with small toilets especially benefit from the safer approach — see the best small toilet guide for compact fixtures that are easier to keep clean in the first place.
How Often Should You Deep Clean A Toilet To Prevent Buildup
Cleaning frequency is not one-size-fits-all. Bathroom usage, water hardness, household size, and ventilation all change the answer. The baseline schedule that prevents buildup in a typical 4-person household on municipal water: weekly bowl cleaning (Steps 1–8 above), monthly seat and exterior disinfection beyond the normal weekly wipe, quarterly rim-jet vinegar soak, and twice-yearly tank descaling.
High-use or hard-water households should double these frequencies. If the toilet serves 5+ people or sits in a home with well water, weekly cleaning becomes every 4 days, and rim-jet treatment moves to monthly. Single-person households on softened municipal water can safely stretch to 10-day weekly cleanings and annual deep cleans without consequence.
Under-cleaning is obvious — stains, odor, biofilm. Over-cleaning is a real concern too. Using pumice stones weekly, bleach tablets permanently in the tank, or harsh acid cleaners daily damages the porcelain and rubber components faster than normal use does.
The goal of learning how to clean a toilet perfectly is not maximum chemical exposure — it is the right intensity at the right interval. A clean toilet that lasts 20 years beats a spotless one that needs replacement at year 8. For replacement timing, review the full lifespan breakdown in the best toilets to buy guide.