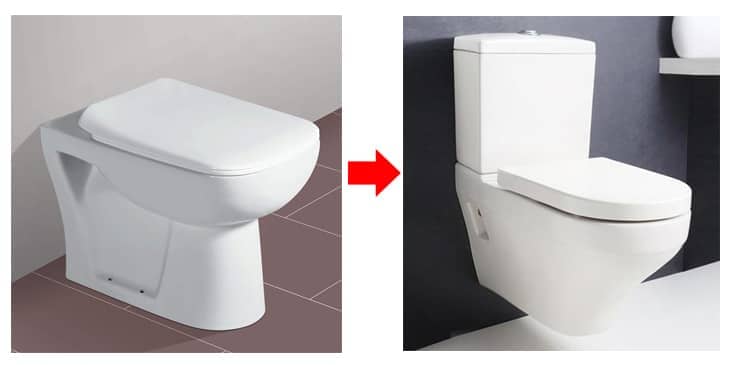
Most householders imagine a quick swap when they search “how to convert floor toilet to wall mount.” In reality, this retrofit is major plumbing and structural work. You must remove the old floor-mounted toilet, seal the existing flange, open the wall (or build a chase), install a heavy-duty in-wall carrier system, reroute the waste pipe and water supply, frame and finish the wall, then mount the new wall-hung bowl. Errors here cause leaks, water damage, mold, or code violations that cost thousands to fix later. This guide walks you through every realistic step, the exact tools and materials, red flags that mean stop and call a pro, and honest costs so you can decide if the sleek look is worth the effort.
If you are planning a full bathroom remodel with experience in framing and plumbing, or you are budgeting for a licensed plumber and contractor, this procedural guide is written for you. You will finish knowing exactly what changes are needed and when DIY ends.
Assuming converting a floor toilet to wall-hung is “just like replacing a regular toilet but mounted on the wall.” In truth, the floor drain must be abandoned and rerouted horizontally into the wall, the wall must gain 6–12 inches of depth for the carrier and concealed tank, and the structure must support 500+ lbs. Skipping these steps leads to leaks, unstable bowls, or failed inspections. Do not start until you read the red flags section below.
• Written for: Experienced DIYers doing a full remodel or homeowners hiring professionals.
• Covers: Full retrofit process, carrier installation, plumbing rerouting, finishing, and safety.
• Does NOT cover: New construction installs, ADA-specific heights without additional framing, or smart toilet electronics.
• When to hire a pro instead: If you lack framing/plumbing experience, live in a multi-story home with limited access, or your local code requires permits (most do).
Tools and Materials Needed
You will need professional-grade tools and specific components. Most carriers are brand-specific (Geberit Duofix, Kohler, Zurn, or Swiss Madison are common). Buy the carrier and compatible wall-hung bowl together.
| Category | Items |
|---|---|
| Carrier System | In-wall carrier frame with concealed tank (dual-flush preferred, 1.28 GPF or less), mounting studs, flush actuator plate |
| Plumbing | PVC waste pipe & fittings (3–4″ diameter), flexible supply line, shut-off valve, Fernco coupling if connecting to cast iron |
| Framing & Finishing | 2×4 or 2×6 lumber, plywood or cement board, drywall, tile or paint, screws, lag bolts (3/8″ or larger) |
| Tools | Reciprocating saw, drywall saw, level, tape measure, pipe cutter, adjustable wrench, drill with masonry bits, silicone sealant, plumber’s putty/grease |
| Safety & Misc | Safety glasses, gloves, drop cloths, shop vacuum, permits if required |
Link to related: See our best wall mounted toilet guide for compatible bowls and carriers.
Popular Wall-Hung Carrier Systems Details (2026)
The carrier is the heart of any successful conversion. It must support 880–1,000+ lbs and fit inside a standard wall. Here are the top systems used in retrofits:
| Brand / Model | Wall Type | Load Rating | Height Adjust | Flush Options | Best For Retrofits |
|---|---|---|---|---|---|
| Geberit Duofix (111.597 / 111.798) | 2×4 or 2×6 | 880 lbs (400 kg) | 15–19″ | 1.28/0.8 or 1.6/0.8 GPF dual-flush | Most reliable, insulated tank |
| Kohler Concealed Carrier | 2×4 or 2×6 | 1,000+ lbs | 15–19″ | 1.28 GPF or dual | Excellent with Kohler bowls |
| Zurn Carrier Systems | 2×4 or 2×6 | 880–1,000 lbs | Adjustable | 1.28–1.6 GPF | Budget-friendly commercial grade |
Geberit Duofix is the gold standard for most U.S. retrofits because of its adjustable legs, insulated tank (no condensation), and proven 880-lb rating. Always match the carrier to your chosen wall-hung bowl.
Step-by-Step Procedure to Convert Floor Toilet to Wall Mount
Turn off the water supply at the shut-off valve. Flush the toilet to empty the tank and bowl. Disconnect the supply line. Remove the tank bolts, then the bowl bolts. Carefully lift the old toilet off the floor flange (use two people). Cap or plug the flange immediately with a test plug or rag to block sewer gases. Scrape old wax ring and clean the flange.
Permanently cap the old floor drain with a threaded PVC cap or Fernco cap sealed with silicone. Patch the floor hole with plywood or cement board cut to fit, then cover with matching flooring or tile. This prevents future leaks under the new wall-hung setup. Check subfloor for rot — replace any damaged sections before proceeding.
Mark the carrier location (usually centered 12–16″ from finished wall to bowl front). Cut drywall with a reciprocating saw. Remove studs if needed to create space for a 2×6 chase wall or deepen the existing wall. Locate the existing waste pipe (often vertical through floor). Measure exact rough-in distance from finished wall face to center of new drain outlet (standard 12″ for most carriers). Reroute the waste pipe horizontally into the wall using 90° elbows and PVC. Install a new vent stack if required by code.
Position the carrier frame (Geberit Duofix or equivalent) between studs spaced exactly 19¾” (500 mm) apart. Use a laser level or 4-ft level to ensure the frame is perfectly plumb and level in all directions — this is critical for a stable bowl. Adjust the telescoping legs so the finished bowl rim height will be 17–19″ (comfort height) from the finished floor. Secure the frame with four 3/8″ lag bolts (minimum 3″ long) into solid studs or added blocking — never rely on drywall alone. Connect the discharge elbow to the rerouted 3–4″ waste pipe using proper gaskets and a Fernco coupling if joining dissimilar materials. Install the concealed tank, anti-siphon fill valve, and water supply line (½” minimum copper). Pressure-test all connections with water before closing the wall. Double-check every measurement twice — a ½” error here will cause leaks or an unusable install.
Add horizontal blocking for strength. Install cement board or green board. Run new water supply line through the frame to the tank. Insulate around the tank to prevent condensation. Hang drywall or tile backer, tape, mud, and finish. Cut precise openings for the mounting studs and flush plate. Allow everything to dry fully before mounting the bowl.
Slide the bowl onto the projecting studs. Hand-tighten the nuts, then use a wrench for ¼ turn past hand-tight (do not overtighten — risk of cracking ceramic). Connect the supply line. Install the flush actuator plate per manufacturer instructions. Turn water back on, flush several times, and check every joint for leaks. Apply silicone sealant where the bowl meets the wall (leave the bottom open for drainage if required by code).
Wear safety gear. Work with water and electricity shut off. Double-check every measurement twice — ½” off can cause leaks or an unusable install. Pressure-test all plumbing before closing walls.
Red Flags — Stop and Call a Professional Plumber
Plumbing Changes Needed & Rough-In Details
The biggest change is relocating the 3–4″ waste pipe from vertical floor penetration to horizontal wall exit. Most carriers require a 12″ rough-in from finished wall to drain centerline. Water supply moves from floor to wall. Venting may need extension. All work must meet IPC or local code (minimum 21″ front clearance for wall-hung toilets).
See our standard toilet rough-in size guide for exact measurements before cutting.
Pros and Cons of Wall-Hung Toilet Conversion
Wall-hung toilets offer easier floor cleaning and a modern floating look, but the retrofit is expensive and space-intensive behind the wall.
What Most Guides Miss + When the Answer Flips
If your bathroom is small and you cannot afford to lose 6–12″ of floor space to a new chase wall, or if budget is under $2,000, stay with a high-quality floor-mounted toilet (see our best flushing toilets guide). The visual “floating” benefit disappears when the conversion costs 4–6× more than a simple upgrade.
FAQ — How to Convert Floor Toilet to Wall Mount
Can I convert a floor toilet to wall hung without opening the wall?
No. The carrier frame and concealed tank require space inside the wall. You must open or build out the wall. Surface-mounted “back-to-wall” units exist but are not true wall-hung and still need floor-flange sealing.
How much does it cost to convert floor toilet to wall mount in 2026?
Total cost ranges $2,000–$6,000+ depending on location and complexity. Carrier + bowl: $800–$1,800. Labor and plumbing: $1,000–$3,000. Framing, drywall, and finishing: $500–$1,500. Permits and inspections add more in many cities. See our toilet installation cost USA guide for current regional pricing.
Is converting to a wall hung toilet worth it?
Only if you value the modern look, easier cleaning, and are already remodeling. The higher upfront cost and complexity rarely pay off for a quick upgrade. Most homeowners who complete the project report loving the clean floor space, but regret the disruption if they underestimated the work.
Do I need a permit to convert a floor toilet to wall mount?
Yes in nearly every U.S. jurisdiction. Moving plumbing lines and altering walls usually requires a plumbing and building permit plus inspection. Check your local building department before cutting anything.
What carrier system brands are best for retrofits?
Geberit Duofix, Kohler in-wall systems, and Zurn carriers are the most reliable. All support 500+ lbs and meet or exceed code when installed correctly. Match the carrier to your chosen wall-hung bowl.
How long does the entire conversion take?
DIY with experience: 3–7 days (including drying times). Professional crew: 2–4 days. Add time for permits and inspections. The wall must remain open long enough for proper finishing.
Verdict / Summary
If your rough-in allows easy horizontal rerouting and you are already gutting the bathroom → proceed with a quality carrier system.
If budget is tight or you lack pro help → upgrade to a high-performance floor-mounted toilet instead.
Professional installation is strongly recommended for 90% of homeowners — the risk of leaks and structural issues is too high for beginners.
Wall-Hung Toilet Design Trends 2026
Wall-hung toilets continue to dominate modern bathrooms in 2026. Key trends include rimless bowls for superior hygiene and easier cleaning, ultra-slim profiles that save space, and matte black, brushed bronze, or soft gray finishes that pair beautifully with warm neutrals and textured tiles. Integrated bidet functionality is surging, along with WaterSense-certified ultra-efficient dual-flush systems (1.28/0.8 GPF). Square and rectangular bowl shapes remain popular for a sculptural look, while ergonomic comfort-height rims (17–19″) and quiet-flush technology make them family-friendly. Many new models now include smart features such as auto-open lids, night lights, and heated seats on premium lines. The overall direction is toward cleaner lines, sustainability, and spa-like minimalism.
Best Wall Mounted Toilets for Conversions in 2026
Once the carrier is installed, choose a bowl that matches your rough-in and style. Top performers include TOTO, Kohler, and American Standard models with elongated bowls and 1.28 GPF dual-flush. See our full best wall mounted toilet guide for current recommendations and compatibility charts.
Toilet Installation Cost Breakdown USA
Wall-hung retrofits run 3–5× the cost of a standard floor toilet swap. Labor is the biggest variable — expect $1,000–$3,000 for a licensed plumber plus framing. Full details and regional pricing in our toilet installation cost USA guide.
Toilet Rough-In Size and Carrier Requirements
Accurate rough-in measurement is critical before buying any carrier. Most wall-hung systems need a 12″ rough-in and sufficient wall depth. Full measurement instructions and diagrams are in our standard toilet rough-in size guide. Measure twice — the wrong rough-in forces expensive rework.
Converting a floor toilet to wall mount is a serious renovation project that delivers a clean, modern bathroom when done correctly. Follow the steps above, respect every red flag, and hire professional help the moment you feel out of your depth. Your finished space will be easier to clean and look years ahead of a standard floor-mounted toilet — but only if the plumbing and structure are rock-solid. Questions? Drop them in the comments or check our related guides linked throughout.