The 3-Inch Rule Nobody Mentions. Every failed over-toilet storage build I have ever seen comes down to the same problem: the builder never measured tank clearance before cutting a single board.
They install the unit, go to lift the tank lid for the first float adjustment six months later, and the cabinet bottom is sitting 3 inches above the tank lid. Nothing comes off without removing the whole unit. That is not a design decision. That is a measurement error disguised as carpentry.
This guide covers how to build over the toilet storage correctly — from measuring your specific toilet and wall space, choosing the right materials for a humid bathroom, and anchoring safely into studs or masonry.
It also covers finishing the unit so it lasts. This guide is written for DIYers who are comfortable with basic woodworking tools: a miter saw or circular saw, a drill, and a stud finder. If you have never used a level or driven lag screws into wall studs, read the Red Flags section before you pick up any lumber.
📋 Scope of This Guide — Build Over the Toilet Storage
Who this is for: Homeowners who want to build over the toilet storage with basic woodworking experience — comfortable using a circular saw, drill, and stud finder. This is a wall-anchored storage unit, not furniture assembly.
Tools assumed: Miter or circular saw, drill/driver, stud finder, level, tape measure, pencil. A pocket screw jig (Kreg or equivalent) speeds up assembly significantly.
What this guide does NOT cover: Freestanding etagere-style units (no wall anchor needed), plumbing modifications, electrical work near the build, or wall repairs required before installation.
When to hire instead: If your wall is tile, concrete, or cement board all the way up; if studs are not where your unit needs to anchor; or if your toilet tank has unusual rear fittings that restrict clearance — consult a carpenter before proceeding.
⚠️ The Most Common Mistake in DIY Over-Toilet Storage
Builders copy dimensions from a photo or YouTube video without accounting for their specific toilet. A toilet tank height varies from 14 inches to 20 inches depending on the model. A shelf positioned at 10 inches above the tank in one bathroom may sit inside the tank opening in another.
Measure your toilet first. Build your unit second. Reversing that order is responsible for the majority of callbacks I have seen in 20 years — storage units that look correct but cannot function because the tank lid is permanently trapped.
Why Build Over the Toilet Storage Instead of Buying Pre-Made
Before you build over the toilet storage, understand why a custom unit outperforms anything pre-made. Pre-made units are built for a generic toilet — a generic fit. Standard units assume a tank roughly 16 to 17 inches tall, 19 to 20 inches wide, and positioned 3 to 4 inches from the back wall.
If your toilet does not match those numbers — and many do not — a purchased unit either sits too low over the tank lid, extends wider than the space allows, or cannot reach the wall for proper anchoring.
Building your own unit solves all three problems. You cut to your exact measurements. You choose shelf depth based on your actual storage needs rather than a manufacturer’s default 8-inch depth. You pick a finish that matches your existing bathroom millwork instead of settling for brushed nickel hardware on a white-painted bathroom or vice versa.
The material cost for a solid plywood build runs $85–$140 in lumber and hardware. A comparable pre-made unit runs $130–$280. The custom build costs less, fits better, and holds more weight.
The second reason to build is structural. Most pre-made over-toilet units are wall-leaning designs — they rest against the wall with two vertical legs on the floor beside the toilet. They are not anchored.
If someone grabs the unit for balance, if a child pulls a shelf, or if a heavy item shifts the center of gravity, the unit tips. A custom wall-anchored build screwed into studs eliminates that failure mode entirely. For related storage solutions already on the site, see our review of the best over the toilet storage units and rustic over the toilet storage options if a pre-made unit is still your preference after reading this guide.
Tools and Materials You Need
Get everything on this list before starting. Stopping mid-build to source a missing tool costs time and causes alignment errors when you restart with components already partially assembled.
Tools Required
| Tool | Purpose | Note |
|---|---|---|
| Miter saw or circular saw | Clean crosscuts on panels | Circular saw + straightedge guide works fine |
| Drill/driver | Pilot holes, assembly screws, wall anchors | 18V cordless handles a full day of drilling |
| Stud finder | Locate studs before drilling wall anchors | Magnetic type works on any drywall |
| 4-foot level | Level shelves and verticals | A tilted shelf is immediately visible |
| Tape measure | All measurements | 25-foot minimum; lock the blade before marking |
| Pocket screw jig (optional) | Strong hidden joinery | Kreg K4 runs $40–60; speeds assembly significantly |
| Sandpaper (120 + 220 grit) | Surface prep before primer | Random orbital sander saves an hour |
| Caulk gun + paintable caulk | Seal unit-to-wall joint | Prevents moisture intrusion at back edge |
Materials — For a Standard Two-Shelf Wall-Anchored Unit
| Material | Quantity / Spec | Cost Range |
|---|---|---|
| ¾” cabinet-grade plywood | One 4×8 sheet — yields all panels | $55–$80 |
| 1×3 pine or poplar | 8 feet — face frame strips | $10–$18 |
| Wood screws — 1-5/8″ and 2-1/2″ | Box of each | $8–$12 |
| Lag screws — 3″ or 3-1/2″ | 4–6 for wall anchoring into studs | $4–$8 |
| Oil-based primer | 1 quart — covers full unit | $12–$18 |
| Semi-gloss or satin moisture-resistant paint | 1 quart — two finish coats | $18–$28 |
| Iron-on edge banding | 25 feet — covers all exposed plywood edges | $8–$14 |
| Paintable wood filler | Small tub — fills screw holes and gaps | $5–$9 |
Why ¾” plywood and not MDF: Bathrooms produce steam. Standard MDF absorbs moisture at raw edges and swells — a problem that shows up at the shelf edges and screw holes first. Cabinet-grade plywood (birch or maple face veneer) holds screws better, does not sag on spans over 24 inches, and tolerates humidity without warping when properly primed and painted.
If you prefer MDF for its smooth, paint-ready surface, use moisture-resistant (MR) grade MDF — not standard MDF — and seal every cut edge with shellac primer before assembly.
How to Measure Your Toilet Space Correctly
To build over the toilet storage correctly, take all seven measurements below before making a single cut. Write them down. Measure twice on each number. The cost of remeasuring is zero. The cost of remaking a panel is $8–$20 in material and three hours of time.
Measurement 1 — Tank height from floor: Measure from the finished floor to the top of the toilet tank lid. Standard tank heights run 28 to 33 inches from floor to lid top. Record this exact number.
Measurement 2 — Tank clearance requirement (The 3-Inch Rule): The bottom of your lowest shelf must sit a minimum of 24 inches above the tank lid. This is the number most guides skip. You need 24 inches to remove the tank lid without interference and to avoid hitting your head on the cabinet bottom when seated.
Add Measurement 1 + 24 inches. That is your minimum bottom shelf height from the floor. If that number puts your shelf too close to the ceiling, you either need a shallower shelf or a unit mounted higher with no lower shelf.
Measurement 3 — Tank width: Measure the widest point of the toilet tank from left side to right side. Most standard tanks run 18 to 21 inches wide. Your unit should be at least as wide as the tank — typically 20 to 24 inches for visual balance — but not so wide that it conflicts with adjacent wall outlets or switches.
Measurement 4 — Wall width between obstructions: Measure the available wall width above the toilet, noting any light switches, outlets, towel bars, or wall-mounted fixtures within reach. Your unit must clear all of these by a minimum of 2 inches on each side.
Measurement 5 — Wall height from tank clearance point to ceiling: Subtract Measurement 2 from your ceiling height. This gives you the maximum unit height. For a standard 8-foot ceiling with a tank top at 30 inches from the floor, your workable height from bottom shelf to ceiling runs roughly 42 inches — enough for two comfortable shelves with 14 to 16 inches between them.
Measurement 6 — Shelf depth: Measure the depth of the tank from the back wall to the front of the tank lid. This is your maximum shelf depth. Going deeper makes the shelf visually intrusive and creates a head-clearance hazard when sitting. Most tanks run 6 to 8 inches deep. Build your shelves at 7 to 9 inches deep — slightly deeper than the tank but not past the flush handle.
Measurement 7 — Stud location: Run your stud finder horizontally across the wall above the toilet. Mark every stud with a pencil. Standard stud spacing is 16 inches on center, but verify — older homes and bathrooms that have been remodeled vary. Your unit must anchor to at least two studs. If the stud spacing does not align with your unit width, you will need to use a ledger board approach (see Step 5 of the procedure).
Step-by-Step: How to Build Over the Toilet Storage
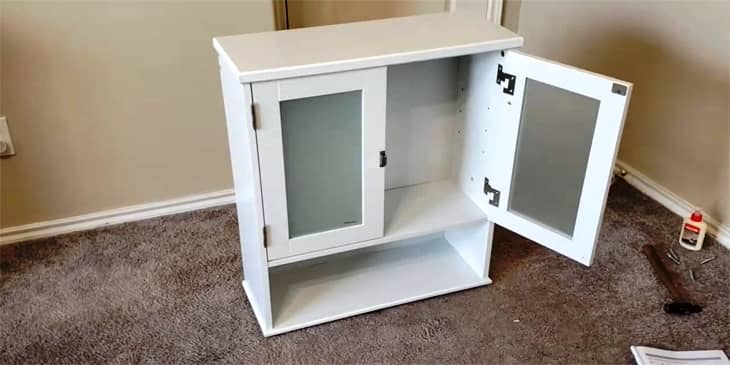
Step 1 — Create Your Cut List to Build Over the Toilet Storage
Convert your measurements into a cut list before touching the saw. For a standard two-shelf wall-mounted unit, your cut list will include: two vertical side panels, two shelves (matching widths), one back cleat (horizontal ledger), and optional face frame strips if you want a furniture-grade edge finish.
Example cut list for a 22-inch wide × 38-inch tall unit with two shelves:
Side panels: 2 pieces at ¾” × 8″ × 38″ | Top shelf: 1 piece at ¾” × 8″ × 22″ | Bottom shelf: 1 piece at ¾” × 8″ × 22″ | Back wall cleat: 1 piece at ¾” × 2″ × 22″ | Middle support cleat (if needed for span over 24″): 1 piece at ¾” × 2″ × 22″. Label every piece with a pencil on the back face before cutting.
Step 2 — Cut All Panels
Set up a straight cutting guide — a clamped 2×4 or a manufactured rip fence works. Never freehand cut a panel that will be a finished face. Blade tear-out on plywood happens on the top face during a circular saw cut; orient your panel face-down when using a circular saw, or use a fine-tooth blade (60T or higher) on a miter saw to minimize tear-out.
⚠️ Warning: Let the blade reach full speed before entering the cut. Forcing a circular saw into a panel at low RPM causes kickback and a rough, splintered edge that requires significant reworking before painting.
After cutting all panels, immediately apply iron-on edge banding to all long exposed plywood edges using a household iron on medium heat. Trim flush with a sharp utility knife. This step is frequently skipped and always regretted — bare plywood edges absorb primer unevenly and show a rough, layered look through paint.
Step 3 — Sand, Prime, and Paint Before Assembly
This step runs counter to most beginner instincts — most people want to assemble first, then paint. Do not. Sand all faces to 120 grit, then 220 grit. Wipe with a tack cloth. Apply one coat of oil-based primer to all surfaces including the back face that will sit against the wall. Allow 4 full hours of dry time before paint. Apply two coats of semi-gloss or satin moisture-resistant paint, sanding lightly between coats with 220-grit paper.
Painting before assembly means every surface — inside corners, shelf undersides, back edges — gets full coverage. Painting after assembly means a brush cannot reach the interior corners and joints properly, leaving raw wood exposed to bathroom humidity exactly where moisture accumulates first.
⚠️ Warning: Oil-based primer requires adequate ventilation. Open windows, use a respirator, and allow 24 hours of off-gassing before bringing panels back into a small enclosed bathroom.
Step 4 — Assemble the Unit Frame
Assemble on a flat floor surface before mounting. Attach the shelves to the side panels using pocket screws (1-5/8″ pocket screws into ¾” stock) or by drilling pilot holes and driving 2″ wood screws from the outside of the side panel into the shelf end grain. If driving screws into end grain, use wood glue on the joint — end grain alone does not hold screws reliably under load.
Check the assembly for square before the glue sets: measure diagonally corner to corner in both directions. If the two diagonal measurements are equal, the frame is square. If they differ by more than ⅛ inch, rack the frame gently until they match. Clamp and allow 60 minutes for glue cure before proceeding.
Fill all exposed screw holes with wood filler. Allow to dry. Sand flush. Touch up with paint.
Step 5 — Install the Wall Cleat
A wall cleat is a horizontal ledger board attached to the wall first, which the unit then hangs on. This method allows one person to install the unit precisely — you mount the cleat level, then hang the unit on it, rather than holding a heavy assembly in place while trying to drill simultaneously.
Cut the cleat to match the interior width of your unit. Mark the cleat position on the wall at the height where the bottom of the unit will sit. Use a 4-foot level to draw a level line. Locate studs within that line and drill pilot holes through the cleat. Drive 3-inch lag screws into a minimum of two studs. Verify the cleat is dead level before fully tightening the lag screws.
🔴 Critical: If the wall above your toilet is tiled all the way up and studs are not accessible, you must use heavy-duty toggle bolt anchors rated for a minimum of 50 lbs each. Standard plastic drywall anchors are not rated for this application. A unit carrying towels, toiletries, and spare rolls can easily reach 30 to 50 lbs of total load.
If studs are not spaced to line up with your unit — common in bathrooms where walls have been modified — mount a wider horizontal ledger board (2×4 or 2×6 stock) into the studs first, then attach your unit cleat to that ledger board. This distributes the load across the available studs regardless of their spacing.
Step 6 — Hang and Final-Anchor the Unit
With the wall cleat installed, lift the assembled unit and set its back top edge onto the cleat. Have a second person hold the unit steady while you verify it is level and plumb on both axes. Check with your level on the top shelf (left-right level) and on the side panel (front-back plumb).
Drive 2-1/2″ screws through the back of each side panel into the wall at stud locations — two screws per side, top and bottom of the unit. The cleat carries the primary hanging load; the side panel screws prevent the unit from tipping forward.
Apply a thin bead of paintable caulk along the joint where the unit meets the wall on the top and both sides. This prevents moisture from wicking behind the unit at the wall junction. Smooth with a wet finger and allow 2 hours before loading the shelves.
Step 7 — Load Test and Final Checks
Before loading with permanent items, perform a load test: place 40 to 50 lbs of weight on the shelves (a full water jug works) and leave for 30 minutes. Check all screw connections for movement. Verify the unit has not shifted or pulled the cleat away from the wall.
Verify the tank lid test: stand in front of the toilet and lift the tank lid. It should come up and off without contacting the bottom of the lowest shelf. If it contacts the shelf, the unit is mounted too low.
Remove the unit, remount the cleat 2 to 4 inches higher, and rehang. This is an uncomfortable fix but a necessary one — inaccessible tank internals mean inability to adjust the float, replace the flapper, or perform any routine maintenance without removing the entire storage unit every time.
Red Flags — Stop and Call a Professional
🔴 Red Flag 1 — No Studs in the Mounting Zone
If your stud finder cannot locate studs within the wall area above your toilet — which happens in corner installations, in bathrooms that have been remodeled, and occasionally in older homes with non-standard framing — do not proceed with toggle bolts alone for a storage unit that will hold real weight. Contact a carpenter to assess whether blocking can be installed between existing studs from above (through the ceiling or attic) before you build the unit.
🔴 Red Flag 2 — Wall Tile From Floor to Ceiling
If the wall behind and above your toilet is fully tiled, drilling into tile without a diamond-tipped drill bit and proper technique risks cracking tiles and exposing the substrate to moisture. A cracked tile in a bathroom wall is a water intrusion path — particularly behind a toilet where the humidity concentration is highest. If you are not experienced with tile drilling, call a tile contractor to either drill anchor points or remove and replace tiles where the mounting hardware will go.
🔴 Red Flag 3 — Active Leaks or Moisture Damage at the Wall
If you find soft drywall, discoloration, or any visible mold on the wall above or behind the toilet during your measuring phase, stop immediately. Installing storage against a wall with active moisture damage creates a concealed environment that accelerates mold growth and can cause structural deterioration inside the wall cavity. Resolve the moisture source, replace the damaged drywall, and allow the wall to fully dry — minimum 7 days with active ventilation — before proceeding with the build.
🔴 Red Flag 4 — Electrical Wiring in the Mounting Zone
Before drilling any lag screws into the wall, verify there is no electrical wiring running through the mounting zone. An AC power scanner (available for $20–$30 at hardware stores) detects live wires through drywall without drilling. Hitting a live wire with a lag screw is a potentially fatal error. If the scanner indicates wiring in the target zone, reroute your mounting points or have an electrician confirm the wire path before continuing.
What Most DIY Guides Get Wrong About Over-Toilet Storage
The gap in most how-to guides on this topic is that they treat the toilet as a fixed, standardized object and the wall as a simple flat surface. Both assumptions fail in real bathrooms. Here is what the gaps in standard coverage cost real homeowners.
Gap 1 — The Flush Handle Clearance Problem
Most toilet flush handles extend 3 to 5 inches to the left of the tank body (standard left-hand trip lever). A shelf built to the same depth as the tank will sit directly above this handle. If the handle height falls within the bottom shelf zone, you either cannot depress the handle fully or the shelf edge catches the lever arc. Measure the flush handle height and compare it to your bottom shelf position before finalizing shelf height.
Gap 2 — Humidity Cycling Destroys Unsealed Edges
A bathroom above a toilet cycles through high-humidity conditions every time anyone showers in the same or adjacent bathroom. Plywood edges that are not sealed — even if the faces are painted — absorb moisture at the exposed cross-section of the laminate layers.
Over 18 to 24 months, unsealed edges on the underside of shelves (where paint from a brush or roller often fails to reach fully) begin to delaminate. The fix is edge banding applied before painting plus a dedicated coat of shellac primer on any edge that cannot be reached with a brush after assembly.
Gap 3 — Weight Distribution Is Not Shelf-by-Shelf
Most guides show weight limits per shelf without addressing how total unit weight transfers to the wall anchors. A unit with two shelves at 25 lbs each does not exert 25 lbs of pull on the wall — the full 50 lbs plus the unit weight itself transfers primarily to the upper anchor points because of the lever effect of a wall-hung structure.
The top anchor points must be engineered for 1.5 to 2× the actual intended load. Two 3-inch lag screws into solid studs per side is the minimum for a unit expected to carry 40–50 lbs of total shelf load.
When the Answer Flips — When NOT to Build Over the Toilet
If your toilet tank top is 33 inches or higher from the floor (common in comfort-height two-piece models), and your ceiling is 8 feet, you have roughly 27 inches of usable space between the required 24-inch clearance height and the ceiling. That is enough for only one shallow shelf — which may not justify the build effort. A quality pre-made farmhouse over-toilet unit with adjustable shelf heights may serve better in this configuration.
Similarly, if your toilet is in a wet-zone bathroom — a combined shower/toilet room where steam is directed at the wall — even well-sealed plywood degrades faster than in a standard toilet compartment. In that case, PVC-based or metal-frame shelving holds up significantly longer than any wood-based custom build, and a purpose-built metal unit is the correct solution.
Frequently Asked Questions — Build Over the Toilet Storage
Q: When you build over the toilet storage, how high should it sit above the tank?
The bottom of the lowest shelf must sit at minimum 24 inches above the tank lid. This clearance allows lid removal without obstruction and adequate head clearance when seated. For comfort-height toilets with higher tank tops, measure up 24 inches from the lid and verify the resulting shelf position is accessible from standing.
Shelves positioned above 72 inches from the floor are difficult to use without a step stool and should be reserved for infrequently accessed items only.
Q: Can I build over the toilet storage without finding studs?
Yes, but the correct anchors are essential. Heavy-duty toggle bolts rated for a minimum of 50 lbs each are required if studs are not available. Standard plastic drywall anchors are not appropriate for a load-bearing wall-mounted unit in a humid environment — they lose grip as drywall cycles through moisture expansion and contraction.
Snap toggles (Toggler brand or equivalent) set in 1/2-inch drywall hold 265 lbs each in shear — far above the needs of an over-toilet storage unit. Use a minimum of four anchors: two at the cleat and one per side panel at the top.
Q: What wood is best for DIY over toilet storage?
Cabinet-grade ¾-inch birch or maple plywood is the recommended material for the structural panels — strong, light, screw-compatible, and dimensionally stable in humidity when properly primed and painted. For the face frame strips, poplar is the standard choice: hard enough to hold a paint edge without denting, less expensive than maple or oak, and widely available at home centers.
MDF is acceptable only in its moisture-resistant grade and only if every cut edge is sealed before assembly. Standard MDF will swell and delaminate within 12 to 18 months in an actively used bathroom if any edges are left unsealed.
Q: How do I build over the toilet storage for a small bathroom?
The critical adjustment is shelf depth. Reduce it to 6 inches — enough for single rows of toiletry items without projecting into the sight line or making the space feel compressed. In very narrow bathrooms (under 36 inches wall-to-wall), run the shelves wall-to-wall rather than limiting them to the tank width.
This creates a visual rhythm that reads as intentional design rather than add-on storage, and gives more usable surface area per linear foot of wall. See our full over the toilet storage guide for small bathroom configuration options.
Q: How long does it take to build over the toilet storage?
A realistic timeline for a first-time builder is 2 days: Day 1 covers measuring, cut list creation, panel cutting, edge banding, and the first coat of primer. Day 2 covers sanding, finish painting, assembly, and installation.
Trying to complete the project in one day means installing a unit with wet paint or skipping the load test — both create problems within the first 6 months. Experienced builders can complete the full project in 6 to 8 hours in a single session.
Q: Is over the toilet storage a good idea for rented apartments?
Only if you use a freestanding etagere-style unit that requires no wall anchors. Driving lag screws into an apartment wall requires landlord approval in most lease agreements and triggers security deposit deductions for wall damage.
Freestanding over-toilet units rest on the floor beside the toilet with a top bar that braces against the wall — no drilling required. The trade-off is stability: freestanding units tip if loaded unevenly. For options, the best over the toilet storage roundup includes freestanding models reviewed for apartment use.
Professional Verdict — How to Build Over the Toilet Storage
If your ceiling height is 8 feet or more and your tank top sits at 30 inches or below from the floor → build a custom two-shelf unit. The clearance math works, the build cost comes in under $140, and the result fits your toilet precisely in a way no pre-made unit can.
If studs are accessible in your mounting zone → use lag screws driven into studs. Do not compromise on anchor quality. A storage unit above a toilet is a permanent fixture, not decorative shelving.
If your tank top is above 33 inches or your wall is fully tiled → consider a quality pre-made unit or consult a carpenter before cutting material. The build is still achievable, but the clearance and anchor requirements move outside straightforward DIY territory.
Always verify tank lid removal before loading the shelves. One clearance measurement taken before building saves hours of reinstallation work afterward.
How to Build Over the Toilet Storage for Small Bathrooms
Small bathrooms — typically defined as under 40 square feet — present two specific challenges for over-toilet storage: limited wall width between obstructions, and the optical effect of deep shelving making an already tight space feel compressed. Both problems are solvable with the right build decisions before you cut the first board.
The first adjustment is shelf depth. Standard over-toilet storage runs 8 to 9 inches deep. In a small bathroom, reduce that to 6 to 7 inches — deep enough for a single row of toiletry bottles or folded hand towels, but not so deep that the shelf edge projects past the flush handle or into the toilet use zone.
A 6-inch shelf positioned correctly does not affect the seated user at all. A 9-inch shelf at the wrong height creates both a head clearance problem and a visual weight issue that makes the room feel smaller.
The second adjustment is width. Rather than building a unit that spans only the width of the toilet tank (typically 19 to 22 inches), extend the shelves to the full width available between the nearest wall obstruction and the adjacent fixture. A wall-to-wall shelf at 6 inches deep reads as a built-in element; a narrow tank-width shelf reads as an afterthought.
The material cost difference between a 22-inch shelf and a 32-inch shelf is roughly $4. The visual and storage difference is significant. For curated ready-made options sized for small bathrooms, see our best over the toilet storage guide and the farmhouse over the toilet storage review.
DIY Over Toilet Storage vs Freestanding Cabinet — Which Is Right for You
The decision between building a wall-anchored DIY unit and purchasing a freestanding over-toilet cabinet comes down to three factors: permanence, stability requirements, and your bathroom’s anchor situation.
A freestanding over-toilet cabinet — the A-frame or etagere style with two floor legs flanking the toilet and a top shelf or cabinet bridging across — requires no wall anchors, installs in 20 to 30 minutes, and moves with you if you rent. The trade-off is stability.
Freestanding units loaded with more than 25 to 30 lbs, or units in homes with children who may grab the shelf for balance, tip. Most pre-made freestanding units are not engineered for load-bearing use. They are display shelving that happens to fit over a toilet.
A wall-anchored custom build is permanent, stable, and load-rated to whatever you engineer into it — two lag screws per side into 2×4 studs holds a unit carrying 60 to 80 lbs without any perceptible flex. The build requires two to three hours of active work across two days and a modest tool investment if you do not already own a circular saw and drill.
Permanent wall anchors will require patching if you later remove the unit. If you own your home and plan to stay, the custom build is the better long-term answer in almost every situation. For a side-by-side look at the best pre-made options, the rustic over the toilet storage review covers freestanding units selected for stability and build quality.
Best Materials for Over Toilet Storage — What Lasts in a Humid Bathroom
The bathroom is one of the harshest environments in a home for wood products. Temperature swings from a cold unoccupied space to a steamy post-shower environment happen multiple times daily. Humidity levels in an unventilated bathroom regularly exceed 80 percent after a shower. The material you choose for over-toilet storage must withstand these conditions for years, not months.
Cabinet-grade birch plywood at ¾-inch thickness is the professional standard for this application. It holds screws without stripping, does not sag on spans up to 36 inches without a center support, and when properly primed and painted with a moisture-resistant semi-gloss, resists bathroom humidity for 10 to 15 years without delaminating.
The key requirement is that every edge — including the back edge that contacts the wall and the underside shelf edges where a roller cannot reach — must be sealed. Iron-on edge banding plus a shellac-based primer on all exposed end grain is the correct preparation sequence before topcoating.
Moisture-resistant MDF is an acceptable alternative for painted builds where a perfectly smooth surface is the priority. Standard MDF is not acceptable — it swells visibly at exposed edges within one to two years in active bathrooms. Solid pine is usable but heavier and more prone to warping unless kiln-dried and well-sealed.
PVC-based shelf materials are the most moisture-immune option but require different joinery methods and do not take paint with the same quality as wood. For any over-toilet storage application in a bathroom with a separate shower in the same room, PVC or powder-coated steel is the more durable long-term choice over any wood-based product. For pre-made alternatives using these materials, see the full roundup at best over the toilet storage.